Getting started with Campaign Monitor
What is Campaign Monitor?
Campaign monitor allows you to create beautifully-designed, professional email marketing campaigns to grow your business. With our integration, this CRM Module allows you to import your target lists into campaign monitor.
Create a Campaign Monitor List
There are 2 ways of starting your Lists.
1. To begin login to your Campaign monitor account by visiting https://fibrecrm.createsend.com
2. Click on “Create a new list” give this list a distinct clear name that relates to the campaign.
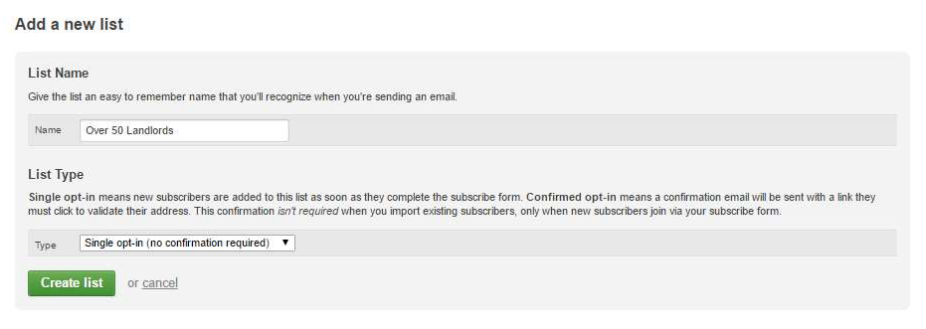
The List type has 2 options, Single Opt-In and Confirmed Opt-In:
Single opt-in means new subscribers are added to this list as soon as they complete the ‘subscribe’ or ‘web enquiry’ form.
Confirmed opt-in means a confirmation email will be sent with a link they must click to validate their address. This confirmation isn’t required when you import existing subscribers or lists from the CRM. Only when new subscribers join via the ‘subscribe’ or ‘web enquiry’ form.
Click “Create List” to finish creating your new list.
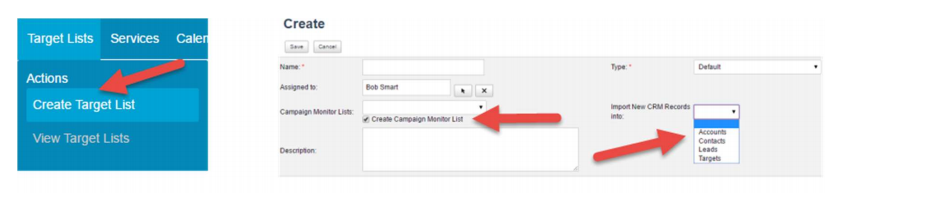
Alternatively, you can create your List in the CRM by clicking on Target Lists > Create Target List or import an already existing target list by clicking create a campaign monitor list from edit target list.
Ensure the Create Campaign Monitor List Check box is ticked and the Import new records dropdown is correctly selected. Whichever module is selected is where new records currently not in the target list will be imported into.
These records could come from signup forms. See sign up forms to see how to create these.
Fields Mapping
Next map the custom fields in Campaign Monitor to the fields from the CRM by using the Wizard in the Admin section of the CRM. To get here you need be a System Administrator user.
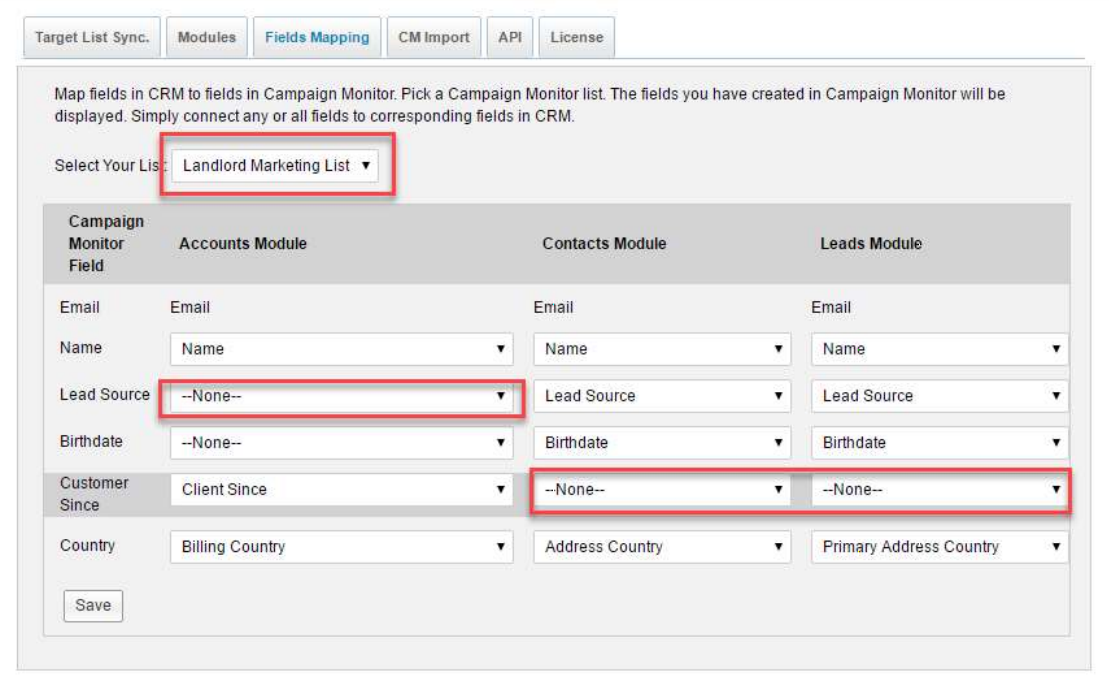
Hover your mouse over your username in the top right-hand corner of the screen which will display a menu, click on ‘Admin’. Now navigate to the FibreCRM Modules section and click on ‘Campaign Monitor Settings’. Next click on the ‘Fields Mapping’ tab.
Under field mapping select the target list you were working on previously in which you added the custom fields. If one of the custom fields that you created does not reside in a specific CRM module for example the Birthdate does not appear in the Account module simply select -none-. Once complete click ‘Save and Complete’ for any other list’s you have.
Note: Changing of fields will trigger an update of the Data held on Campaign monitor.
Mailing and Marketing at account level
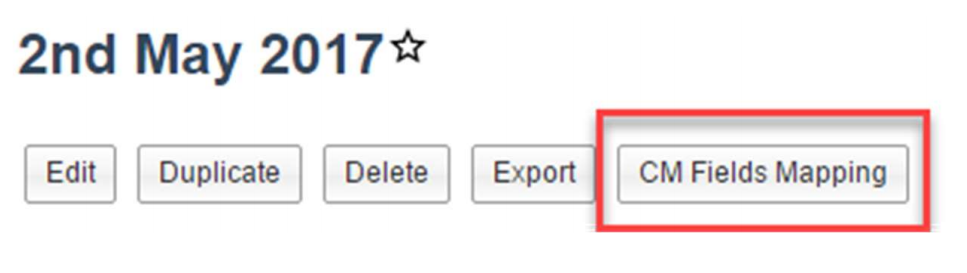
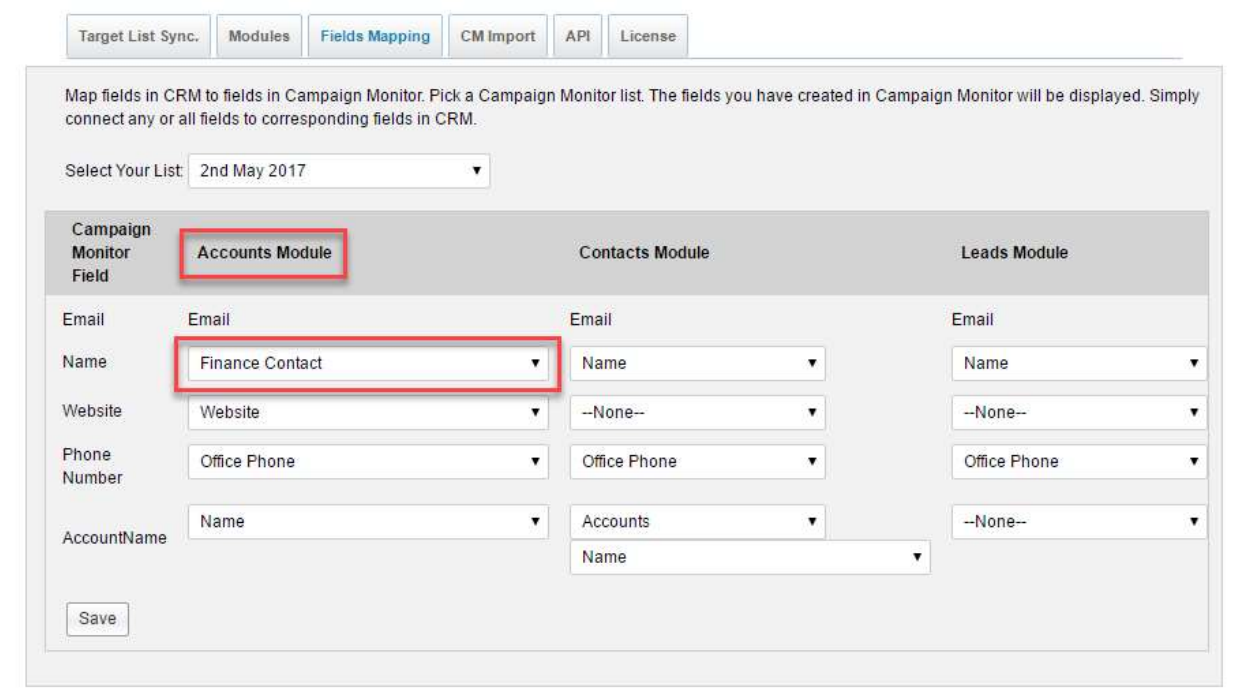
It is possible through the Campaign Monitor integration to send emails to account level email addresses and include either the related Primary, Finance or Admin contacts name. To do this you will need to configure the Fields Mapping for the related target list. Navigate to a target list in the CRM and click on ‘CM Fields Mapping’.
You can then change the ‘Name’ field from name to either Primary Contact, Finance Contact or Admin Contact to select the name for a more personalized email. Pictured below is an example of the finance contact being used for the main contact on the accounts module.
If an Account does not have a primary contact the Account name will be used instead.
Note: If a User and an account share an email address the last added record will overwrite the previous.
Contacts leads and Account data
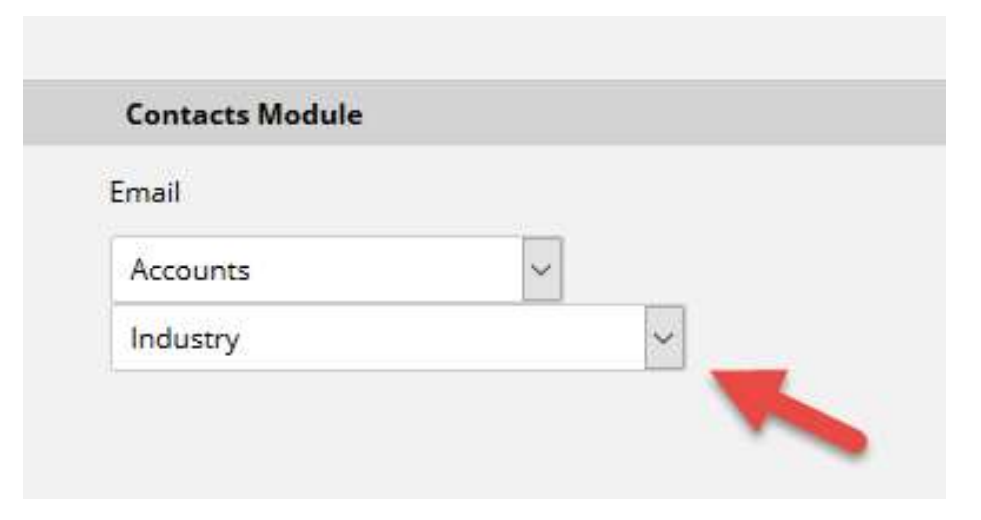
The CM Fields mapping allows you to include account level data in a contact or lead.
An example of this would be able marketing to contacts but including their industry sector or grade of client.
To do this select the Accounts option under either the contacts module or leads module, a secondary dropdown will appear underneath allowing you to select a field from Accounts module.
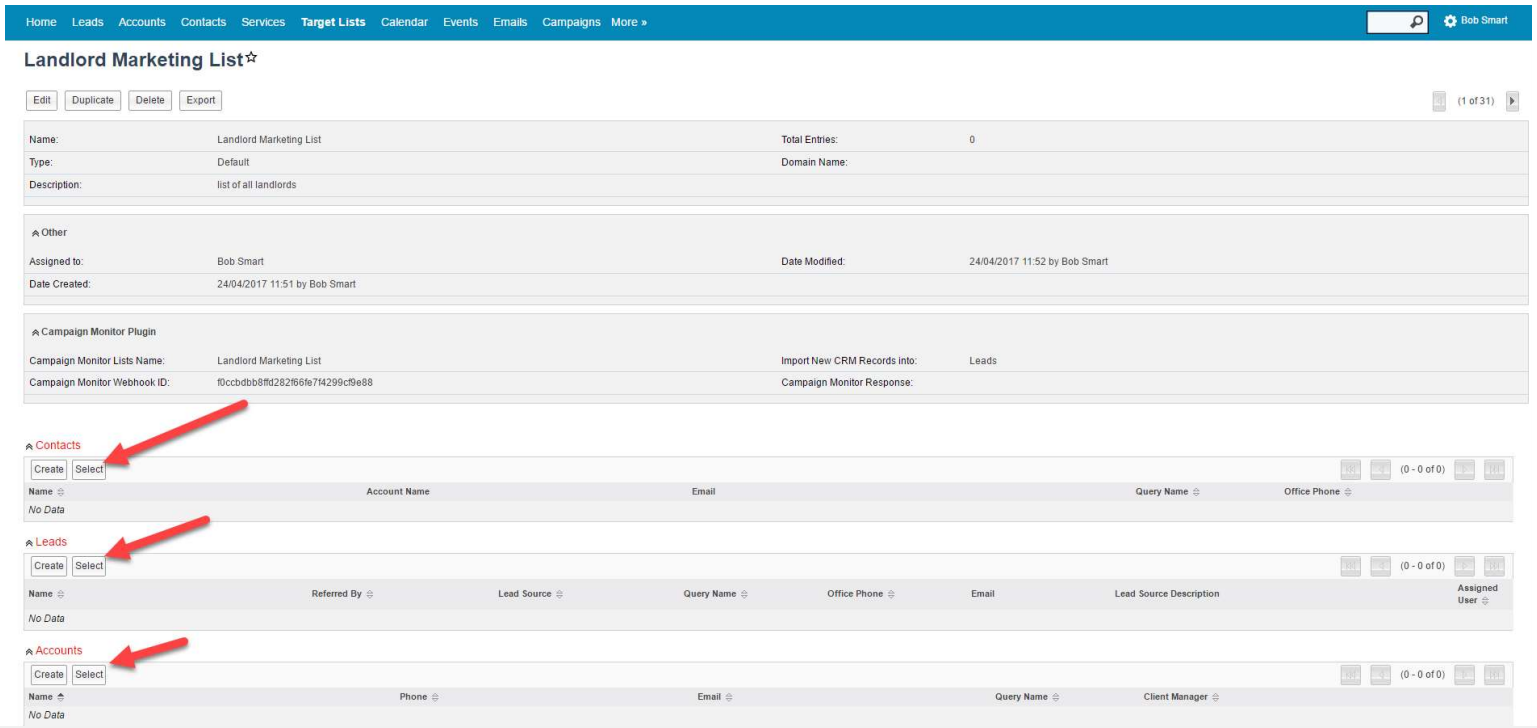
You now need to populate this list with the required records, to do so click on ‘Select’ next to one of the headings and choose the records you want by filtering. If you would prefer to filter the records further before reaching campaign monitor then you can create a new SQL query or import from a Quick2List.
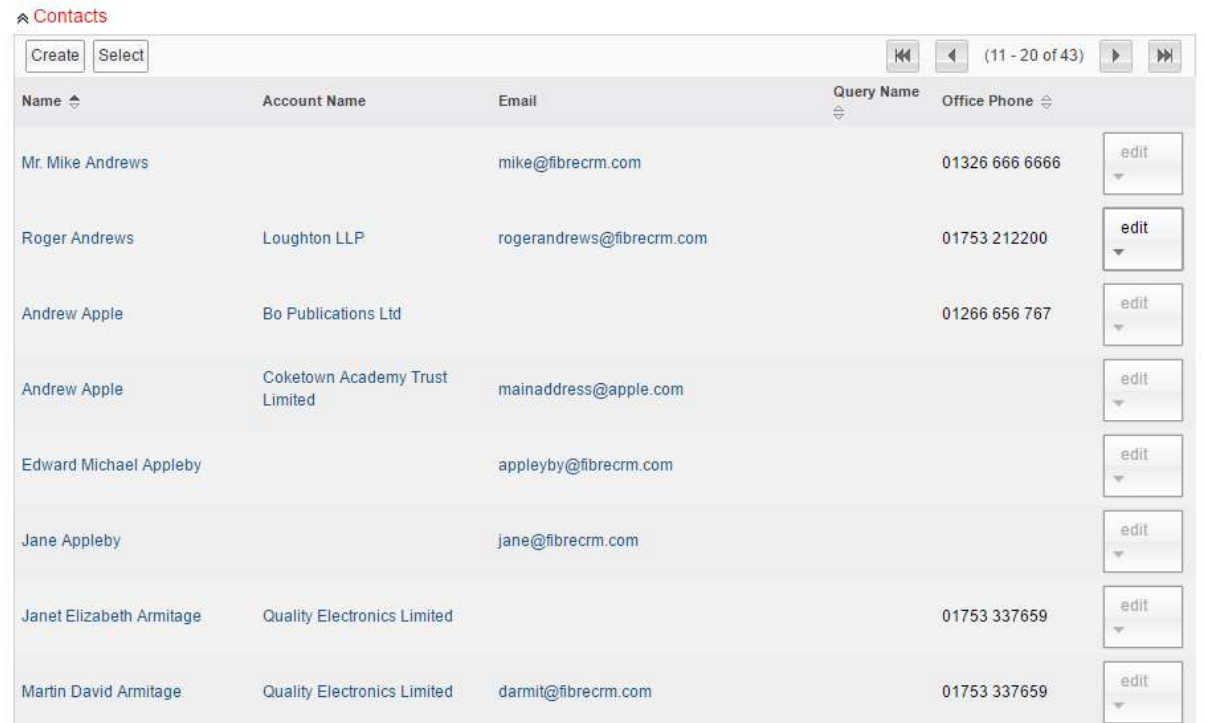
Once done correctly your records should appear in a list like the example (right).
Note: if any contacts, leads or accounts have matching Email addresses the last record to be added will overwrite the previous.
Now it’s time to head back to campaign monitor to create our campaign.
Creating a Campaign
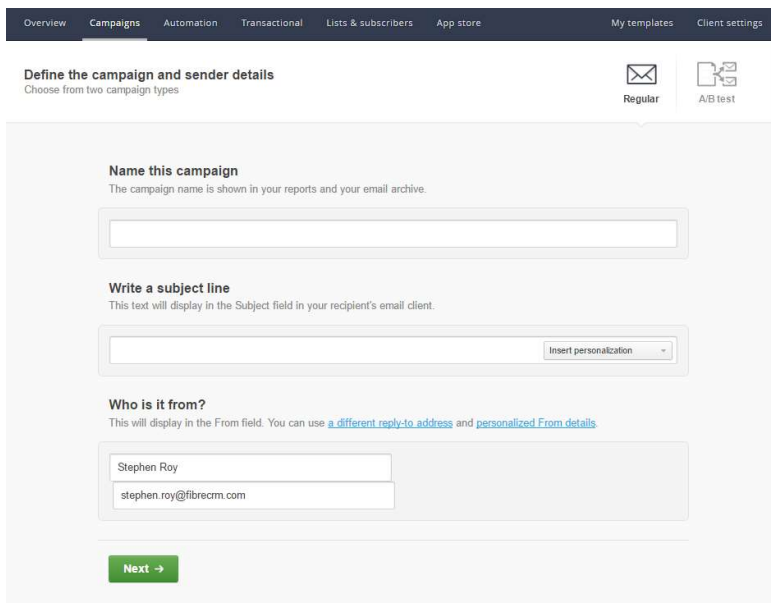
Under Campaigns select Create Campaign. Give the Campaign a name, fill out the subject line and enter who the email will be sent from. The Subject line has the option to personalise it with First, Last or Full Name.
Next you need to pick a template for the email, select the one which best suits your needs. Once clicked go through to edit the design by clicking on the Setting Cog, you can edit the theme and fonts etc. Adjust the Design to best suit the campaign requirements or company branding. Templates can be saved to be reused whenever you wish.
Once the template is looking how you want it you can edit the content by clicking within it and typing to enter the required content. From the left menu, you can also add in further text, images, spacers and videos. In the text boxes, it is possible to use any of the Custom fields you set up earlier for a more personal experience.
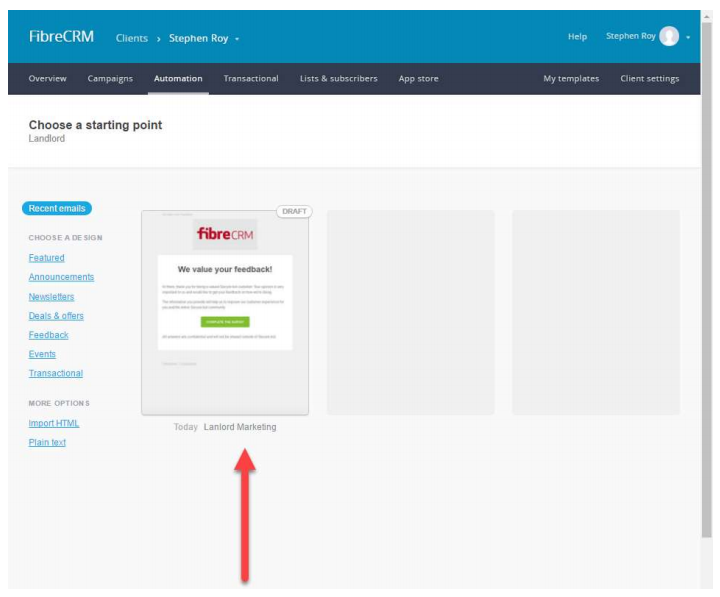
Creating a Journey
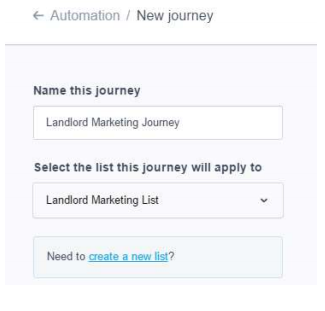
Under Automation Click on create a new journey. Fill in the name for this journey and make sure the correct list is applied.
The next step is to decide how you want to trigger this event. The options are:
1. When a Subscriber joins the list: Ideal for getting emails out to new web enquiry’s every time someone shows interest.
2. Subscriber enters a segment: This is for when a subscriber has been assigned to a segment based on your rules. (see Segments)
3. Subscriber leaves a segment: The opposite of above, the requirements are no longer met and they have been removed from the segment.
4. A date: Send out these emails on a specific date, such as when a Payment is due or a birthday. 5. An anniversary of a date: Allows you to start the journey a set time after a specified date.
Select which of the above is right for you and click ‘Save’, you can then begin to start the journey.
Select the “+” and choose the first step of your journey, the options are:
1. Delay: Choose how many minutes, hours, days, weeks or months before the next step.
2. Email: Send an email straight away.
3. Condition: Does the subscriber meet these conditions.
If you choose to delay enter the amount of time to wait then add the next step by pressing the “+” icon. For the email step give the step a name, the subject of the email and any personalisation you would like. Enter who the email will be coming from then select ‘Add Email Content’.
If you select the conditions option start by giving it a name, then select which rule to use such as Custom Field > birthdate > is before >1967 giving you people over 50. You can then choose what to do if the condition is or isn’t met such as delay or send an email.
Adding Email Content
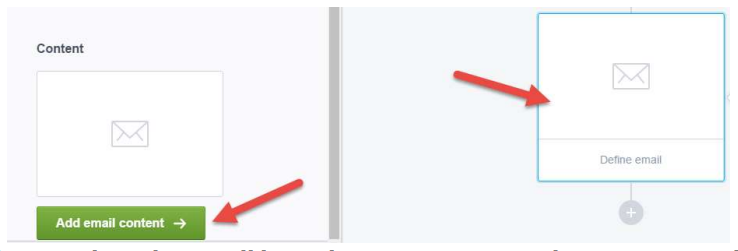
You will be faced with the same 3 options again Delay, Email, Condition.
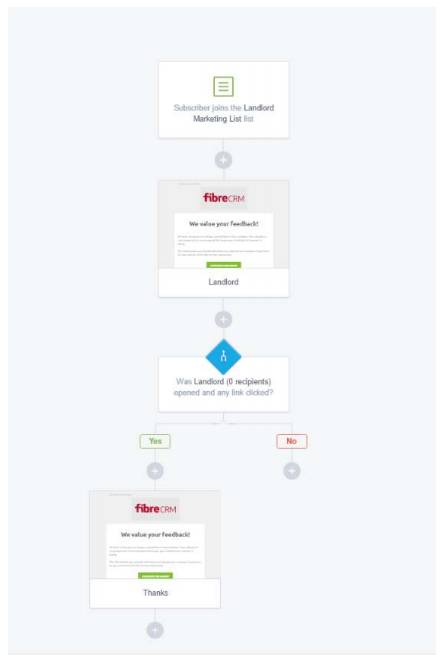
A condition could then be used here to generate different action depending on if the email was opened or clicked on to send through a further follow up email sometime after. The possibilities are endless and are completely controlled by you.
The journey below sends a feedback email every time some joins the landlord marketing list. If they open it and click it they get a follow-up email with a thank you.
Here you will be able to select from within your automation process one of your templates or a pre-built template from the left to customise. Once the template is selected you will have the opportunity to edit it again to make sure you are happy with the way it looks and reads. Select preview to see how everything looks on both a large screen and on a mobile device. If you are happy click “I’m done return to journey” to decide what to do next.
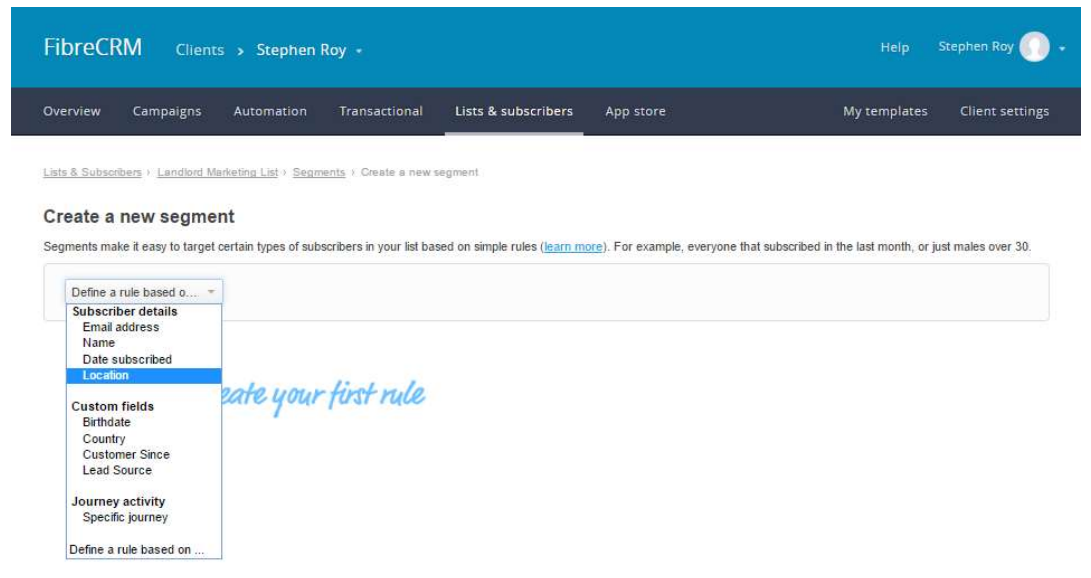
Segments
Segments are a way for you to segment your Accounts, Contacts or Leads into smaller more manageable groups. For example, you may want to target age ranges with different campaigns, or whether a customer has been with you for a certain amount of time or even which previous campaigns they were interested in. To begin, within your campaign monitor list select ‘Segments’ from the link on the right-hand side of the page and then select a rule you wish to use from the drop-down.
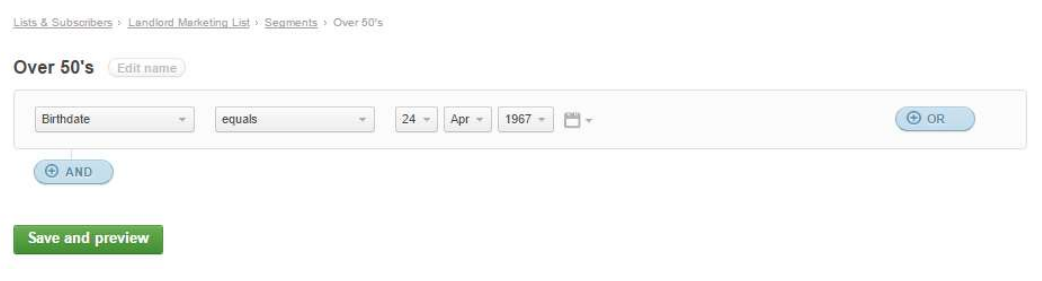
Next you need to specify the conditions it must meet, you can have multiple filters on each segment to allow you to specifically target each group. The Rule below will create a segment of people over 50.
Sign Up Forms
Within your Target List select ‘Sign up forms’ from the link on the right-hand side of the page.
For each list, you can have an individual sign up form, you could have one for Blog subscriptions and one as a contact form. Each list can have multiple ways of signing up such as a pop up button, a link to a custom subscribe page, an inbuilt form for your website or Facebook subscribe (This can only be linked to only one list).
Any new subscribers from these forms will be imported into the CRM module specified when creating the list.

Subscribe Button
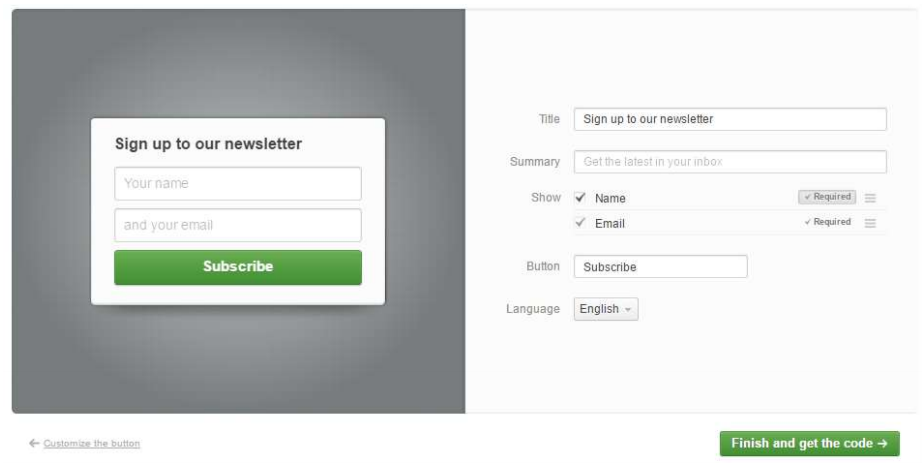
Great for your sidebar, footer or those with limited screen real-estate. If you are happy with the way the Subscribe looks simply copy the HTML and add it to your website. Alternatively click ‘Make Some Changes To this Button’ to edit the Text and colours and size. You can also customise the popup Form by clicking through ‘make some changes’ and clicking ‘Customise the Form’.
Here you can edit the Title, Summary, add required and custom fields and what the button says.
Once you have customised the form to your liking click ‘Finish and get the code’ to get the HTML code to paste into your website.
Link to a subscribe page Customize your form and then easily link to it. No website required.
The stand form will be displayed, if you wish to customize this click “Customise the look”. Here you can replace the title with text of your choosing or an image, change the background colour, the Fields required to input, the Button text and the text displayed once a submission is
complete.
Once you are happy with the setup click save changes, you will then be presented with a link which you can paste and send to anyone no need to add anything to a website.
Copy/Paste a Form to your site If you know your code, make your own form and style it yourself.
This is the most complicated setup but does allow for the most customisation. You will need to know you HTML and CSS to get this looking right, simply tick the fields you wish to use and select “Get the Code”.
This code will only contain the barebones of the form and would need to be styled to your website theme via CSS and HTML. Another benefit of this sign-up form is the ability to redirect to another page after subscription such as a Thank You page or access to a document.
Dealing with spam
To prevent spambots from poisoning your list, you can add a verification step called a CAPTCHA. This is a great way to filter out any non-human responses.
To force the CAPTCHA step, first generate your code, then look for the input
id=”fieldEmail” code. In that same line, change the name=”cm-[unique identifier]” to name=”email”. See example below:

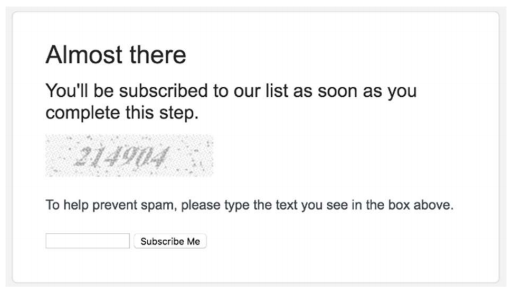
Now when the form is submitted, a CAPTCHA will need to be passed to complete the subscription. See example above.
RSS Campaigns
Automatically send subscribers new content from your website or blog whenever you make an update.
To setup up an RSS Campaign head to the Automation tab and select ‘Setup an RSS Campaign’ on the right-hand side. Enter the URL of your RSS feed such as http://www.fibrecrm.com/category/blog/
You will then see a preview of your posts, if this is correct then click “Use This Feed”. Next choose the subject of the emails, this can be your own subject or the title of the blog post. Choose who the email is to be sent from and when the emails are to be sent out, the emails will only send on a recurring basis when there is new content otherwise nothing will be sent.
Next you can customize how the email looks, you have two options ‘upload your own code’ or ‘use a template’. Select Template for the easiest option, first pick a theme that best suits your requirements and adjust the background and pick a font under the ‘Basics’ tab.
On the header tab, you can change the style of the header along with replacing the header text for an image if needed. You can also change the top bar or ‘Quick Links’ style to really customize the look.
The Content tab allows you to edit the bulk section of the email containing the posts, you can change background and font colours along with the length of article to show. The footer is the same again allowing you to edit the background and font colours, along with adding the address and the reason for receiving this email.
When happy with the design you need to assign it to a List such as Blog subscribers, select the correct list and click ‘Next’. Here you have the option to edit any of the details you have entered previously.
Unsubscribing
There are multiple behaviours dealing with subscriptions.
1. If a Record is set to ‘Opted out’ in the CRM but then added to a target list they will not be imported into campaign monitor.
2. If a record is already in a target list then set to ‘Opted Out’ on the CRM they will be set to Unsubscribed on all campaign monitor lists.
If the option ‘opted out’ is no longer set they will be added back to all lists they were a part of unless they have opted out from individual lists in campaign monitor.
There are two options when a subscriber wants to unsubscribe themselves from a list.
1. Removed from all lists and campaigns they are a part of.
2. Removed from just the list they have been sent.
The setting can be configured by going to Lists & Subscribers in Campaign Monitor, clicking the list you wish to configure then selecting unsubscribe settings on the right-hand side. If the option is set to ‘Unsubscribe from all lists’ they will also be set to ‘Opt out’ in the CRM as well as being set to ‘Unsubscribed’ on all Campaign Monitor lists.
If the option is set to ‘Just this list’ then the email address will only be unsubscribed from that specific list and not all marketing. There is currently no indication of this on the CRM and is handled by Campaign monitor.
Admin Settings
Under Admin of the CRM in the heading FibreCRM modules you will find Campaign monitor settings.

Clicking on this will allow you to edit settings related to campaign monitor.
Target List Sync – This tab shows all the target lists which are not linked to a campaign monitor list.
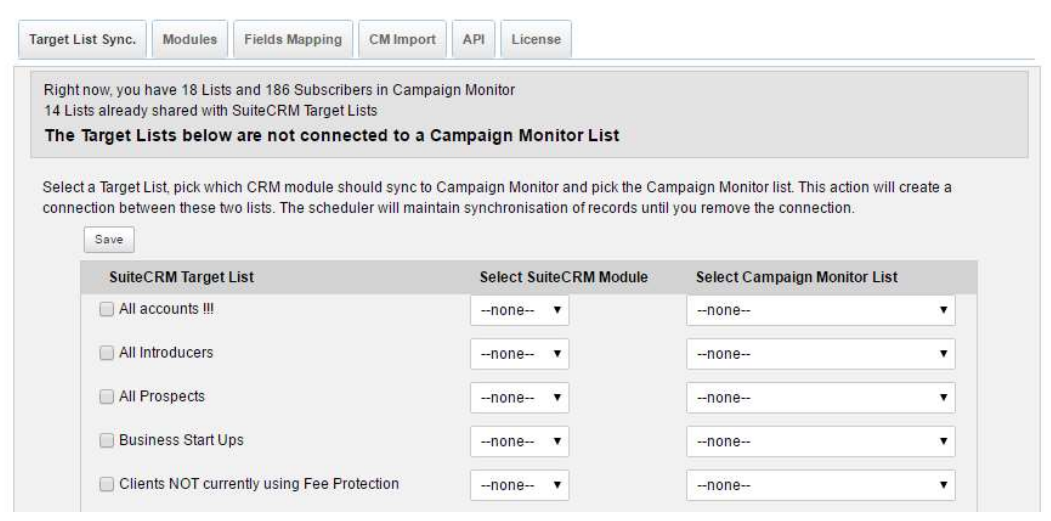
You can bulk edit target lists here for speed or see what lists you may have missed from linking to campaign monitor. The SuiteCRM module is the module in which users added from campaign monitor will be imported into. Campaign monitor list is which list you want to link to.
Modules – This tab allows us to set which modules we can import into from campaign monitor. By default, accounts, contacts, leads and users are set to yes and targets set to no. to change this click the drop down and select the correct value then click save.
Fields Mapping – See page above
CM Import – This Tab shows a list of all if any lists created in campaign monitor but not yet synced to the CRM target lists. To import a list from campaign monitor, tick the check box and select the module you wish to have the records imported into. Click import and the target list will be created and all the records imported.
API – The API tab allows you to enter your Campaign Monitor API key. These can be obtained from the campaign monitor website clicking on account settings and going to API keys in the righthand column. You will get your Client Id and API key from here. Copy these to the CRM and add your Campaign Monitor URL for quickly navigating to Campaign Monitor throughout the CRM.
Your URL should be something like https://YourCompany.createsend.com
License – The license tab is just a shortcut to the licensing section of the CRM. Here you can enter your key and validate it
Campaign Monitor Security
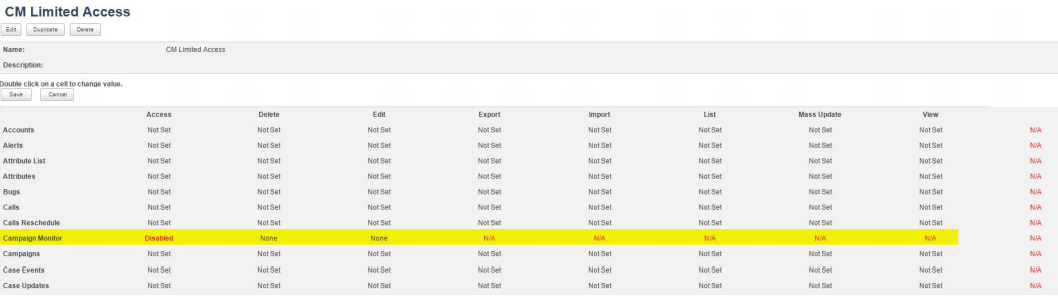
It is possible within the CRM to restrict the accessibility to the features of the integration. To do so create a new role under admin call it a relevant name such as “Limit Campaign Monitor Access”
Set the access for campaign monitor to disabled, along with delete and edit to none. This will restrict all access to everything related to campaign monitor. At the bottom of the page you can set which individual users or groups this role should apply to.
Campaign Monitor History
Through the integration, it is possible to retrieve Campaign monitor history for an email address whether it relates to account lead or contact. The data that is available is the Campaigns they have been a part of, the opens and click throughs of emails when they occurred and which URL they had clicked. This data is in a subpanel below the record.
NOTE: in a future release, we are implementing the ability to report over campaign monitor history, this would allow you to create report and in turn target lists of people who always click through or always open emails further extending the functionality of campaign monitor.