How Can We Help?
Upsell/Cross Report User Guide

In FibreCRM you have access to the Upsell/Cross-Sell report. The report is for gap analysis can easily highlight to you where the gaps exist in your service, see where new opportunities lies and create a more complete service for your clients. Because we all know it’s easier to get more work from an existing customer than it is to win a new one.
The report can easily have filters added to it so you can easily filter the results towards each individuals employee needs. You can also use the results to easily build a list of firms for a highly targeted marketing campaign.
To make the most of your Upsell/Cross-Sell report the first thing you need to decide if what you’d like the report for. Is it creating targeted marketing campaigns? Or is it to increase services and business development across your practice? Once you’ve decided what your main use for the report will be, FibreCRM can tweak the report to make the most worthwhile for your firm.
To set up your initial Upsell/Cross-Sell report please contact FibreCRM and we can get this set up for you.
Your practice management software will need to have at least a 1-way integration into CRM and needs to be bringing across your Services/Assignments/Jobs depending on what practice management system you have. With the information coming from your practice management system you will be able to use this report from Day 1 so you’re getting benefits from the CRM right from the very start. When deciding on what information you’d like to see in the report you can also decide if you’d like to see all your Services/Assignments/Jobs available or just select ones.
If you don’t have a 1-way integration bring through your Services/Assignments/Jobs, the report can be built via Opportunities, however your firm will need to be adding opportunities and this may take a while before you see the benefits. Contact one of the FibreCRM team for more information on upsell/cross-sell reporting using Opportunities.
Once set up you can access your report by navigating to the KReports module which can found in the navigation menu.
From there you’ll see a list of reports scroll down the list or use the search filter to find your report.
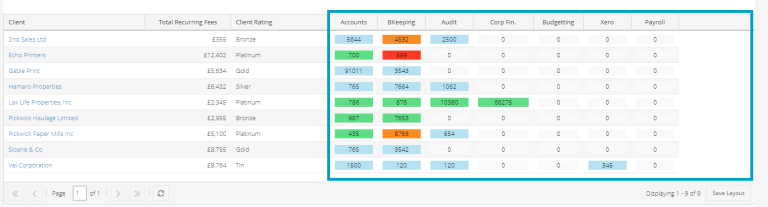
In the report you will have a columns containing relevant information to the services. This can include the Organisations name, total recurring fees, clients rating and columns of your services. The information you see can be altered if required to be more suited for your firms requirements.
The report can be colour coded to help with understanding what work and opportunities are going on with each company there are:
Blue – In your practice management
Green – Exists as an active opportunity but is not in your practice management
Amber – Suspended opportunity
Red – Service/Assignment/Job no longer apply
The blank sections which have no colour codes on them in the columns show you the gaps in your service. If the section is blank, it means that currently no work for that service is going on with that client and no opportunities are there at the present time. The report updates in real time so if you save a new opportunity the report will automatically update itself to show.
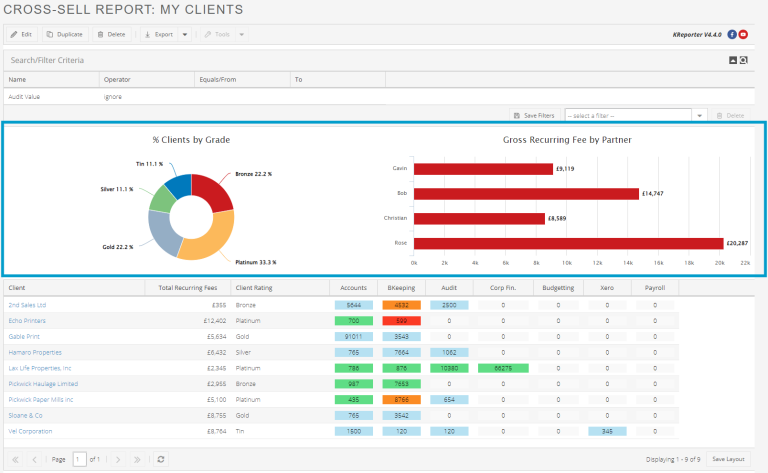
You can also add graphs and charts to the report by selecting Edit and then navigating to the Visualise tab to build. For more information on how to create graphs and charts on your reports please see our user guide: KReports Overview – FibreCRM Support Portal
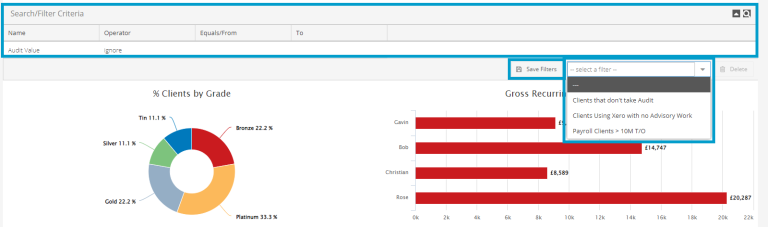
You can add a Search/Filter Criteria section to the report, this section lets you or other user narrows down or find specific results of the report without going into the report and having to edit it. You can save your search/filter so it is available to reapply/used by other users when needed.
As few examples of filters you could add to the report are; Clients that don’t take audit, Clients using xero with no advisory work or Payroll clients. You can use filters to search for specific CRM users clients.
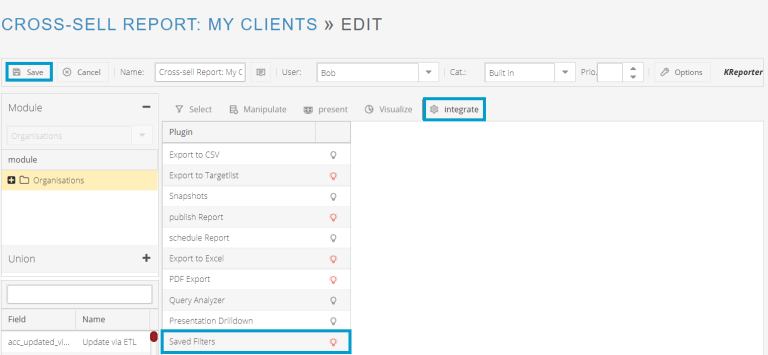
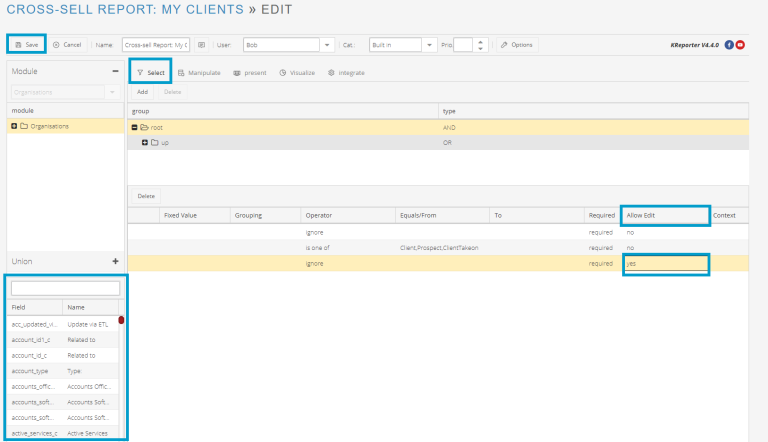
To add a filter select Edit on the report and then select the Integrate tab. In the list scroll down to the Saved Filters section and click the lightbulb to turn on the Saved Filters section (the lightbulb will be lit up red if switched on) and then click Save.
Next go the Select tab in the report this is where you can apply filters. Drag and Drop fields you’d like to filter by from the field to the path section. To be able to edit a filter without editing the report you’ll need to scroll down to the Allow Edit column in the path section and select Yes from the drop down menu. Once done click Save, users will now be able to filter the report when viewing.
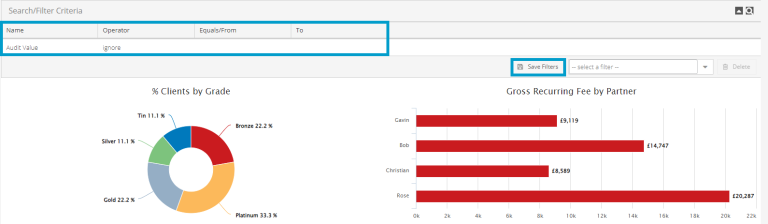
To save a filter so it can be picked from the filters drop down menu on the report. Fill in the criteria you’d like to filter by and then click the Save Filters icon.
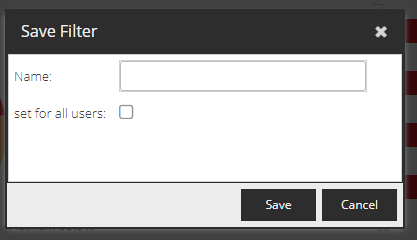
A pop up box will then appear, give the filter a name and the select the tick box if you’d like to make this filter available for all users. Once done click Save. Your new filter will now be available to apply from the drop down menu. To apply the filter select it from the drop down menu and it will automatically load up the filter.