As an Admin for your CRM you have the ability to edit the layouts of the modules and customise them to suit your firm. Layouts display field and field data. This guide will cover how edit the Edit and Detail View when viewing a record in a module.
Editing the Edit View + Detail View
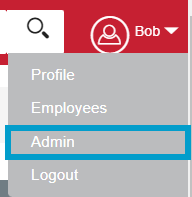
To edit a layout first navigate to your username in the top right hand corner and select Admin from the drop down list.
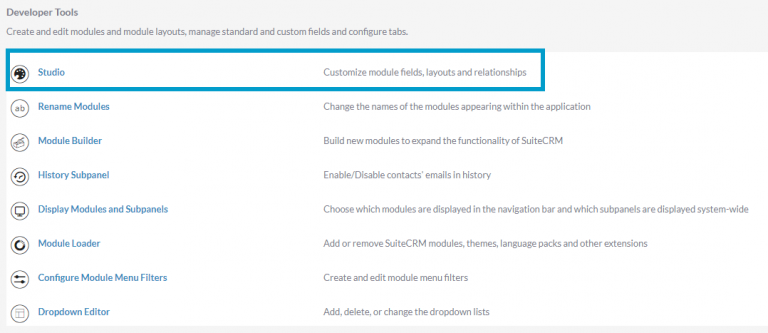
Scroll down to Developer Tools and then select Studio
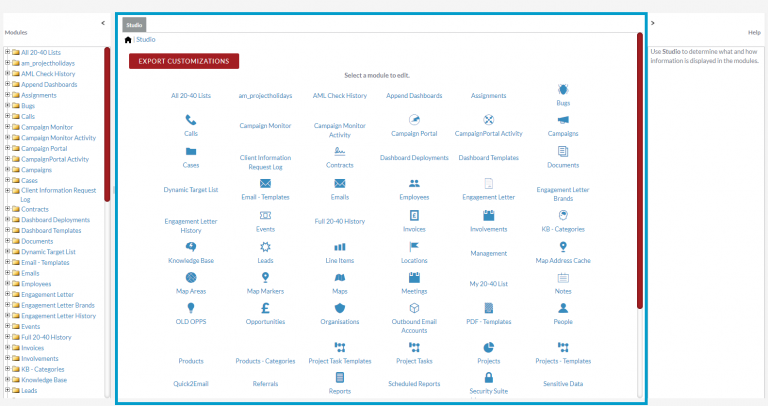
In Studio select the module you’d like to edit.
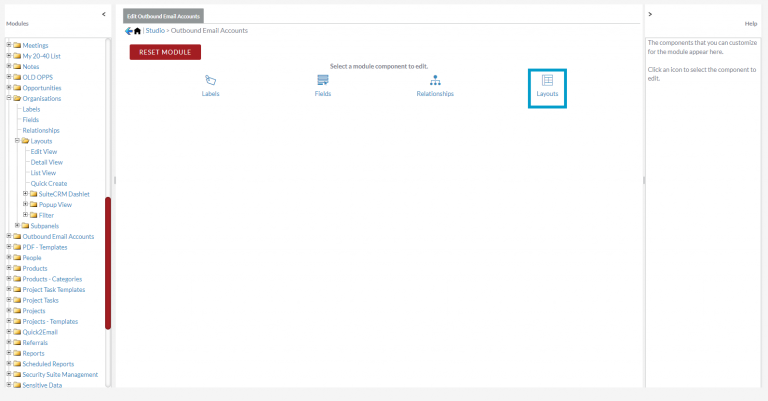
You’ll then have options for which module component you’d like to edit, select the Layout option.
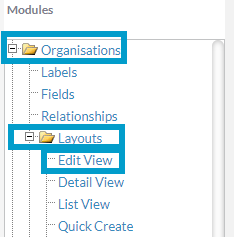
You can also navigate to which layout you’d like to edit by using the tree on the left hand side. Select the + button next to the module name to open up the options. Then select the + button next to Layouts, to find Edit View.
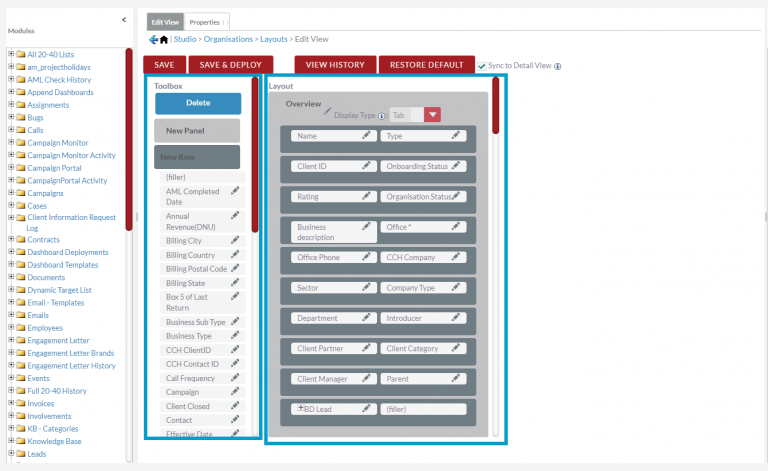
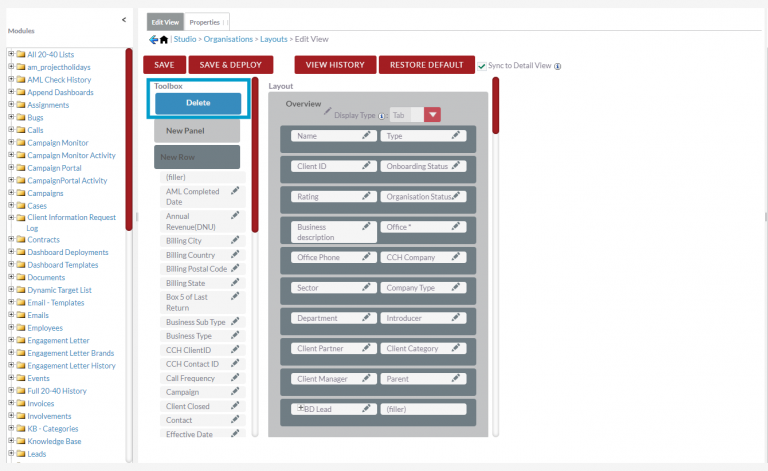
In the Edit View edit section the layout area contains the fields that are currently displayed when the record of the module is in Edit View. The Toolbox contains layout elements such as the Delete, New Panel and New Row option. The Toolbox also contains the fields that can be added to the layout.
Make changes to the layout by dragging and dropping elements and fields between the Toolbox and the Layout and within the Layout itself.
To rename a Panel use the little pencil icon.
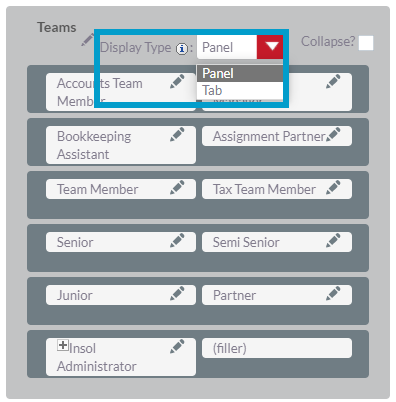
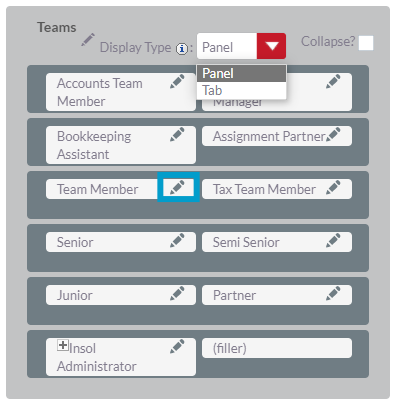
You can change a Panel in the layout of the record to a Tab in the Layout section. To do this go to a Panel in the Layout and in the Display Type drop down select Tab. When Tab is specified for a panel, subsequent panels set to display as Panel will be displayed within the tab. A new Tab will be started for the next panel for which Tab is selected.
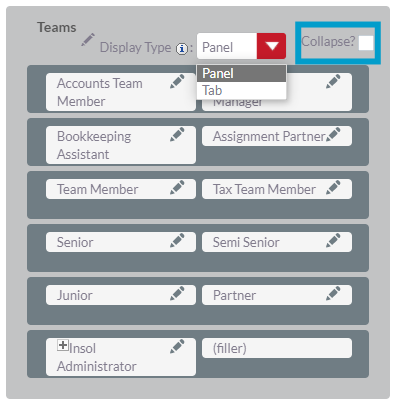
If the Collapse tick box is selected in the panel will mean that panel will be closed when the user first goes into the module and will have to click to open the panel up to see the fields.
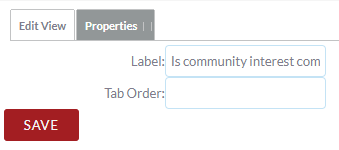
Select the Pencil Icon in any of the fields will take you to edit the Label of the field. The Label is the name of the field such as Team Member and will be shown in the module.
Selecting the Pencil will take you to the Properties tab where you can changed the label. If you make any changes click Save which will take you back to the Edit Layout Page. A pop up box will appear to let you know the operated has completed successfully, click Close to get rid of the pop up.
Above the Layout is the Sync to Detail View tick box. If you select this option the Edit View layout will sync with the corresponding Detail View layout. Once selected you will not be able to make changes in the Detail View.
To remove a field from the layout, drag and drop the field onto the Delete button. Once removed the field will be available in the Toolbox to re-add to the Layout if you’d like.
If you select the Save button it will preserve the changes you made to the layout since the last time you saved it. The changes will not be displayed in the module until you Deploy the saved changes.
Select Save & Deploy to save all changes you made to the layout since the last time you saved it, and to make the changes active in the module. The layout will immediately be displayed in the module.
Click View History to view and restore a previously saved layout from the history and Restore Default to restore a view to its original layout.
Detail View
If you have the Edit View layout synced with the Detail you’ll unable to make any changes in the Detail View layout page. FibreCRM recommends having the Edit View and Detail View synced together as Fields and Field placements in the layouts replicate each, which makes it easier for users to use.
If you don’t have the two views synced then you can make edits to the layout of the detail view the same way as you would in the Edit View layout.
Cheat Sheet
To download the Edit the Edit View Layout Cheat Sheet click here
Table of Contents
We use cookies to assess how people are using our website, only necessary cookies are enabled. Cookie settingsACCEPTREJECT
Cookie Policy
Privacy Overview
This website uses cookies to improve your experience while you navigate through the website. Out of these cookies, the cookies that are categorized as necessary are stored on your browser as they are essential for the working of basic functionalities of the website. We also use third-party cookies that help us analyze and understand how you use this website. These cookies will be stored in your browser only with your consent. You also have the option to opt-out of these cookies. But opting out of some of these cookies may have an effect on your browsing experience.
Necessary cookies are absolutely essential for the website to function properly. This category only includes cookies that ensures basic functionalities and security features of the website. These cookies do not store any personal information.
Any cookies that may not be particularly necessary for the website to function and is used specifically to collect user personal data via analytics, ads, other embedded contents are termed as non-necessary cookies. It is mandatory to procure user consent prior to running these cookies on your website.
Functional cookies help to perform certain functionalities like sharing the content of the website on social media platforms, collect feedbacks, and other third-party features.
Performance cookies are used to understand and analyze the key performance indexes of the website which helps in delivering a better user experience for the visitors.
Analytical cookies are used to understand how visitors interact with the website. These cookies help provide information on metrics the number of visitors, bounce rate, traffic source, etc.
Advertisement cookies are used to provide visitors with relevant ads and marketing campaigns. These cookies track visitors across websites and collect information to provide customized ads.