Creating and Sending an Engagement Letter – User Guide
Updated
Creating an Engagement Letter
Engagement Letters are stored in their own module, located in the Opportunities or the All tab on the Navigation Menu.
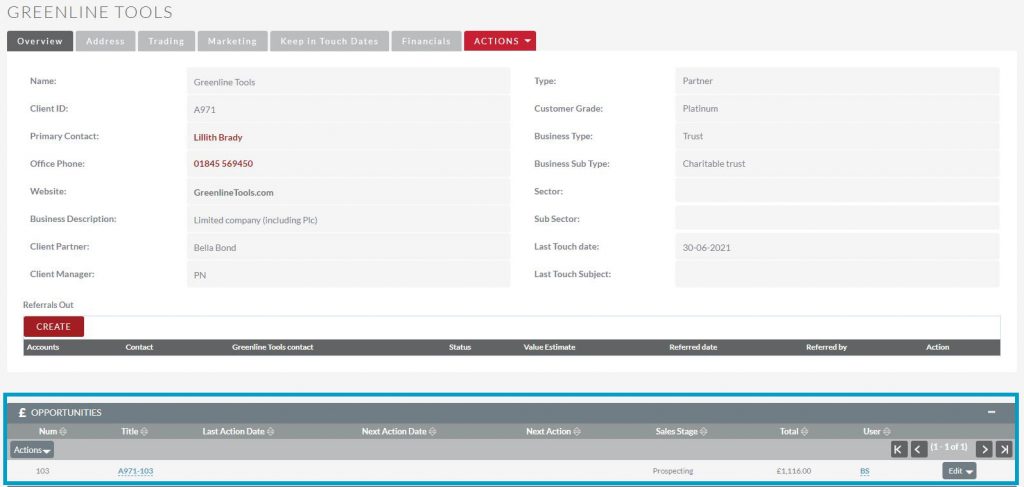
To create an Engagement Letter, you’ll need to find the Opportunity record for the client you wish to create the letter for. To do this navigate to the Person or Organisation record the opportunity is related to and then scroll down to the Opportunity Subpanel and select the Opportunity.
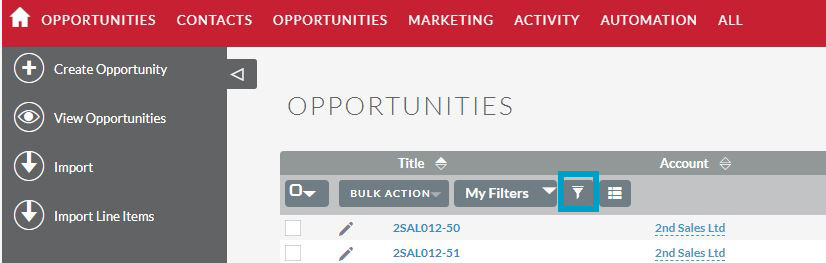
You can also find the Opportunity by selecting the Opportunities Module from the Navigation Menu and use the Advanced Filter System to locate the correct record.
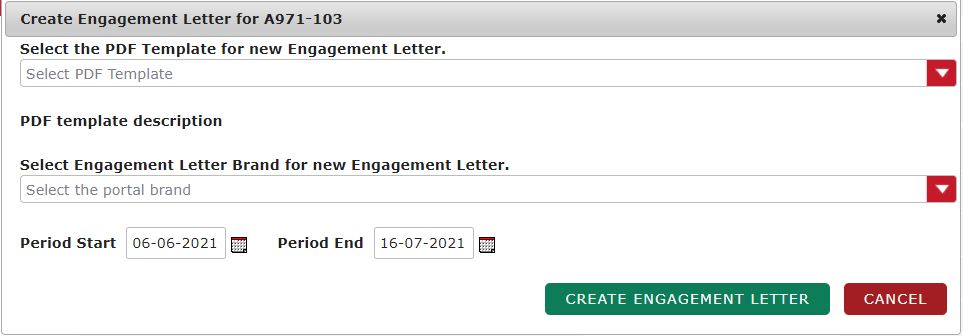
Once you’ve selected the correct Opportunity record, select the CreateEngagement Letter option from the Actions Menu on the top bar of the record.
The Engagement Letter Template and Branding options will now appear. Select the correct template and branding from the drop down menus available. You will also need to the enter the period start and period end. If you cannot find the correct template or branding, please contact your CRM manager for clarification. Once done click Create Engagement Letter, this will take you to the engagement letter record you’ve just created in the CRM.
Engagement Letter Appendices
In CRM you can also add Engagement Letter Appendices. These can be used to add specific sections or information to an Engagement Letter which don’t need to be included in every Engagement Letter sent.
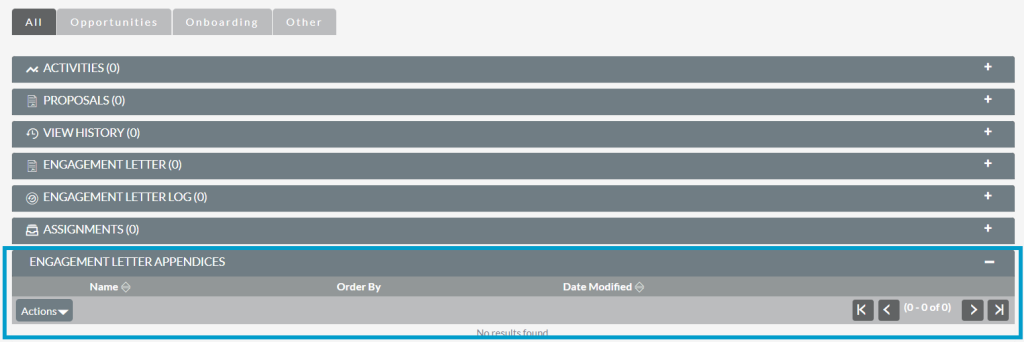
To add an Appendix to an Engagement Letter navigate to the Opportunity that the Engagement Letter will be related to and scroll down to the Engagement Letter Appendix subpanel.
Note: As they are added at Opportunity Level you will need to select the appendices you want to add to the Engagement Letter before you create the engagement letter in the Actions Menu. This is because information from Opportunity is pulled into Engagement Letter upon its creation. Once created anything added to the Opportunity will not be added to the letter.
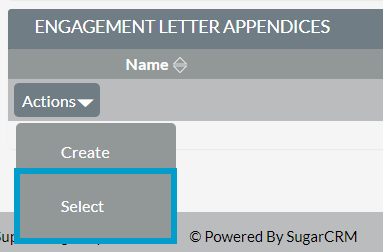
In the Actions Menu drop down click the Select option.
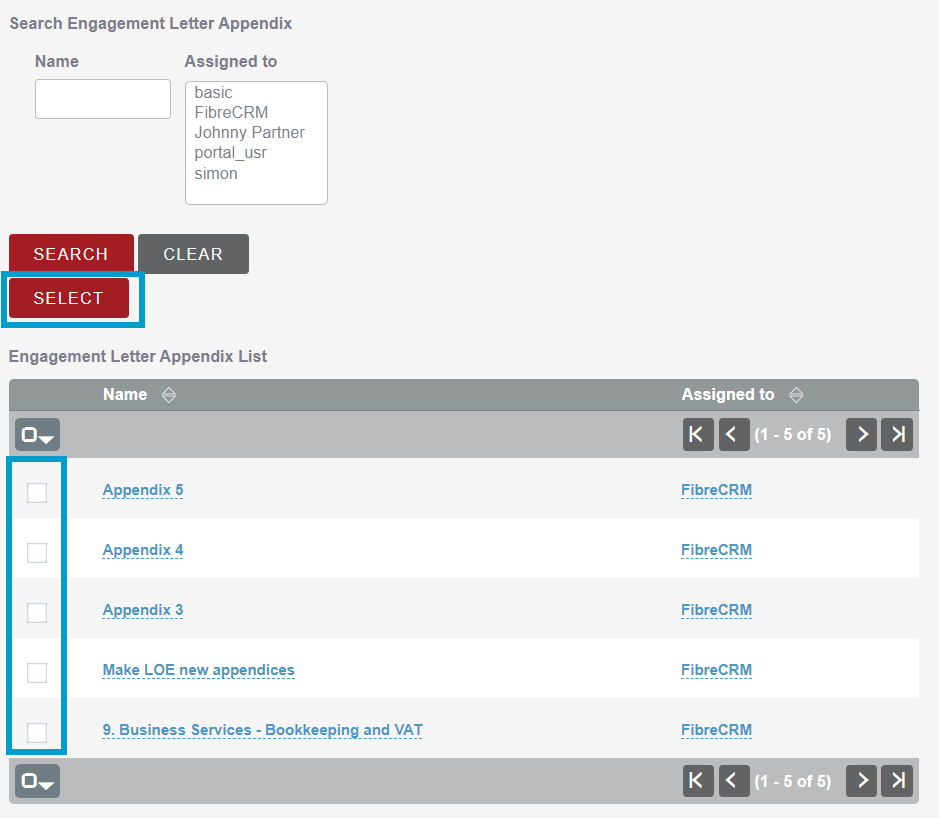
A pop up box will then appear with the Engagement Letter Appendix List. Use the Tick Boxes to select the Appendices you’d like to include. Once you’ve selected the Appendices you’d like to use click Select.
The Appendices will now be listed in the Subpanel. In the Order By column you can sort the Appendices in the order you’d like them to appear in the text boxes. Once done click Save. To remove any appendices click the Edit option.
Once you’ve added and ordered the Appendices you would like. Create your Engagement Letter in the Actions Menu. The Appendices you have added will be shown in the Engagement Letter.
Editing an Engagement Letter
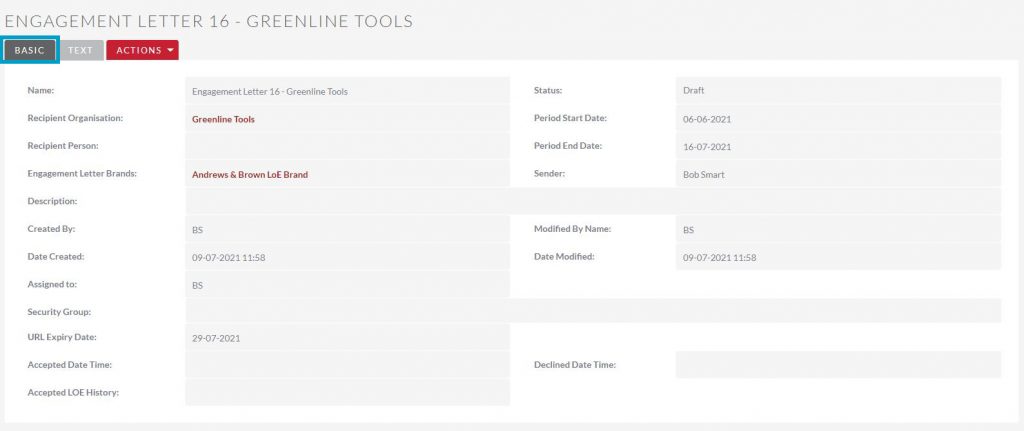
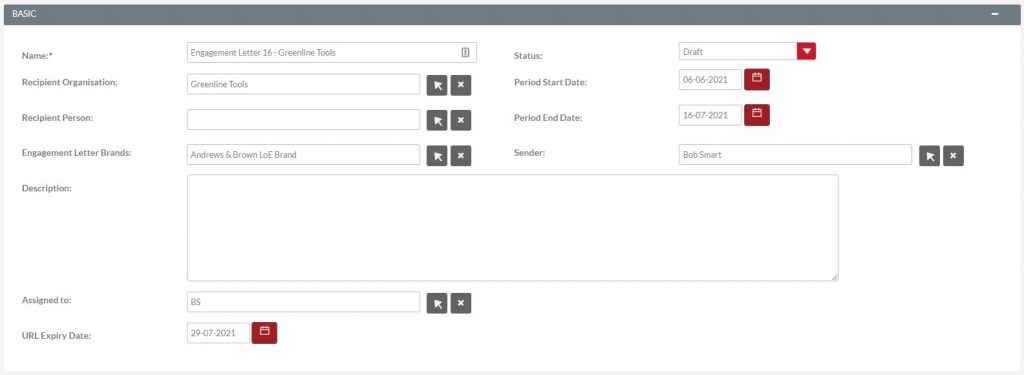
Now that the Engagement Letter has been created. In the Basic Tab you can view details about the Engagement Letter such as Recipient Person and Recipient Organisation. These will be pulled through automatically from the Person and Organisation contact in the Opportunity but can be changed when in Edit Mode.
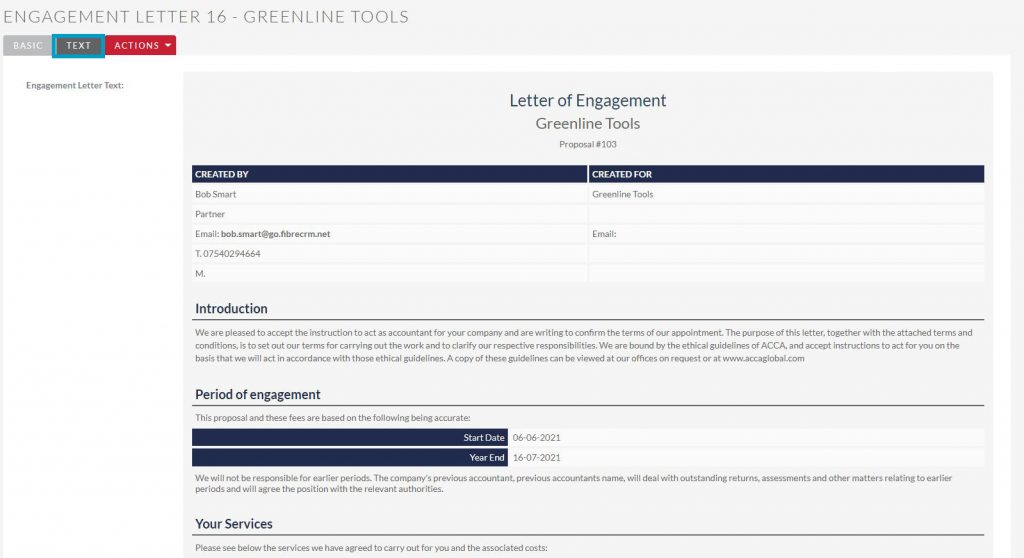
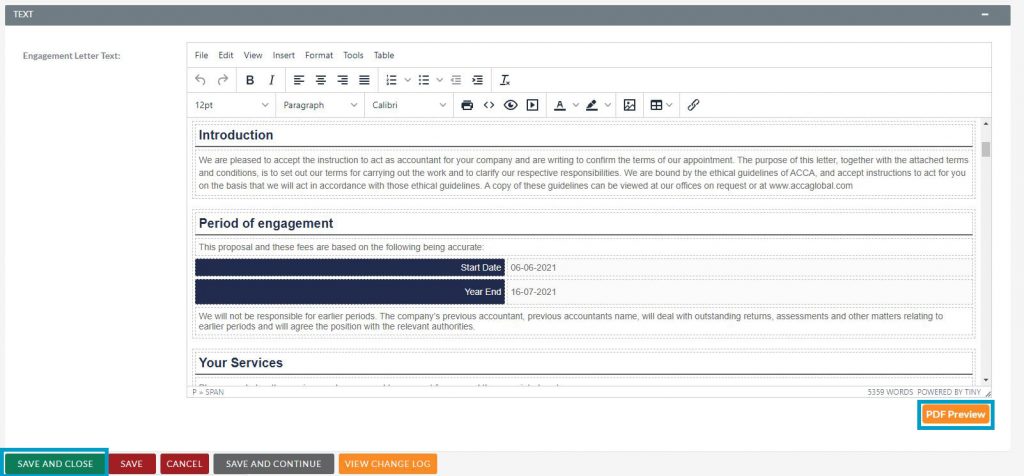
Use the Text tab to view what the Engagement Letter looks like.
You can use the Actions Menu to; search the system for duplicates or modify any information by selecting Edit. In the Basic Tab you can changed the information such as the Name, Status and Period Start and End. Using the Select Arrows you make changes to the Recipient Organisation, Recipient Person, Branding and Sender.
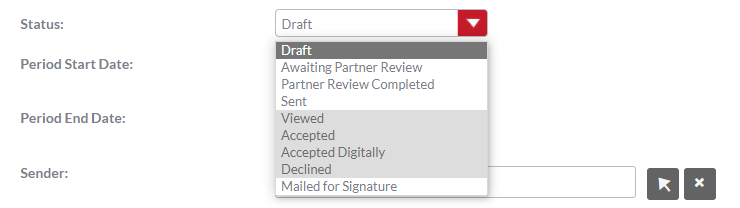
The dropdown menu in Status shows the lifecycle stages of the Engagement Letter. The status will automatically default to Draft when the Engagement Letter is created. When you select a stage in the status you’ll only be given options for the next stage of the Letters lifecycle. For example; When the status is set to Draft you will only be able to change the status and send the Letter out for Partner Review, Mail forSignature or Sent.
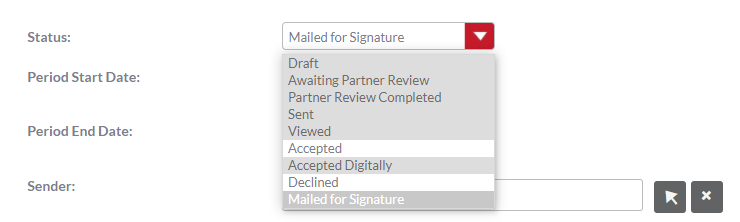
If you select Mail for Signature you will then only be able to select Accept or Decline from the Status when the Letter has been accepted or declined.
You can also make changes to the selected Engagement Letter template if necessary in the Text panel. To view the changes you make to the Engagement Letter template select the Preview PDF option at the bottom right hand corner.
Once you are happy with everything click Save & Close.
Approval
Approval processes for Engagement Letters can be created in CRM. If you currently don’t have an approval process in your CRM, FibreCRM can work with your CRM manager to put one in place.
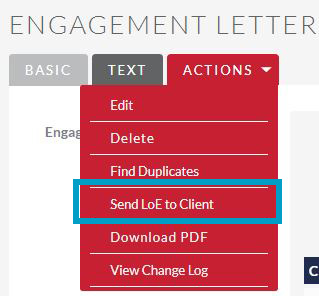
Sending an Engagement Letter
When you are ready to send to your client, click Send Engagement Letter to Client option in the Actions Menu.
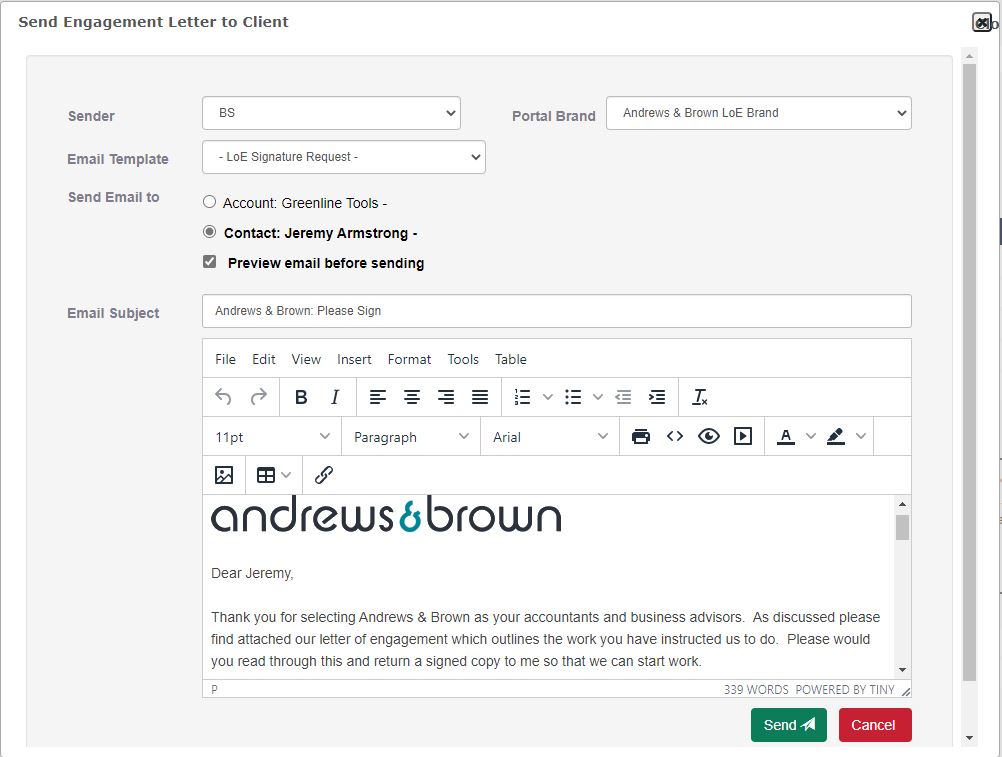
Here, you can choose the sender, the portal brand and the email template. You can also the choose recipient of the email as either the person or organisation record associated with the opportunity. Tick the preview email before sending box, to view the email and make any changes to the Email template if necessary. Once you’re done click Send.
Once sent, the status of the Engagement Letter will automatically be updated and locked to Sent.
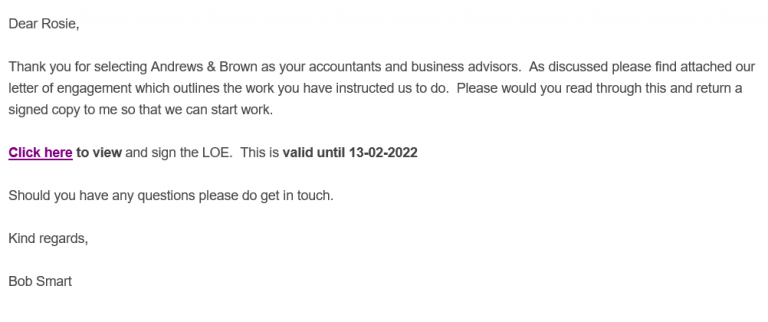
The client will then receive their email with the Engagement Letter. They will be able to view and sign a digital copy which will then notify you that it has been signed.
If your client has viewed the Engagement Letter the status will update automatically to Viewed in the Engagement Letter Record. If they then accept the Engagement Letter the status will automatically update to Accepted.
You can also view the status of the letter by looking at the Engagement Letter Log in the Engagement Letter record, which will show you if a client has viewed or signed the letter. The Engagement Letter log is also available to view in the related Person/Organisation and Opportunity records.
Cheat Sheets
To download the Creating and Sending an Engagement Letter Cheat Sheet click here
To download the Engagement Letter Appendices Cheat Sheet click here
Table of Contents
We use cookies to assess how people are using our website, only necessary cookies are enabled. Cookie settingsACCEPTREJECT
Cookie Policy
Privacy Overview
This website uses cookies to improve your experience while you navigate through the website. Out of these cookies, the cookies that are categorized as necessary are stored on your browser as they are essential for the working of basic functionalities of the website. We also use third-party cookies that help us analyze and understand how you use this website. These cookies will be stored in your browser only with your consent. You also have the option to opt-out of these cookies. But opting out of some of these cookies may have an effect on your browsing experience.
Necessary cookies are absolutely essential for the website to function properly. This category only includes cookies that ensures basic functionalities and security features of the website. These cookies do not store any personal information.
Any cookies that may not be particularly necessary for the website to function and is used specifically to collect user personal data via analytics, ads, other embedded contents are termed as non-necessary cookies. It is mandatory to procure user consent prior to running these cookies on your website.
Functional cookies help to perform certain functionalities like sharing the content of the website on social media platforms, collect feedbacks, and other third-party features.
Performance cookies are used to understand and analyze the key performance indexes of the website which helps in delivering a better user experience for the visitors.
Analytical cookies are used to understand how visitors interact with the website. These cookies help provide information on metrics the number of visitors, bounce rate, traffic source, etc.
Advertisement cookies are used to provide visitors with relevant ads and marketing campaigns. These cookies track visitors across websites and collect information to provide customized ads.