How Can We Help?
Onboarding Forms User Guide


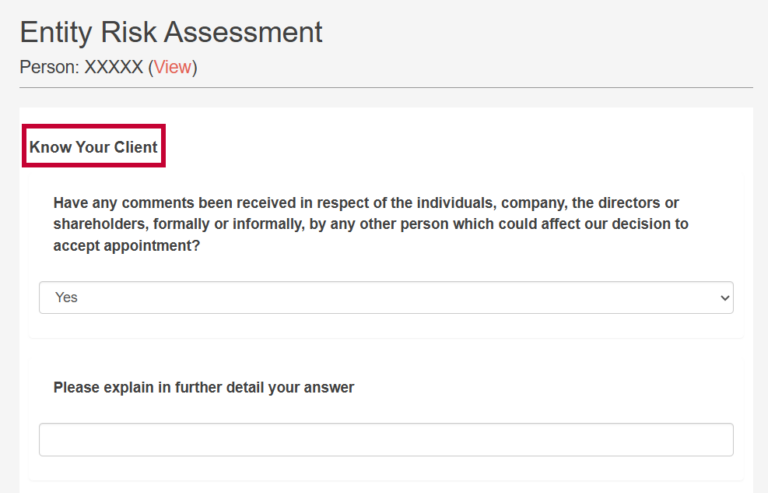


In CRM you can create Onboarding Forms that can be used as part of the Risk Assessment for your new client. Once the form is created, a CRM user can select the form and add it to the KYC form when onboarding a Person or Organisation record. Once the KYC Form for the Organisation or Person has been completed, the Onboarding form will be downloaded as part of the KYC zip file which you can then use to add your own document management if that is part of your firms process.
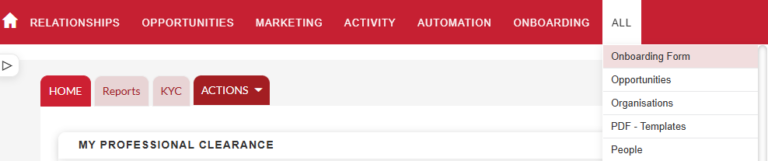
To create an Onboarding Form, navigate to the All option on the Navigation Menu
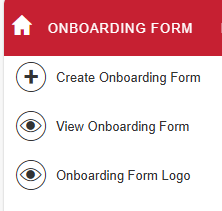
To create an Onboarding Form, select the Create Onboarding Form option on the sidebar menu
The create new Onboarding Form screen will then appear:
Name: Enter the title of the form to be displayed to users. This is a required field.
Status:
Description: Explains the topic of the Onboarding Form
Tick the check box for Show Description Message on Onboarding Form Page if you want the description to be displayed.
Version: This will show you what version the onboarding form is on. Once responses have been put against the onboarding form you will not be able to edit the form. If you need to make changes you will archive the current onboarding form and create a new version.
Once done click the Save button. Now that the Onboarding Form is created the next step is to add the survey questions and sections.
Click the New Question button to add a question to the onboarding form
In Text enter the question that you would like adding to the onboarding form
Select the Question Type from the dropdown list.
The available question types are as follows:
Text – A standard text input
Textbox – A larger text input area
Checkbox – Displays a single checkbox alongside the question.
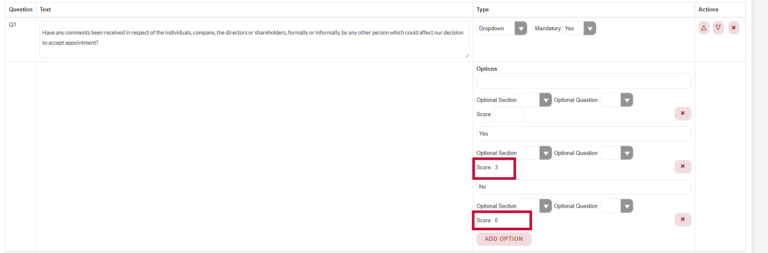
Radio – Specify several answer options to choose from, with radio buttons. Only one answer can be selected. To add answer options select the Add Option button and type in the answer option in the field.
Dropdown – Specify several answer options to choose from, in a dropdown list. Only one answer can be selected. To add answer options select the Add Option button and type in the answer option in the field.
Multiselect – Like a dropdown list, but one or more answers can be selected. To add answer options select the Add Option button and type in the answer option in the field.
Matrix – For each option specified, the user will be able to answer “Satisfied”, “Neither Satisfied nor Dissatisfied” or “Dissatisfied”. These responses can be also be customised -see below.
Date/Time – A Date/Time picker will be displayed for the user to select a date and time.
Date – A Date/Time picker will be displayed for the user to select a date.
Scale – A 1-10 scale will be displayed. Users can select one number on the scale in response to the question.
Rating – A five-star rating widget will be displayed. Users can select 0 to 5 stars in response to the question.
You can also make a question Mandatory so a user will have to fill in the question before being able to complete and lock the onboarding form.
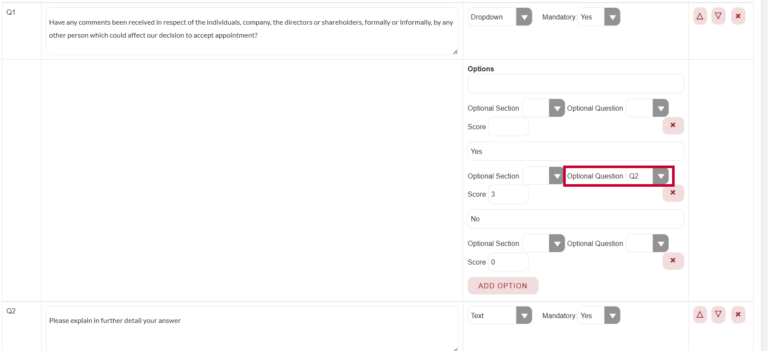
If you select a Dropdown, Multiselect or Radio question you can add Optional Question Links which means when a user selects an answer with an optional question link enabled it directs them to answer more optional questions. For example if a person selects ‘No’ as an answer to a question you can then redirect them to another question in the list to ask them to go into more detail. The Optional Question it is linked to will only appear if they have selected the answer that has the question link enabled.
To enable the Optional Question Link use the drop down menu to select the question it will go if the answer is selected. Set up the optional question just like you would any other question.
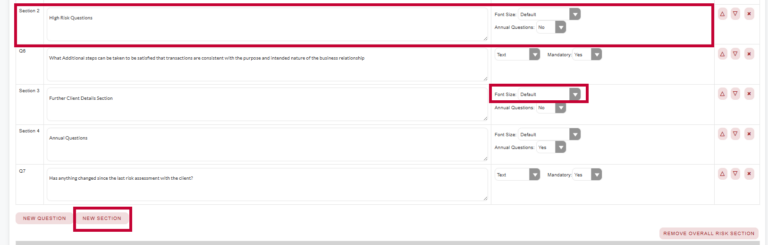
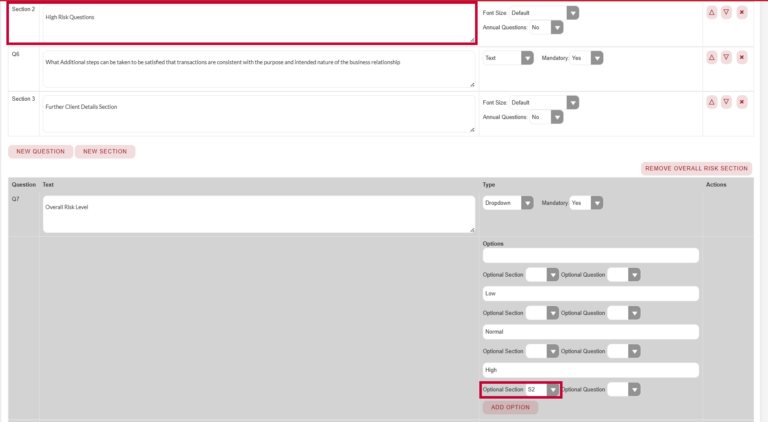
You can group questions into sections in the Onboarding Form. To add a section select the New Section button. Once selected you can add a name/heading for the section in the text field. Use the Font Size dropdown to choose whether you want the text to be the size of a heading or the same size as a question. This can be used if you’re looking to create subsections that doesn’t require a full size heading or an answer.
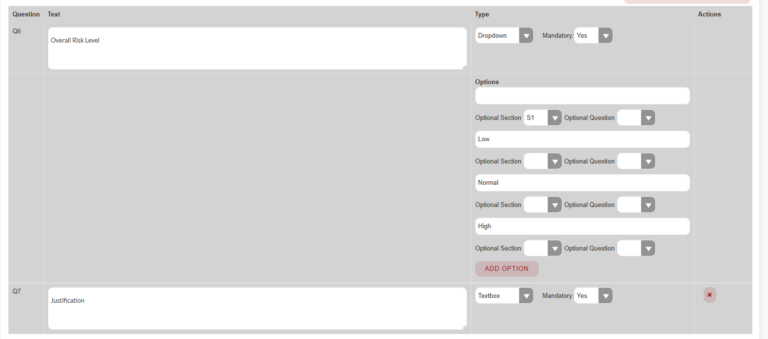
If you select a Dropdown, Multiselect or Radio
question you can add Optional Sections which means when a user selects
an answer with an optional question link enabled it directs them to answer more
optional questions. For example if a
user selects a certain risk as an answer to a question you can then redirect
them to another section to ask them further questions and to go into more
detail. The Optional Section it is linked to will only appear if they have
selected the answer that has the section link enabled.
To enable the Optional Section Link use the drop down menu to select the question it will go if the answer is selected. Set up the optional section just like you would any other section.
On the Onboarding Form you can now create an annual questions section that will only appear on the form if it being filled in as part of an Annual KYC. To set up Annual Questions add a new section and in the Annual Questions drop down select Yes. You can add multiple annual question sections if needed. In that section add your annual questions. If there are further questions that need to be part of the Original KYC form after this annual section you will need to add another section with the Annual Questions drop down set to No.
For more information on Annual KYC please see our user guide: Annual KYC – FibreCRM Support Portal
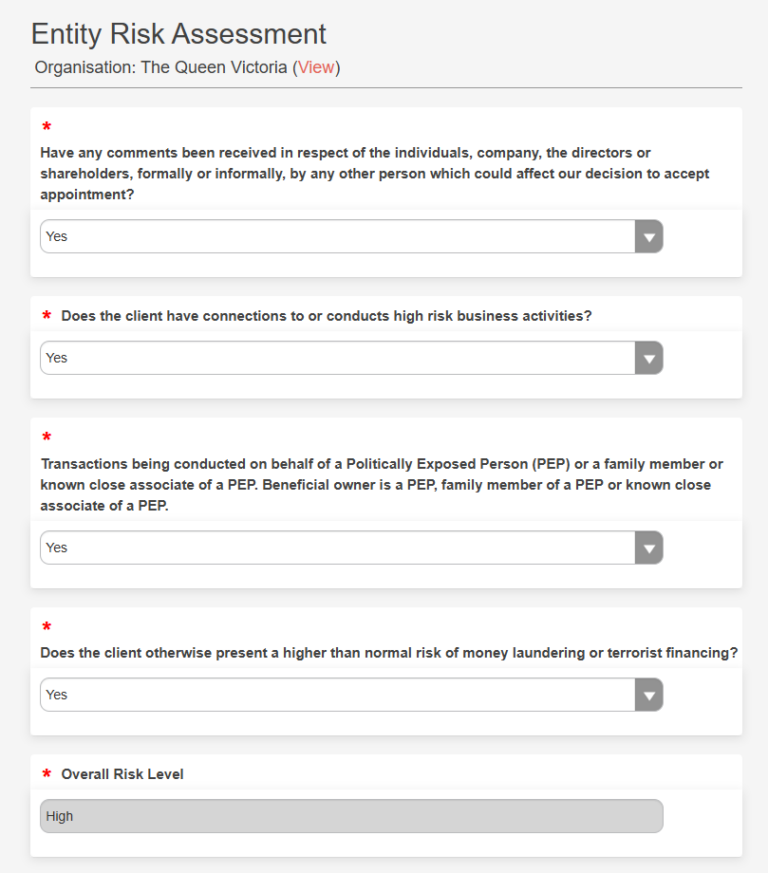
When creating an onboarding form you’ll notice that the Overall Risk + Justification questions are already on the form.
These questions link to the Risk Level column that is in the Onboarding Risk section next to the Onboarding Form. If you were to select Low the icon would be Green, Medium would be Amber and if you select High Risk the icon would be Red. These icons are designed so you can see the risk level of client quickly without having to go through the risk assessment form.
If you don’t require these questions they can be removed from the form using the X button on the Onboarding Form creation page.
To remove the Overall Risk Section completely select the Remove Overall Risk Section button.
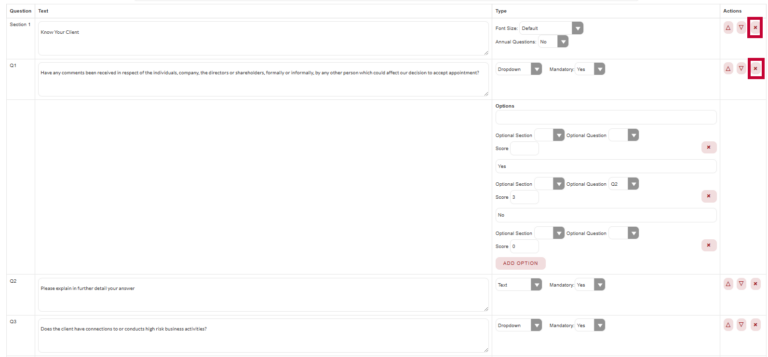
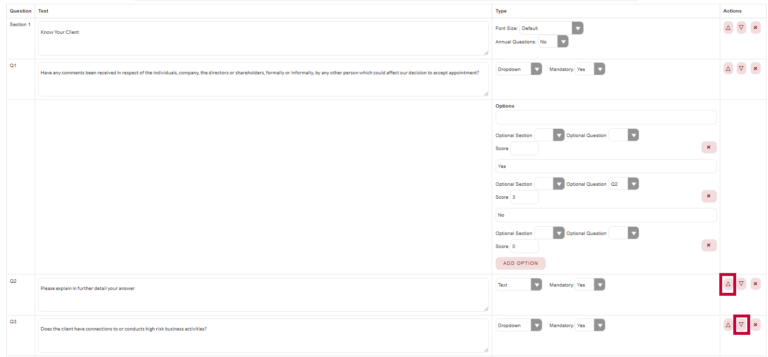
To delete a question or section from the onboarding form: Click the X button
To change the order of the questions or section: Click on the Up and Down arrows
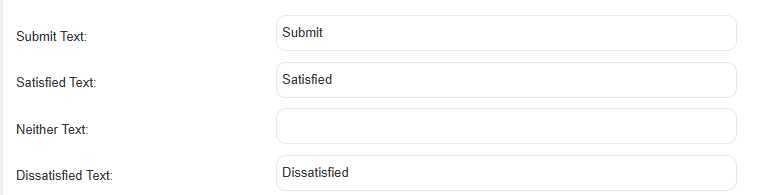
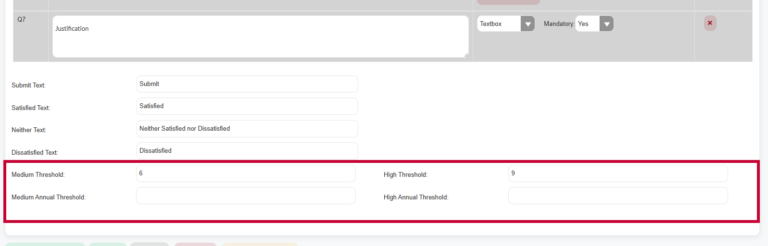
Submit Text: Edit the text for the onboarding form’s Submit button here, if desired.
Customise the responses for Matrix type questions by editing the default matrix response text here
If you just want a simple yes or no option leave the middle option blank which will stop the option showing on the form.
Click the Save & Close button to save the onboarding form
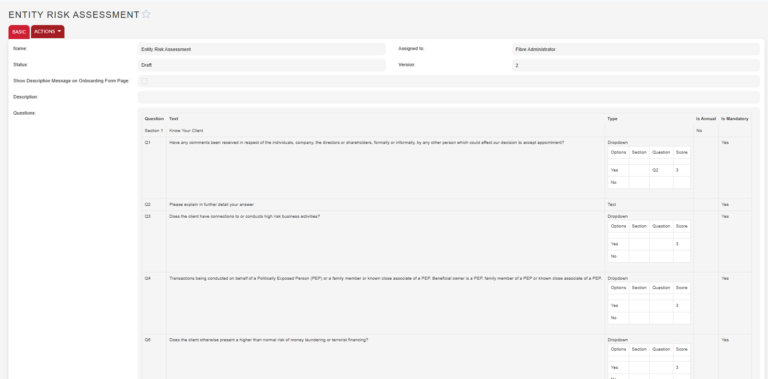
The Detail View for the draft Onboarding Form will be displayed. This overview shows all the survey questions and question types included in the Onboarding Form. To use the Onboarding Form you will need to set the status to Public using the Edit option in the Actions Menu.
Note: that the URL field is blank – this field will display the CRM-generated URL link for the survey once the survey status has been set to Public.
Risk forms can be automatically categorised as Low, Medium or High based on the answers in a client’s risk assessment form. Based on the risk level, additional questions can be triggered, helping your firm streamline client onboarding and maintain compliance more efficiently.
In the questions of the form you’ll see the score fields, here you assign a numerical score based on your firm’s criteria.
Example: Answer “Yes” = 3 points, “No” = 0 points.
Note: Text or free-form comment fields cannot be scored automatically—only structured answers like Yes/No or multiple-choice are supported.
In the Overall Risk Level configuration section you set score thresholds that define the risk categories for example:
These thresholds are fully customisable, so adjust them according to your internal risk policies.
You can also set Annual KYC Thresholds as well if there are additional annual questions after the initial completion and the scoring between new client and existing differs.
Once the Onboarding Form has been created, it can be used and selected by a user in the KYC Form of a Person or Organisation record. For more information on KYC Forms see our user guide here:
Scroll down to the Onboarding Risks section of the KYC Form. Forms that need to be completed will be listed in this section. Select the Hyperlink name to be taken to the Onboarding Form to complete.
If you need to add more onboarding forms to the KYC form
select the Pick OB Form button. A popup box will then appear with a list
of available onboarding forms you can select from. Select the form you would
like to use.
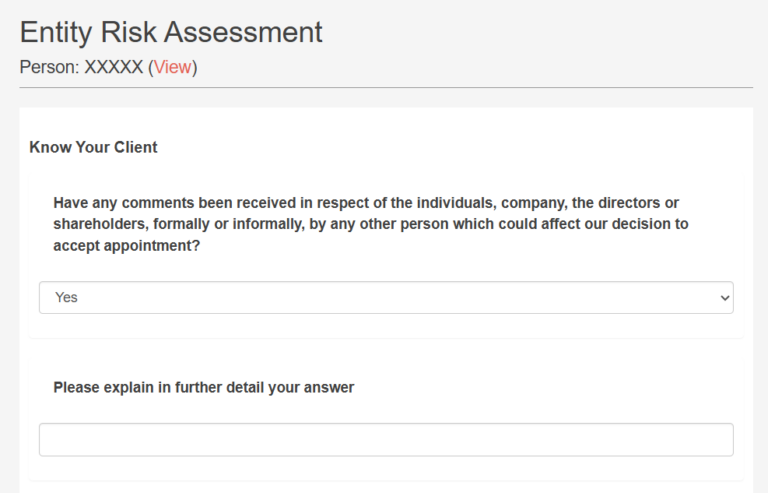
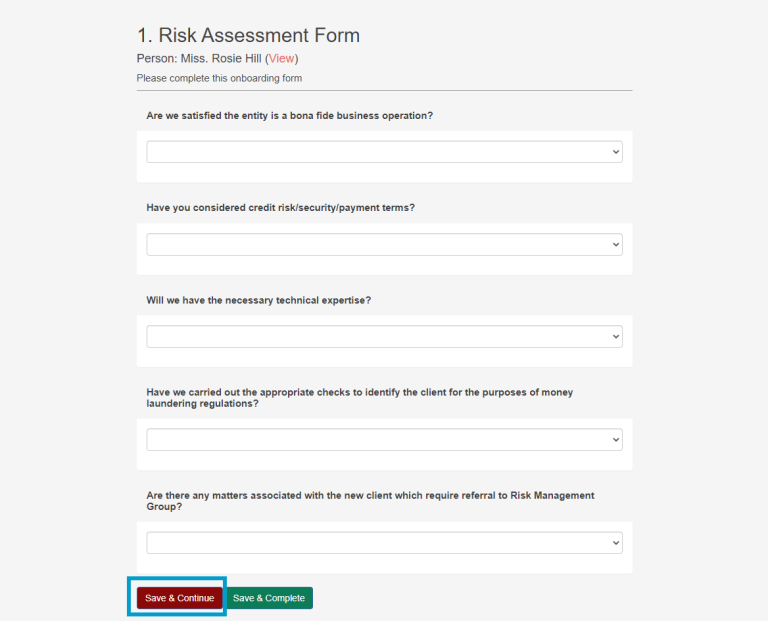
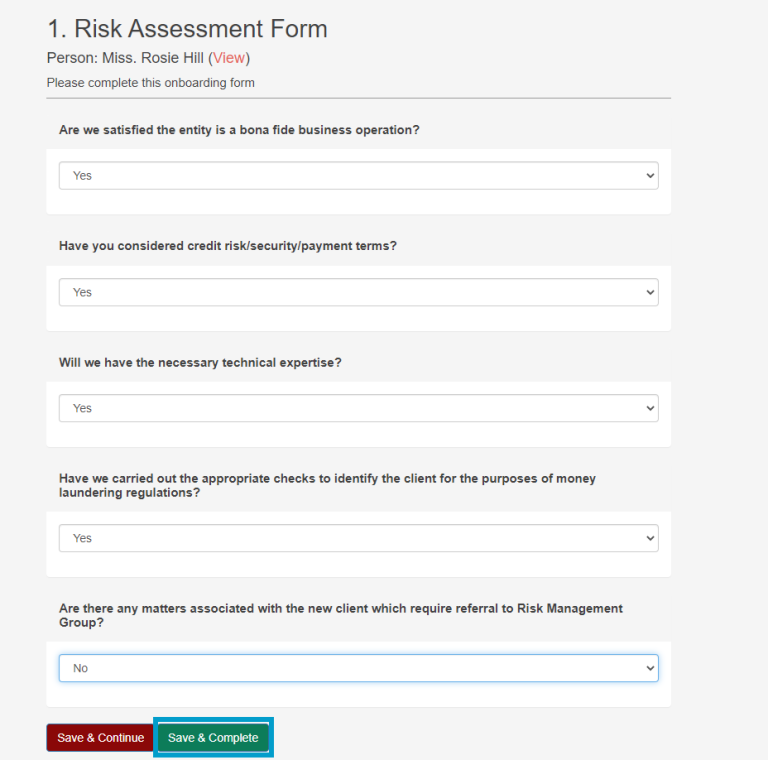
Once selected a new tab will open containing the onboarding form, complete the questions on the form. Fields highlighted with a red asterisk means its is a mandatory field and you will not be able to complete the form without an answer.
At the bottom of the form you have two options, Save & Continue and Save & Complete. The Save & Continue option allows you to Save the form and come back to the form at another time to fill in or complete.
If you select Save & Continue you can return to
the form at another time by navigating to the Onboarding Risks section of the
KYC Form. Forms that are in progress will be displayed, click the hyperlink to
return to form.
Once you’ve completed the form with all the information that is required select Save & Close.
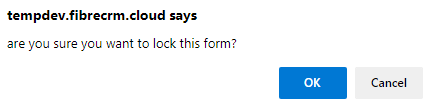
A pop up box will then appear asking you would like to lock the form, select OK.
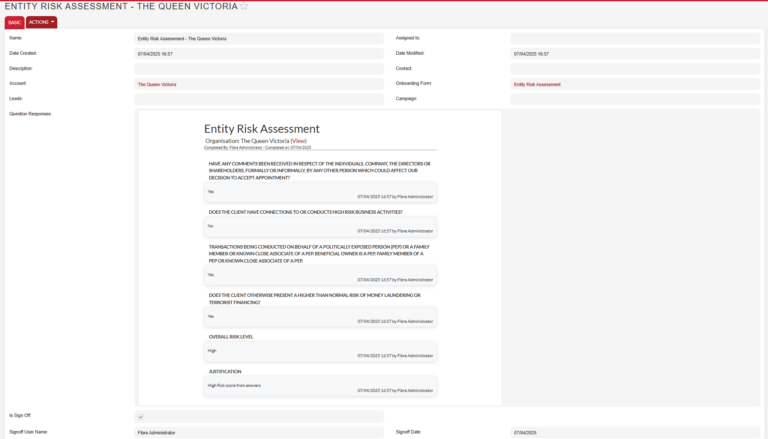
You’ll then be redirected back to the Organisation or Person record, scroll down to the Onboarding Risks section of the KYC form to view the completed onboarding forms. To view a response click on the name of the form which is hyperlinked and you’ll be taken to the form response record. Once the KYC and Onboarding of your new client is complete you’ll be able to download all the onboarding forms along with other information in a zip file that you can store in your firms document management.
An onboarding form can be edited (for example when a partner is reviewing and would like to change a response) once it has been Saved and Completed as long as the KYC has not been signed off. To make any changes click into the form make the changes and then click Save & Complete again this will update the Date modified information and the form will be locked again. If you are using the 3 tiered signing if your role has signed off their part of the KYC then you will not be able to make any changes however the roles that will sign off after you will still be able to edit until they sign off.
You can view completed risk forms in the Onboarding Form Response subpanel it will show all completed or in progress Onboarding Forms for those records
In the forms record you can view the responses that have been filled in on the form. The tick box will also be ticked in the Is Signed Off field. The Signoff User Name and Signoff Date will also be filled in. To view further detail of the onboarding from click the hyperlinked Name.
In the Actions Menu in the Onboarding Form Response record you can select Edit to change the name of the record, add a description, reassign to a different Organisation or Person for it to be linked to and assign the record to someone. Once you’ve made any changes click Save & Close.
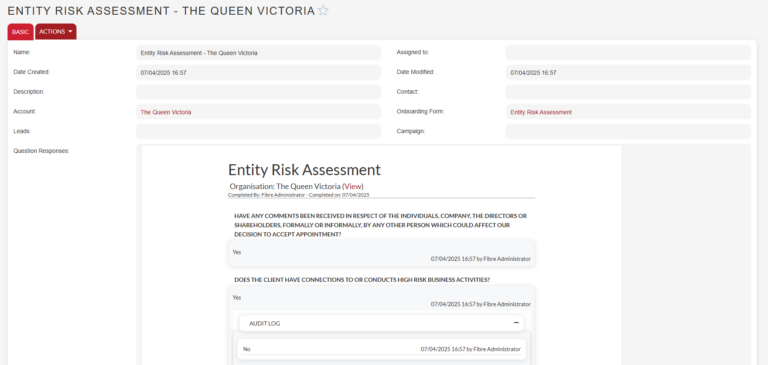
Onboarding Risk Form answers and sign-off are all audited. So you can track who made changes to answers, what was changed and when. Previous form answers are also retained between versions of the form as well.
To view the audit trail, navigate to the Onboarding Form Response record and in the answer you will see if any changes have been made and by which user.
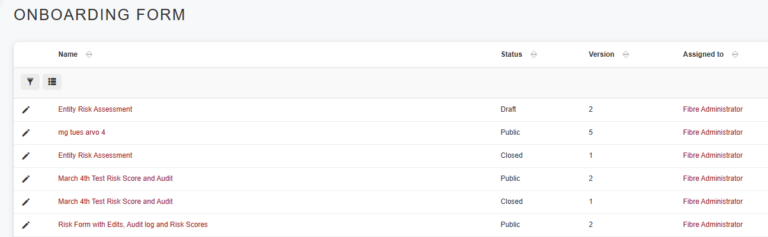
Navigate to the List View Screen of the Onboarding Forms
Click the Pencil Edit icon beside the survey name to open the onboarding form in Edit mode
Alternatively, navigate to the Onboarding Form in Detail View and click on the Actions Menu then select Edit from the drop down menu.
Questions can only be edited in Draft surveys or in Public onboarding forms which have not yet been filled in.
Note: Once the onboarding form has received responses the questions cannot be edited
Once the onboarding form has received responses the questions and sections can not be edited, if you need to edit or update the form you will need to archive the current form and create a new version.
To do this select Archive and Create New Version in the Actions menu.
A new draft version will be created and the previous version updated to closed (this can be changed back to public whilst you make your changes if necessary). Make your changes to the new version and once you’re ready set the form to public and click Save and Close.
Double check the correct new version is pulling through to your KYC form.
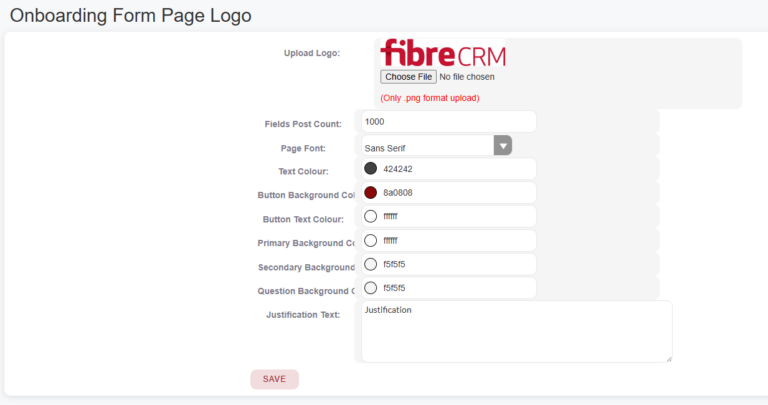
To upload a logo for the onboarding forms navigate to the onboarding
forms module and select Onboarding Form Logo from the options on the
left hand side.
On the Onboarding Form Page Logo click on the Choose File button to upload an logo image. Note: logos need to be in the format of a .png file
You can choose the forms font by selecting a font from the drop down menu. Below you can then select colours for bits of your survey such as; Text Colour, Button Background, Button Text, Primary Background, Secondary Background and Question Background.
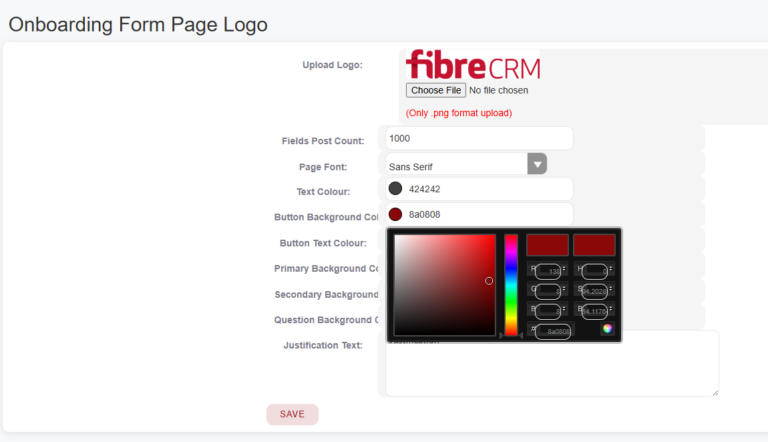
To change any colour click in the box of the bit of the form you’d like to change and colour picker box will appear. Choose the colours you’d like to change it to using the drag and drop picker over the colours or typing in the colour hex code if you know it. Once done select the little colour palette in the colour picker to set the colour.
When you’ve uploaded your logo and picked your colours click Save.
Note: The branding you’ve uploaded will be applied to all onboarding forms.