When it comes to onboarding a client you need to make sure you’re capturing your clients data in a safe and secure way. Especially when gathering sensitive information for KYC and AML checks. Using the client information request tool in FibreCRM will allow you to gather information securely.
Sending a Client Information Request
Note: To send a Client Information Request you will need an email address and mobile number for the individual you are sending the request to.
Note 2: International Mobile Numbers are also supported
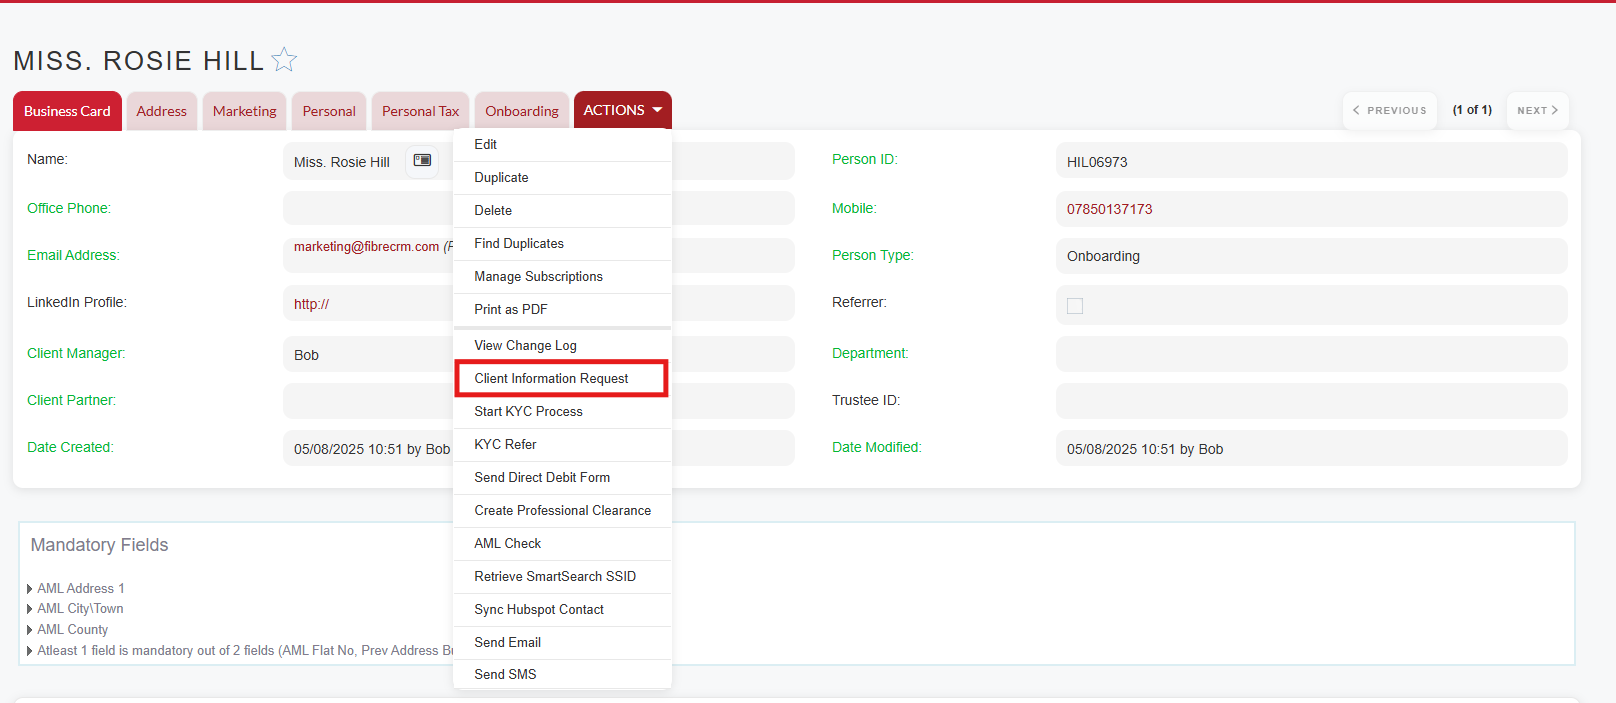
A client information request needs to be sent from a Person record. In the Actions Menu of the Person record select ‘Send Client Information Request’.
Note 3: A User will need the Onboarding Role applied to their user to be able to do this.
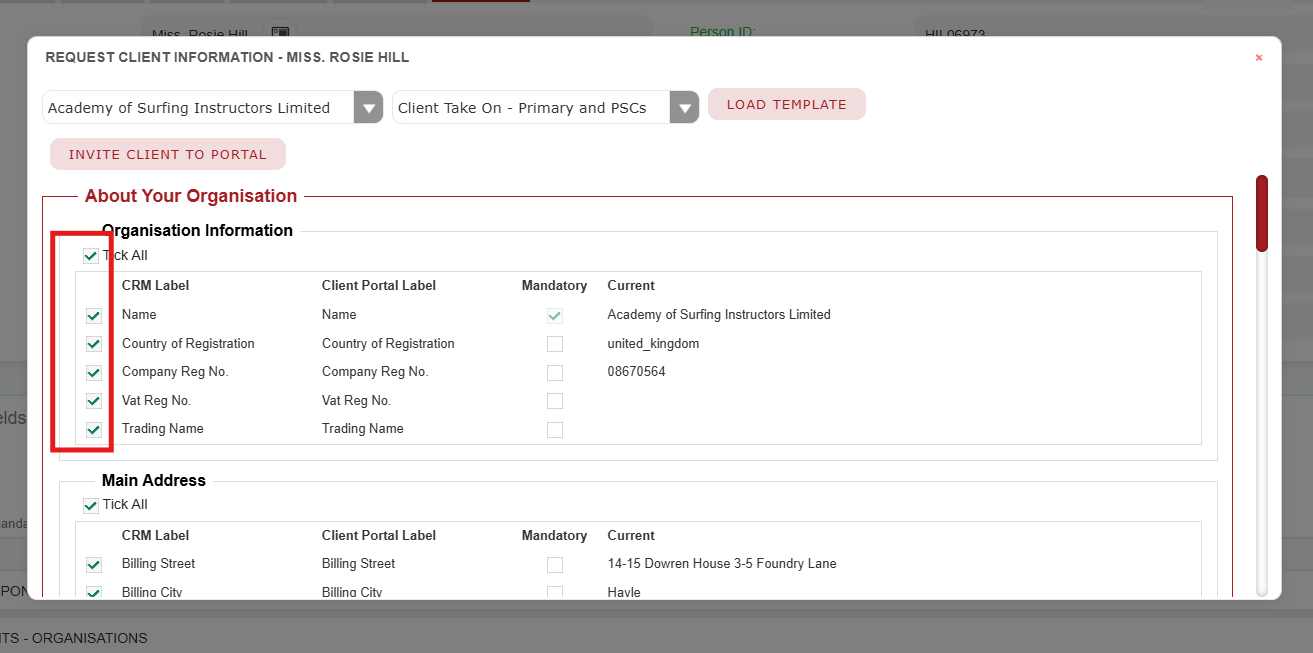
In the Pop Up you’ll see 2 drop downs. The first drop down is to select an Organisation to request the information on. The person must have an involvement with an Organisation to appear in the list. If this request is just for the individual leave the drop down blank.
The second drop down is the Client Request Form list here you will choose the client info form that is sent to the client. You may have a number of different forms so choose the one that is relevant to your client. If the request is just for a person the drop down will only show client info forms that just contain person fields.
Once selected click Load Template.
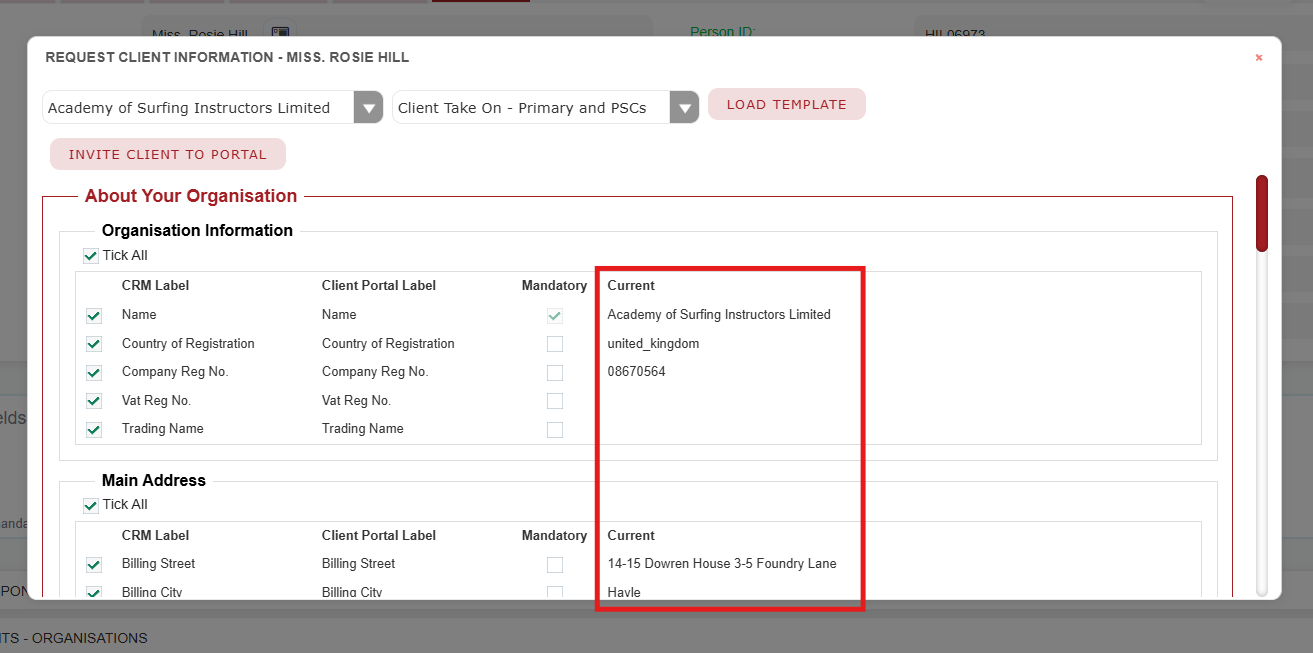
When the template is loaded you’ll see multiple columns. The tick boxes on the left handside show which fields are going to be included in the request. If you don’t want a field to be included in the request just untick a box and that field won’t be shown in the request. The form may be broken down into sections/panels, you can untick certain sections if you don’t want them included.
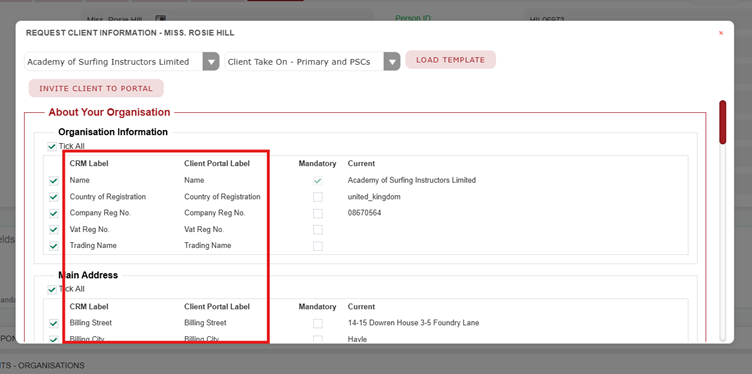
The CRM Label column will show what the fields are called in FibreCRM whilst the Client Portal Label is what will be displayed to the client when they’re in the portal.
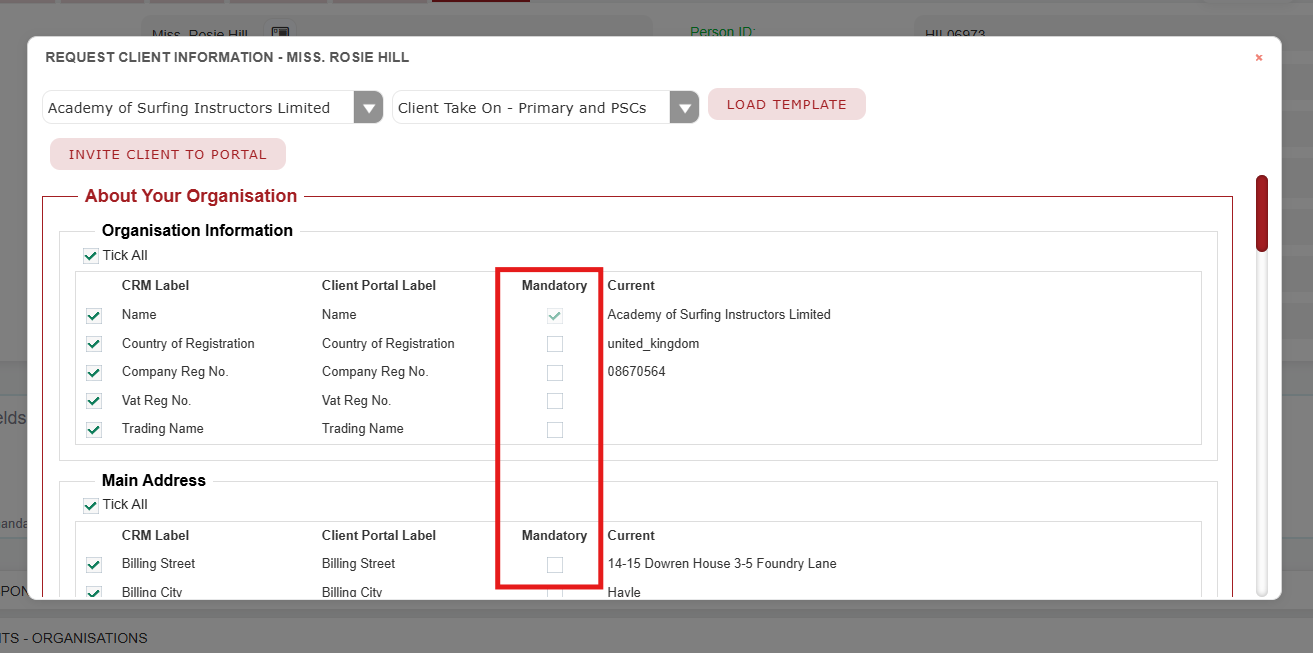
The Mandatory column is where you can see what fields need to be completed by client before they are able to submit back into Fibre. Some of these fields may be made mandatory by default however is there anything additional you like making mandatory tick the tick box for that field.
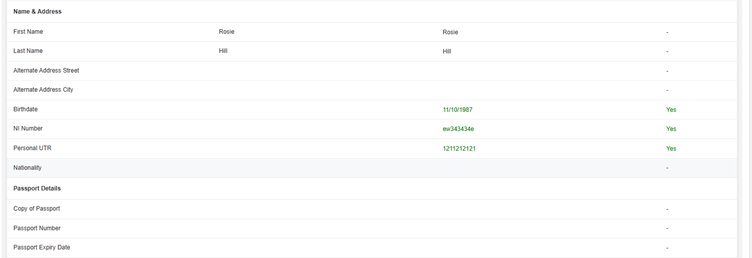
The Current column lists what information what you already hold on the client. This information will appear to them in the portal so they can check what you hold is correct and make any amendments if needs be.
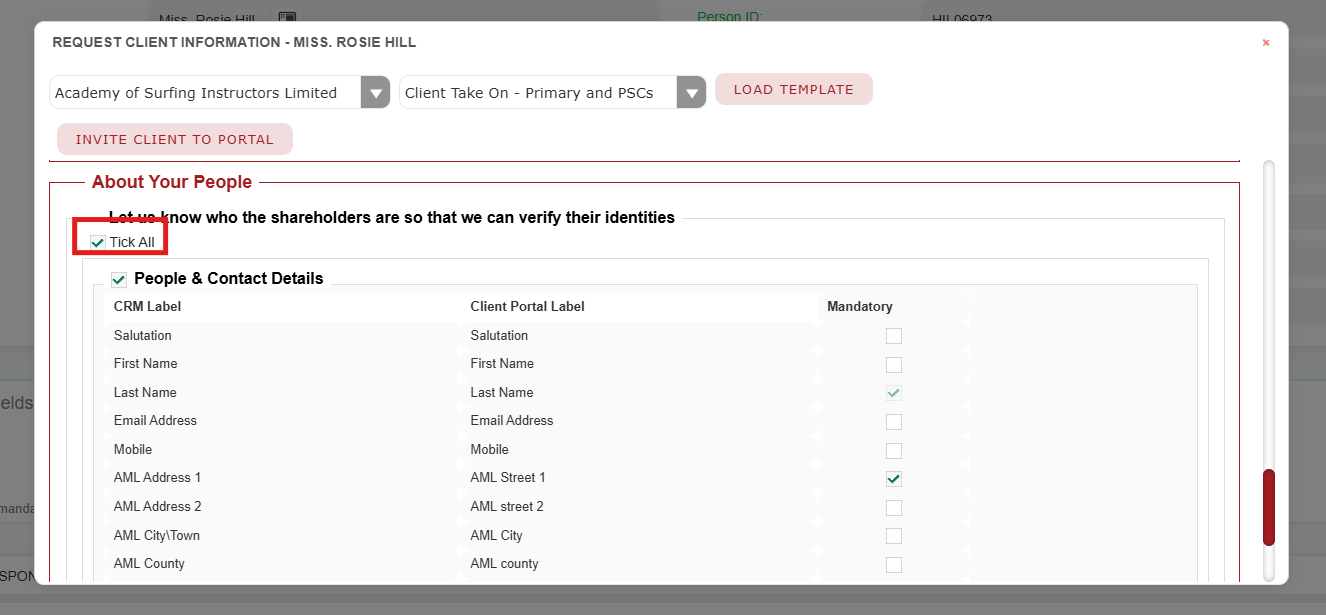
At the bottom of the list you may see different panels depending on your client form set up which is where you can request information on different Shareholders/Directors and PSCs. You won’t be able to edit as its set up in the panel set up however you can choose not to include this section if you don’t require.
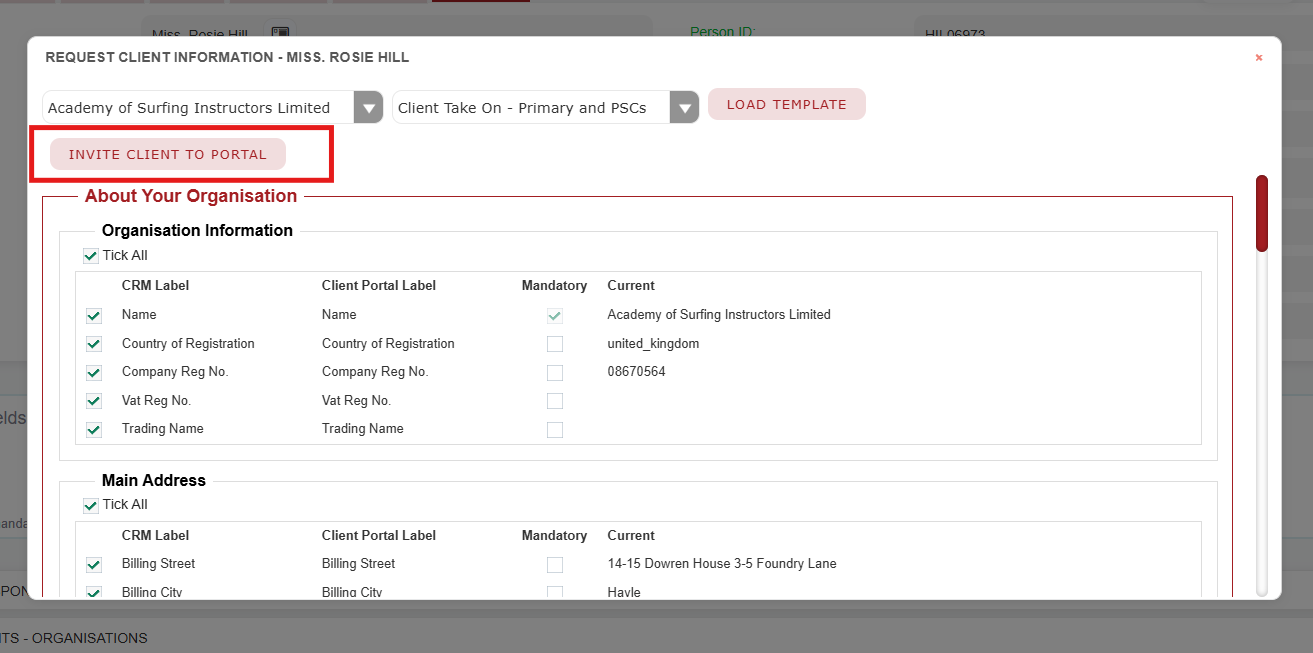
Once you’re happy with the information you’re requesting click Invite Client to Portal.
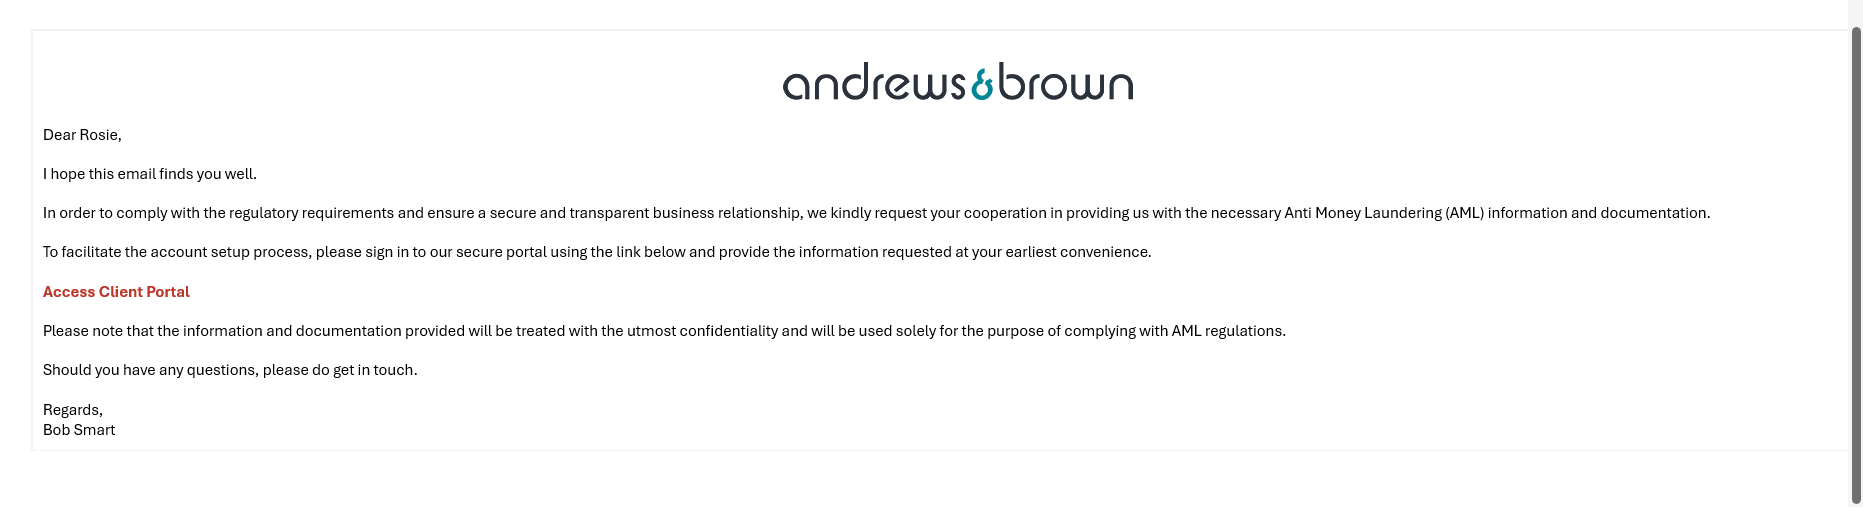
On the next screen you can choose who the sender is, this will be defaulted to you but can be changed if needs be. You can also choose the email template that will be sent to the client with the portal link and also see which email address and mobile number the 2FA code is going to. Tick the preview email before sending box to preview the email. Once you’re ready to send click Send, the client will then receive an email with a link to the client portal.
Client Portal
Your client will access the client portal via the link they will receive in the email.
In the Portal they will need to set a password and accept the terms and conditions.
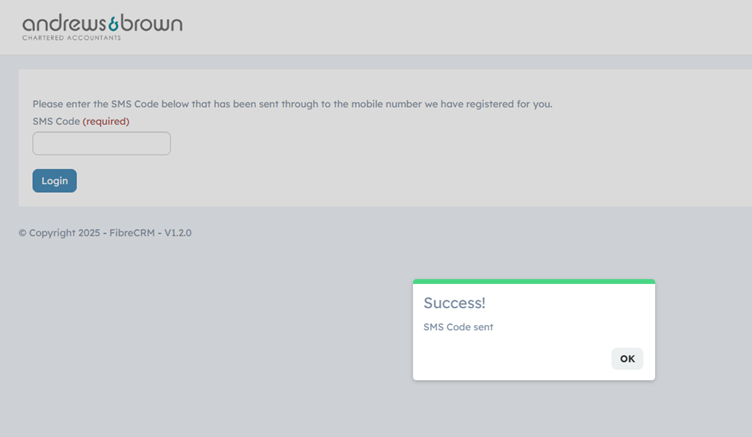
Once they’ve clicked save, they will receive a SMS with a 2FA code. They will need to enter this code into the box on screen and then click Login, they will then gain access to the portal.
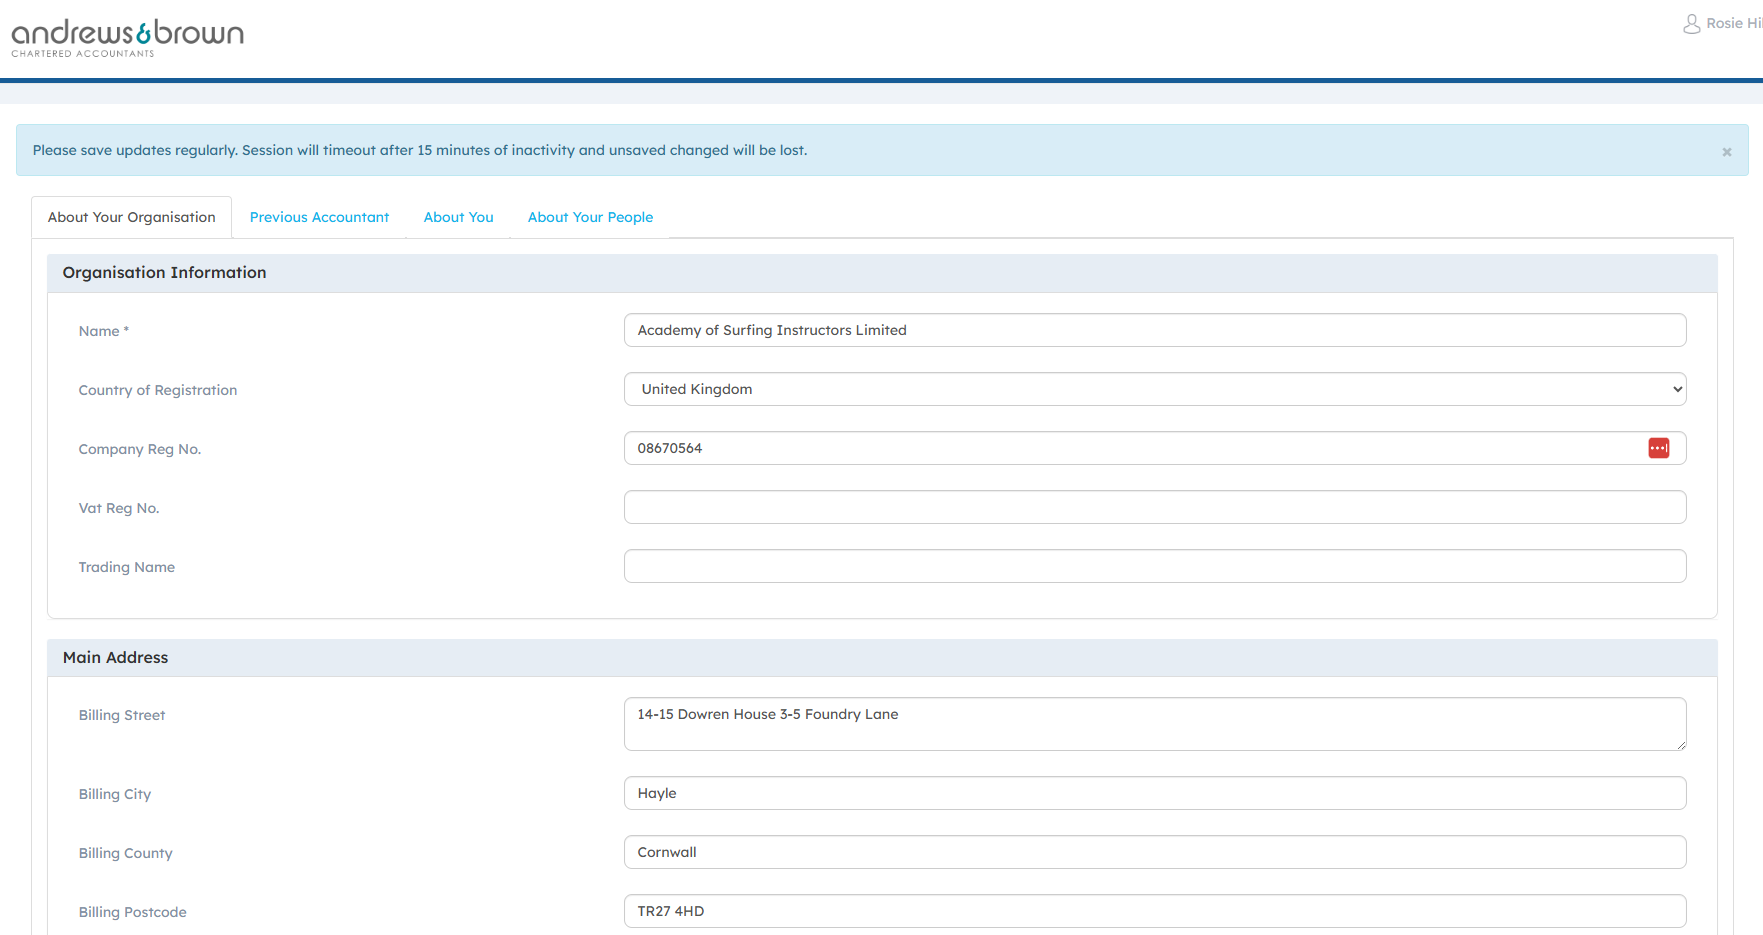
In the Client Portal they can enter all the required information. The fields you made mandatory will be marked with an Asterisk, and they will be required to populate before they can submit the form.
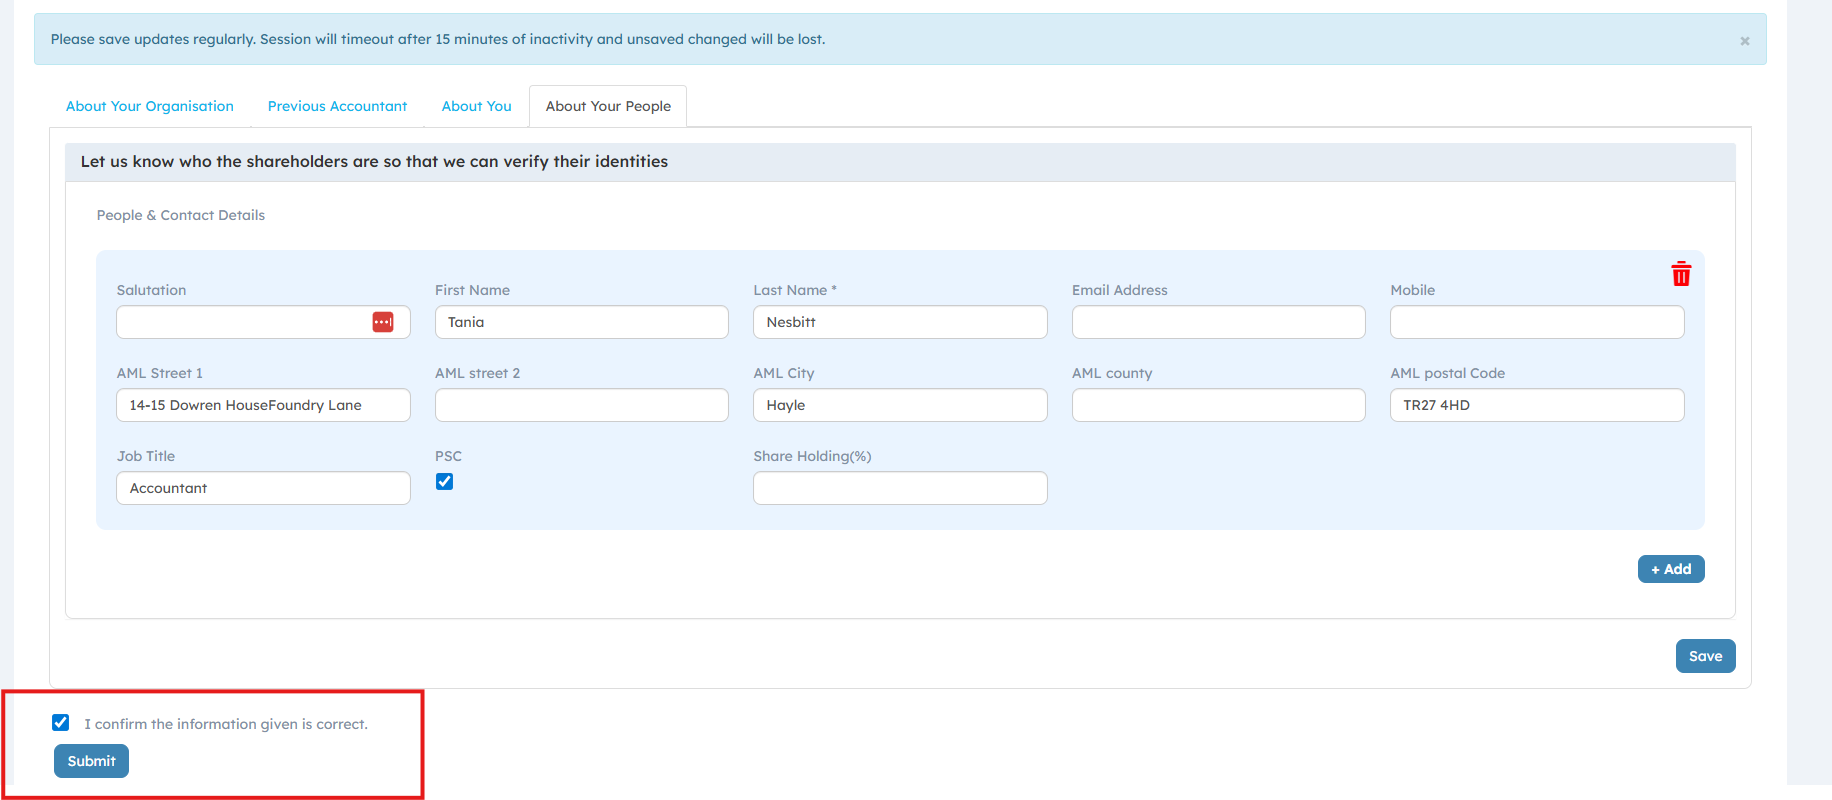
If you have multiple panels in your client information form then the client will have to go through each panel before they can submit. At the bottom of each panel they will find the Save and Next button – which will save their information and move them to the next panel.
On the final panel of the form in the portal the client will find the Submit button they will need to tick the I confirm the information is correct tick box and then it will allow them to submit.
Note 4: Your client does have the option to save their progress and access the portal at a later time. To login again they will enter their email address and password and then enter a new 2FA code that will be sent to them on logging in.
Once submitted they will get a success pop up, at this point
the access to the portal will close and will only be able to access again if
another request is sent to them.
Returned Client Information Request
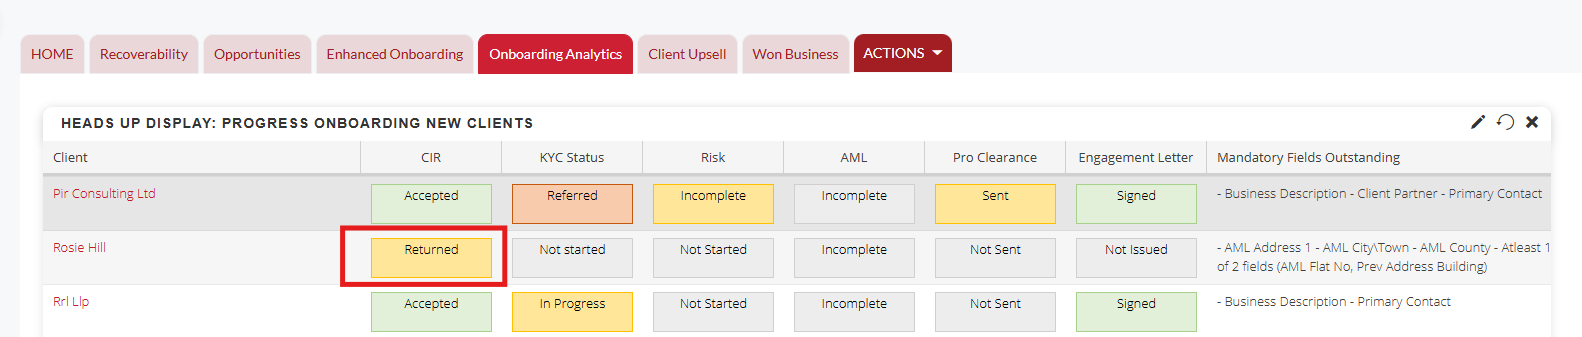
When the client has submitted their information the sender will receive an email notification. This can also be seen on the Client Information Request Dashlet and the Onboarding HUD on your dashboards.
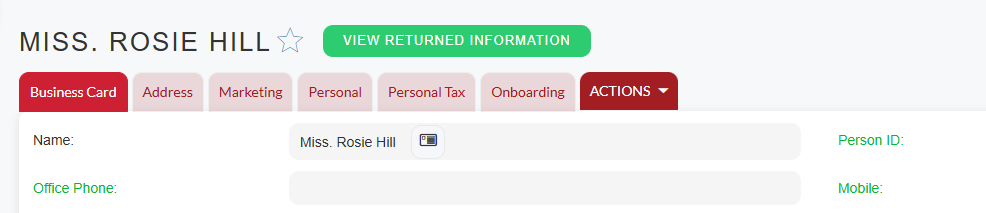
To review the returned information navigate to the Person record you sent the request to. At the top of the record you’ll see a View Returned Information banner. Click on the banner to review the information.
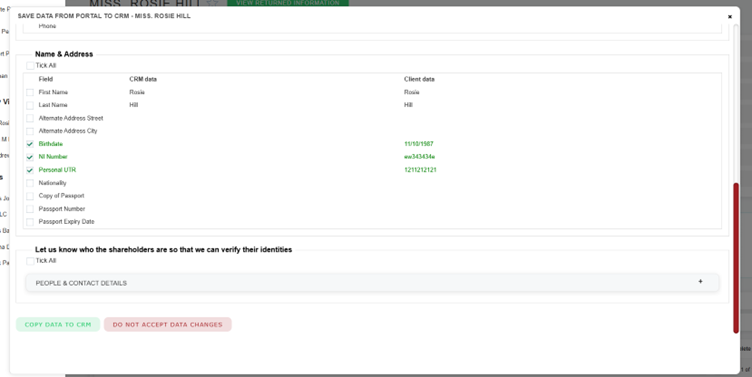
In the Pop Up you can review the information that was entered, new information will be highlighted in Green. You can untick any of the fields to stop them being added to the CRM. When ready select Copy Data to CRM.
If you want to reject all the data submitted by your client click Do Not Accept Data Changes. You will need to send another request if you’d like the client to submit anymore information.
Client Portal Audit Log
Once the data has been submitted. You can view what was submitted by the client in the Client Request Log at any time.
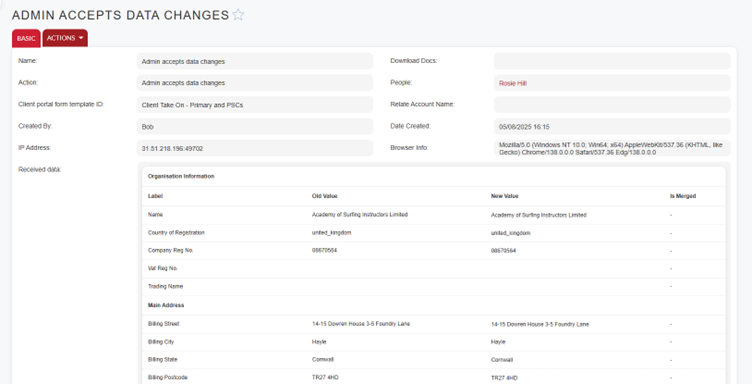
In the Client Information Request Log subpanel in the clients records you’ll see either Admin accepts Data Changes or Admin Rejects Data Changes depending if you’ve accepted the client submission or completely rejected the client submission. Click on the hyperlink name in the log. This will take you to the audit log of the client information request.
In the log it will tell you; what client form was used on the request, the IP address it was submitted from, the Action and who by and also the option to download the submitted documents (if accepted).
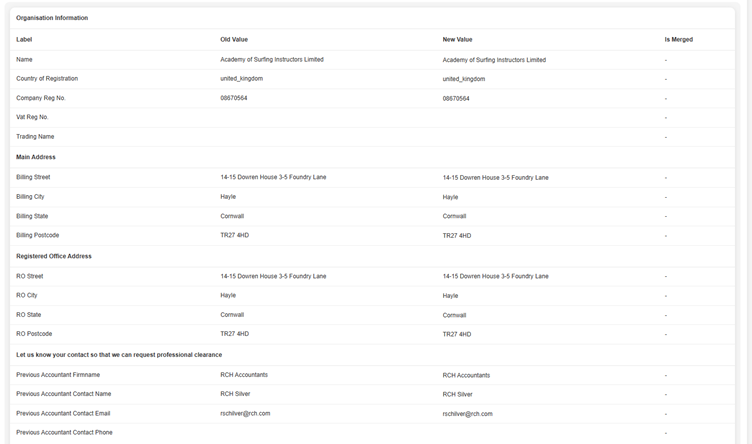
In the Received Data section you can see what was requested and what data was submitted. In the Old Value column it shows what information was held previously and in the New Value shows you what information the client has submitted. Just like the client portal review stage anything highlighted in green shows what the client has added or updated.
In the is Merged column you can see if the data has been accepted by the user. If the new value has been accepted and has updated the client you’ll see that it says Yes in green. If it’s been rejected and not updated the client it’ll show No in red.
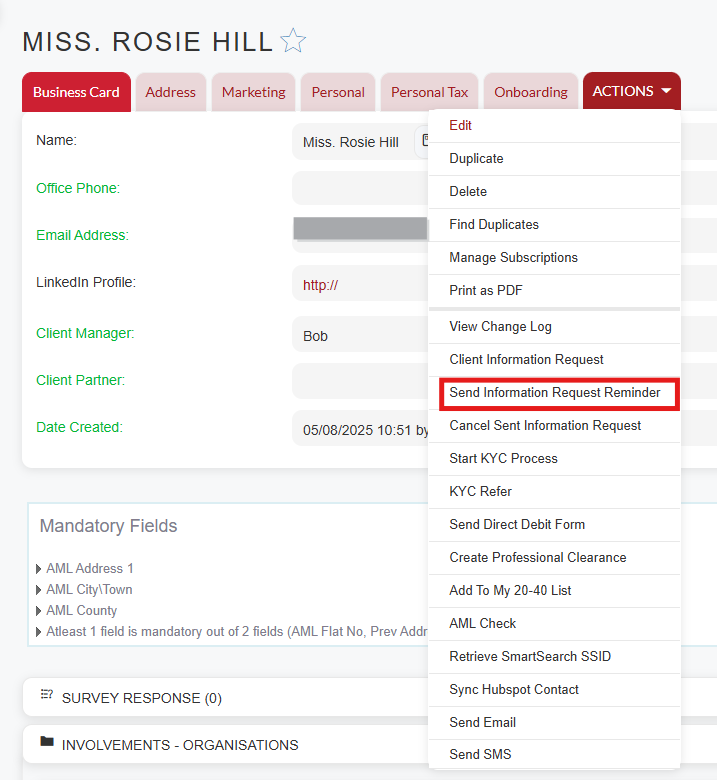
Client Information Request Reminders
Client Information Request reminders can be sent via the Person record the request has gone to.
In the Actions Menu select Send Information Request Reminder and a new link to the portal will be sent to the client.
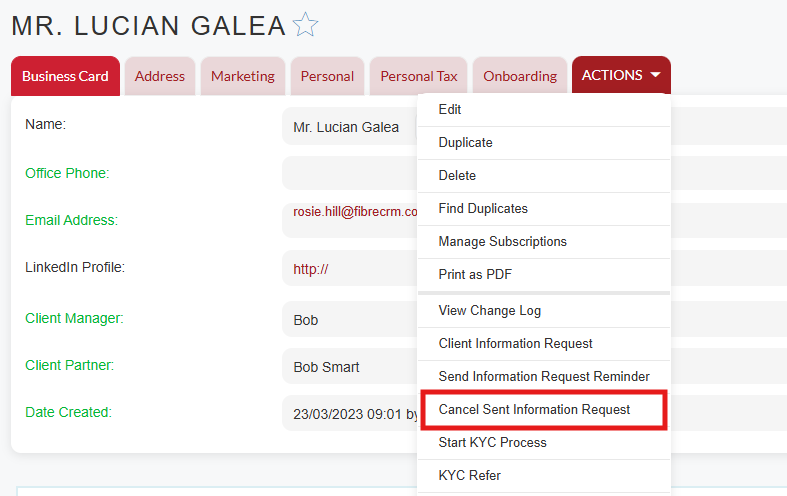
Cancelling a Client Information Request
If you need to cancel a Client Information Request navigate to the Person record the request was sent to. In Actions Menu select Cancel Client Information Request.
Cheat Sheet
To download the Sending a Client Information RequestCheat Sheetclick here
Table of Contents
We use cookies to assess how people are using our website, only necessary cookies are enabled. Cookie settingsACCEPTREJECT
Cookie Policy
Privacy Overview
This website uses cookies to improve your experience while you navigate through the website. Out of these cookies, the cookies that are categorized as necessary are stored on your browser as they are essential for the working of basic functionalities of the website. We also use third-party cookies that help us analyze and understand how you use this website. These cookies will be stored in your browser only with your consent. You also have the option to opt-out of these cookies. But opting out of some of these cookies may have an effect on your browsing experience.
Necessary cookies are absolutely essential for the website to function properly. This category only includes cookies that ensures basic functionalities and security features of the website. These cookies do not store any personal information.
Any cookies that may not be particularly necessary for the website to function and is used specifically to collect user personal data via analytics, ads, other embedded contents are termed as non-necessary cookies. It is mandatory to procure user consent prior to running these cookies on your website.
Functional cookies help to perform certain functionalities like sharing the content of the website on social media platforms, collect feedbacks, and other third-party features.
Performance cookies are used to understand and analyze the key performance indexes of the website which helps in delivering a better user experience for the visitors.
Analytical cookies are used to understand how visitors interact with the website. These cookies help provide information on metrics the number of visitors, bounce rate, traffic source, etc.
Advertisement cookies are used to provide visitors with relevant ads and marketing campaigns. These cookies track visitors across websites and collect information to provide customized ads.