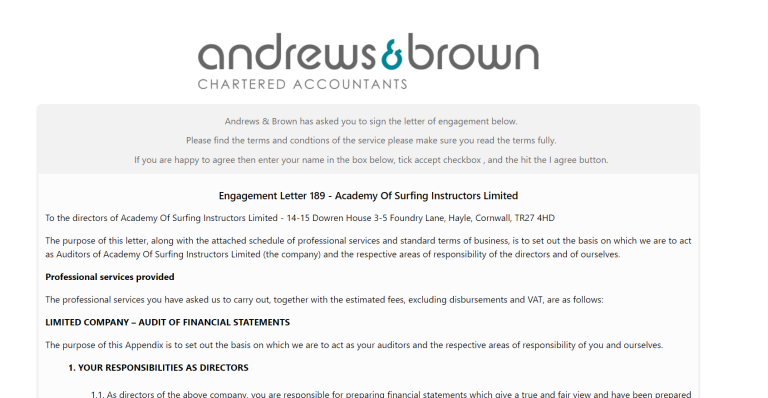
Engagement Letters in FibreCRM are generated from an Opportunity
record. As a user you are able to select what content goes into each clients
engagement letter depending on the clients entity and what products/services they
have chosen.
Once the engagement letter has been created approval
processes may be in place so the letter cannot be sent to the client without
approval first.
This user guide will be covering how to create your
engagement letter, how they approval processes work and, how to send your
engagement letters out for signature to clients using the engagement letter
portal.
Creating an Engagement Letter
To begin creating an Engagement Letter, you’ll first need to find the Opportunity record related to the client you are going to send it to. To do this navigate to the Person or Organisation record the opportunity is related to and then scroll down to the Opportunity Subpanel and select the Opportunity.
If you need to create an opportunity for your client in the subpanel click the Actions button and then click Create to create a new Opportunity. Further information on opportunities are available in this user guide: Creating an Opportunity – User Guide – FibreCRM Support Portal
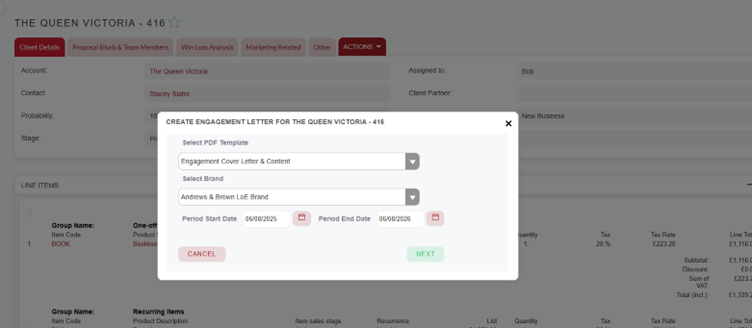
In the Opportunity navigate to the Actions Menu and in the drop down select Create Engagement Letter
A pop up box will then appear where you can choose a PDF Template for your engagement letter using the drop down. The PDF templates will be labelled according to your firms criteria so should know which be one to choose from the drop down.
Below you can also select the Branding that your client they will see in the engagement letter signing portal. You may have different branding options to choose from due to the different divisions in your firm to choose the correct one you need.
The period start and end dates will also generate you can change these using the date buttons if you need too. Once you’ve selected your PDF Template + Signing Portal branding click Next.
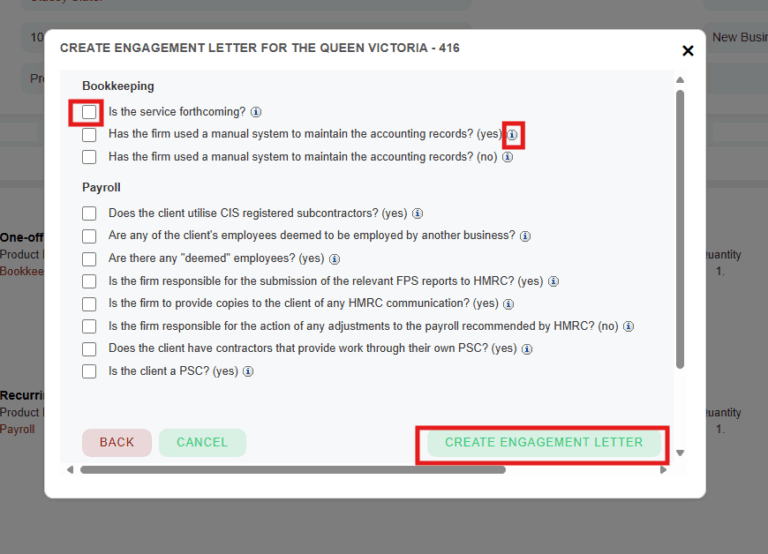
You’ll then be taken to a further screen where for each product you have selected in the Opportunity you can pick and choose which variable of the product text you’d like to include in the Engagement Letter. Use the Tickboxes to select which variable you would like to include.
If you’re not sure which to include use the i icon which will give you a description of what each variable contains.
Once you’ve selected your text to include click Create Engagement Letter. Your Engagement Letter record will now be created.
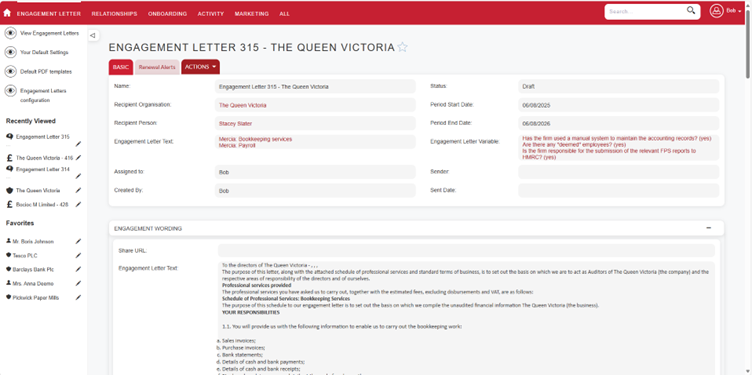
Engagement Letter Record
Now that the Engagement Letter has been created you can view and edit the Engagement Letter record. In the Basic tab you can view details about the Engagement Letter such as Recipient Person and Recipient Organisation. These will be pulled through automatically from the Person and Organisation contact in the Opportunity but can be changed when in Edit mode.
Other information you can view in the Basic tab includes fields such as; Sender, Assigned To, Sent Date, Accepted Date and Engagement Letter Text and Variables. If you need to make any changes or update this information click Edit in the Actions menu.
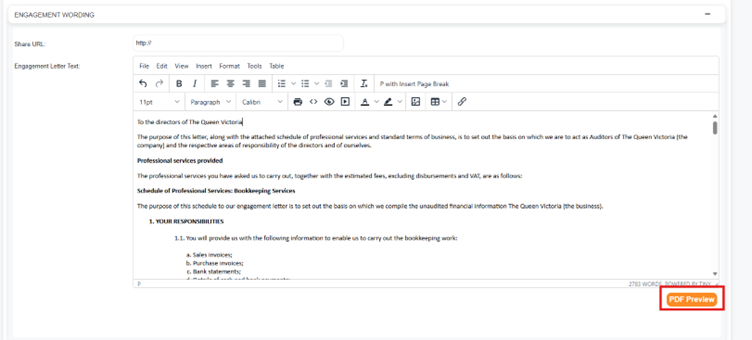
In the Text tab you’ll see the Engagement Letter. This is a text field so a user can go in and make any amendments if necessary when in Edit mode. To see view what the Engagement Letter will look like to your client click the PDF Preview button.
Engagement Letter Approval
There is an optional approval process for the Engagement Letters which your firm may or may not be using.
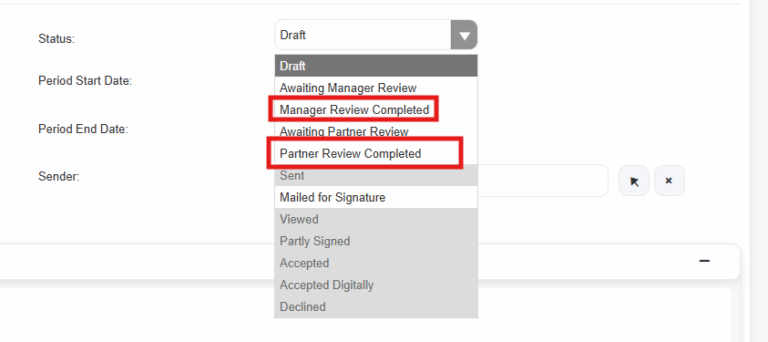
If the approval process is used when in edit mode, a user will go to the Status in the Engagement Letter record and from the drop down select Awaiting Partner/Manager Review and then click Save and Close. This will trigger an email notification for the Partner/Manager to into the record and approve the letter.
A task in the engagement letter record can also be generated where the approval task is assigned to the Partner/Manager. This can be used as an Audit Log.
Once the Partner/Manager has reviewed and approved the letter they can then update the status to Partner/Manager Review Completed and clicking Save & Close. This will the trigger a notification back to the user who requested the approval, letting them know the engagement letter is ready to send.
Sending an Engagement Letter
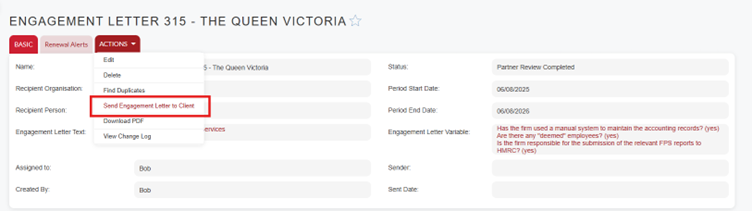
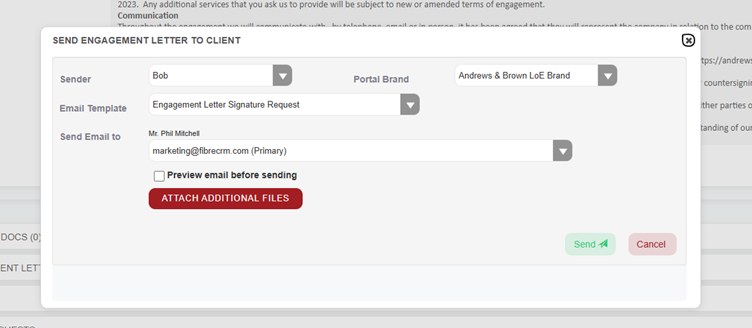
Once the Engagement Letter is ready to send you can do by selecting Send Engagement Letter to Client in the Actions Menu of the Engagement Letter record.
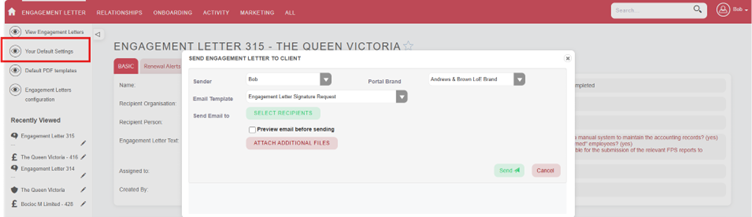
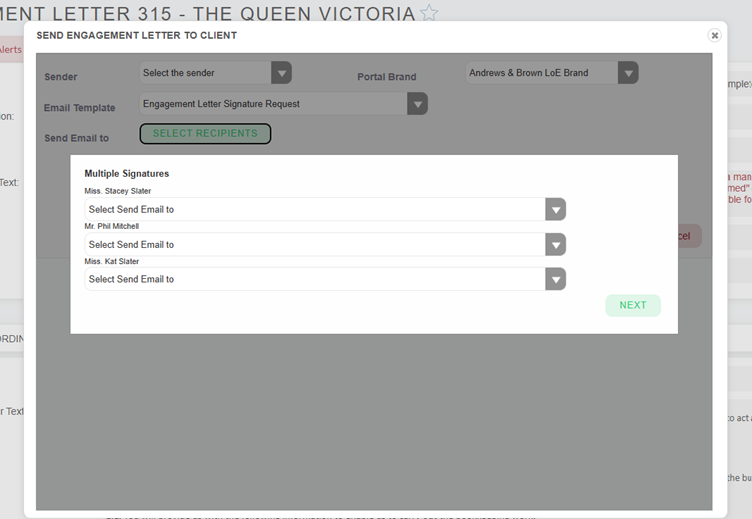
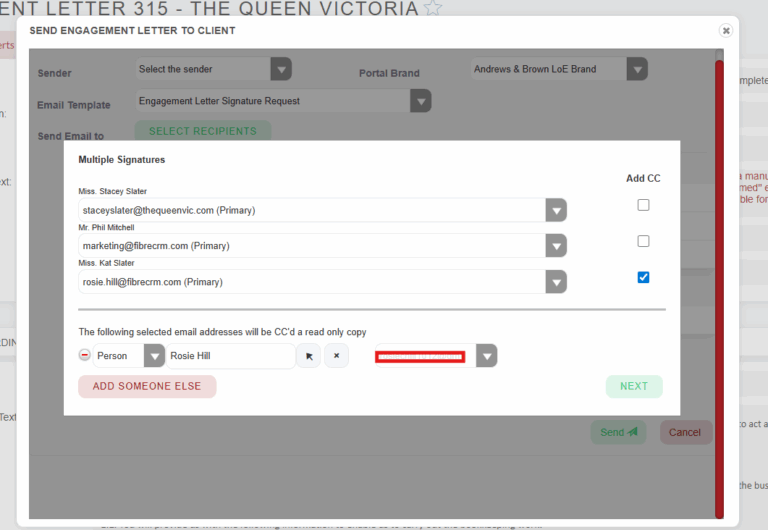
In the Pop Up box you can select the Sender (if you haven’t done so in the record already) and the Portal Brand using the respective drop downs. In the Email Template drop down you can select the email that the recipients will receive with a link to the Engagement Letter – you have may have this defaulted to populate automatically by selecting the email template in the Your Default Settings.
If you click the Select Recipients button a pop up box will appear listing all the involvements of the record. You can send to multiple people for signing so you can pick and choose who will be requested to sign the Engagement Letter. To pick use each individual dropdown and select their Email Address.
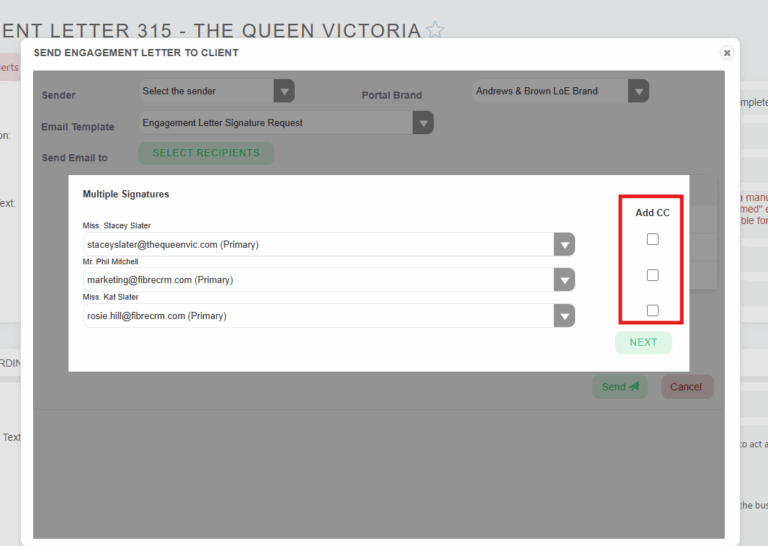
You also have the option to copy in Users such as the client partner or other People records so they view a copy of the engagement letter for the client.
Once an email for a recipient has been selected you’ll see the Add CC option. Here you can select which recipients request you would like them copied into.
Note: You can only select one recipients request as the Engagement Letter will be the same for all requests.
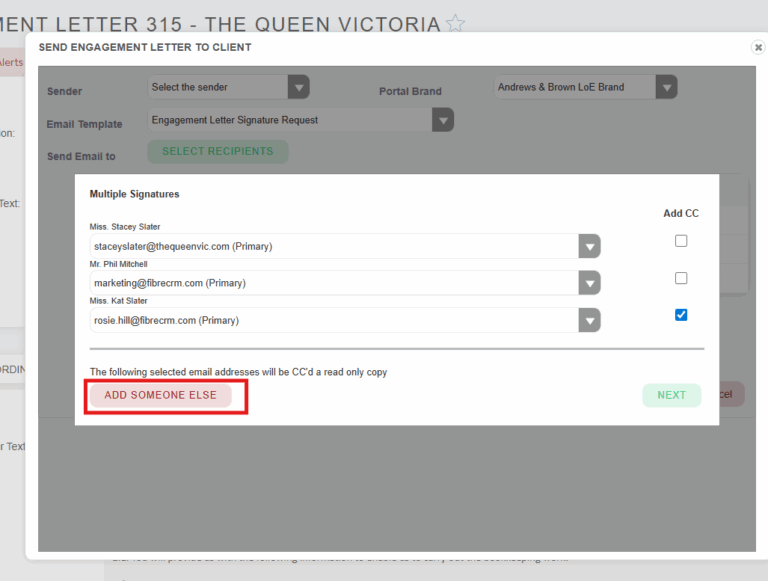
Once selected a new area will appear where you can select which People or Users needs to be copied in. Click the Add Someone Else option to add.
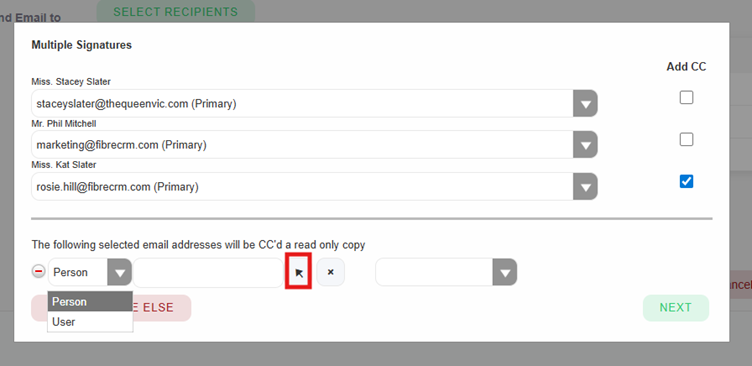
In the drop down select whether it’s a Person/User and then use the select arrow the individual.
The drop down on the right hand side allows you to select the correct email address if the record has more than one email address related to it.
Repeat the process to copy in additional individuals and the once done click Next.
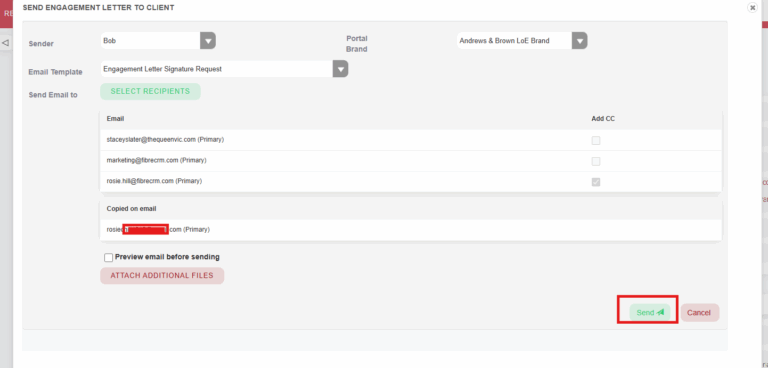
Back to the sending screen, use the preview email before sending tick box to view the email the recipients are going to receive. You can edit the text in the template if you need to. You will also see what individuals are being sent a request for signature and what emails are copied into the request as well. When you’re ready to send click Send.
Once sent, the status of the Engagement Letter will automatically be updated to Sent.
Engagement Letter Signing
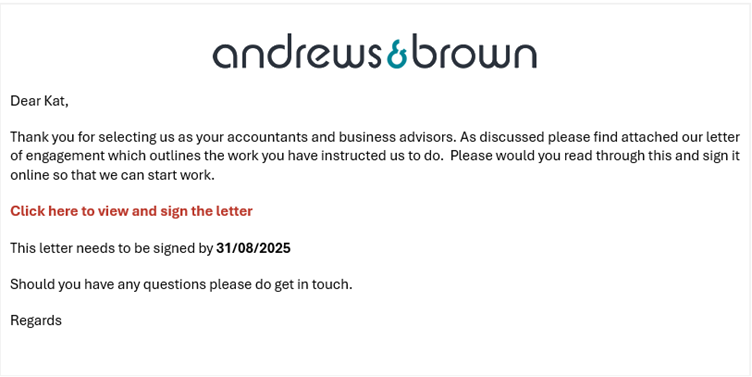
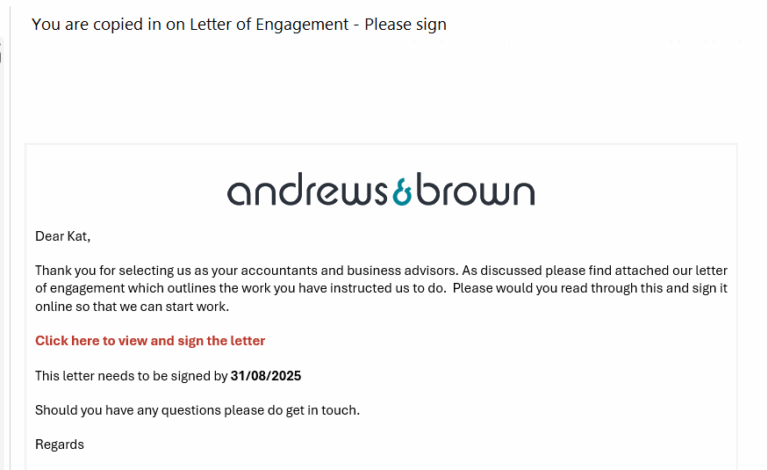
Once you’ve sent an Engagement Letter from the system each person you’ve sent it to for signature will receive an email with a link to the signing portal.
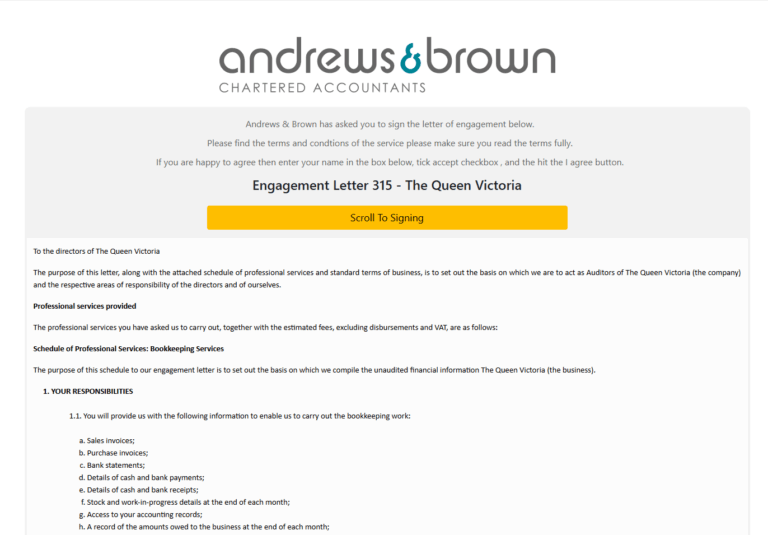
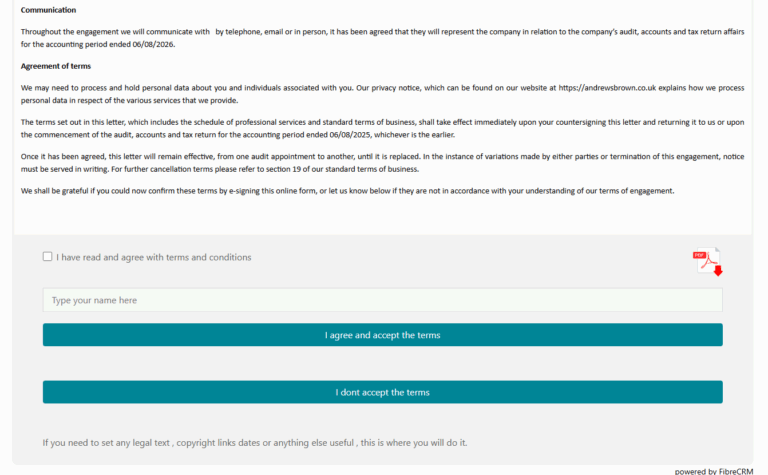
When they click the link they’ll be able to view the Engagement Letter and then at the bottom of the letter sign and accept or decline.
If a recipient declines the Engagement Letter request a pop up will appear asking them to give details as to why. This will feedback into the system and also the sender will be notified.
Once all required signees have signed the Engagement Letter, they will receive an email along with the sender with a PDF copy of the engagement letter including all the required signatures on it.
Engagement Letter Viewing if Copied In
For anyone that you have copied in to view the Engagement Letter they will receive an email with a link to the portal. In the subject it will say they have been copied into the engagement letter.
When they view the Engagement Letter in the portal the signing capability will have been removed so they will not have the ability to sign. They can download a PDF copy of the Engagement Letter from the portal by selecting the Download PDF Button at the bottom of the portal.
URL Expiry Date
A clients access to the portal for signing is set by the URL Expiry Date field. You can easily change the date it expires by selecting the calendar date button. Select the date you require – can be both extended or decreased and then click Save and Close.
Engagement Letter Log, EL Request and EL Recipient Subpanels
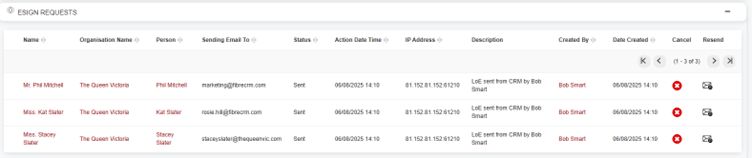
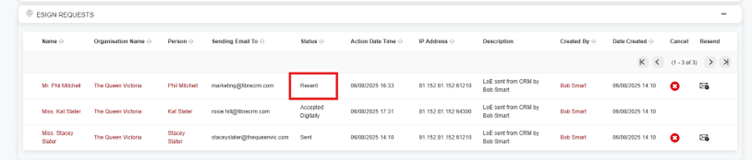
For each person you have sent the Engagement Letter to you can track the status of each signee in the Engagement Letter Request subpanel. This will show the latest action by the requested signee such as if they’ve View/Accepted or still not accessed the Engagement Letter. This will also be time stamped so you can see when the latest action occurred.
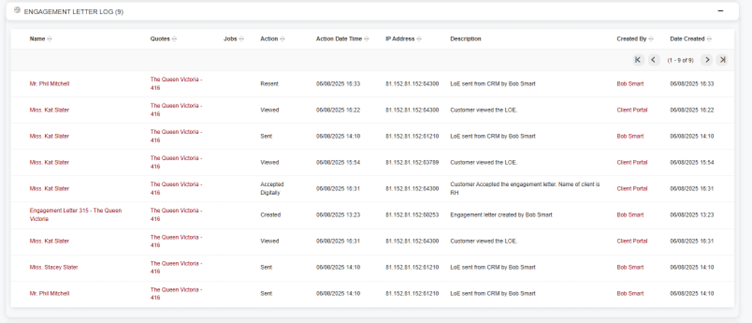
In the Engagement Letter Log subpanel this will show every action that occurs by each recipient. For each action that is taken a new line will appear so you can see every time a client has viewed the engagement letter and gives you visibility.
In the Engagement Letter Recipients subpanel this will show all the individuals that have been copied in on an engagement letter.
Resending an Engagement Letter
If you need to resend an Engagement Letter to an individual you can select the resend button in the Engagement Letter Request Subpanel.
A pop up will then appear where you review the information (and change if needs be) and also have the ability to change the email address its going to. Once you’re ready to resend select the send button.
Once the engagement letter has been resent the status in the Engagement Letter Request tab will be sent to Resent.
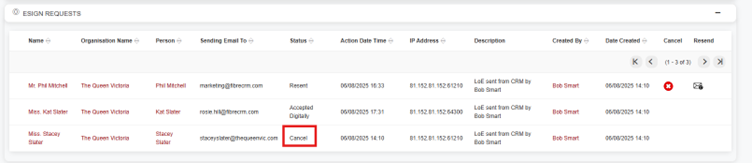
Cancelling an Engagement Letter Request
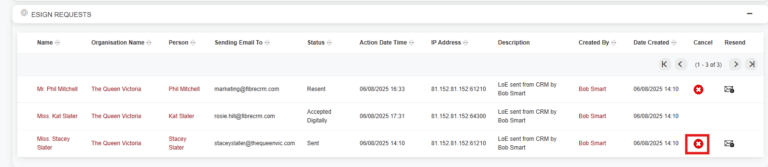
If you need to cancel an Engagement Letter, navigate to the Engagement Letter Request subpanel and select the Cancel Button.
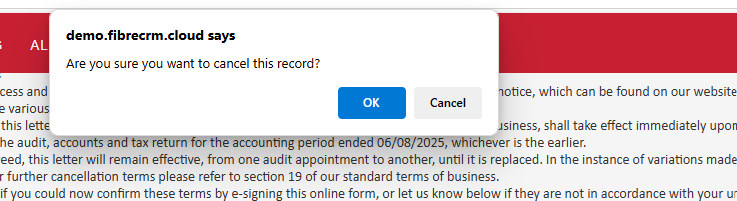
A pop up will appear asking if you’d like to cancel the record, click Ok.
The request will be then be cancelled and the status of that request will update to Cancelled.
Engagement Letter Status
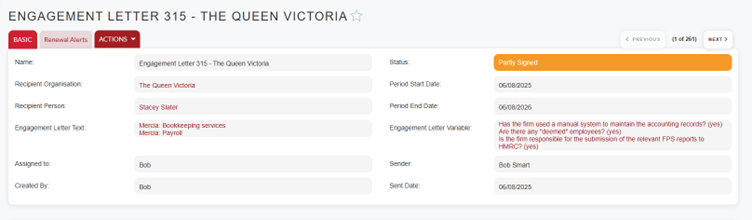
If you’ve sent the Engagement Letter to multiple recipients and some have signed and others haven’t the Engagement Letter status will be set to Partially Signed. Use the Engagement Letter Log and Engagement Letter Request subpanels to track the actions.
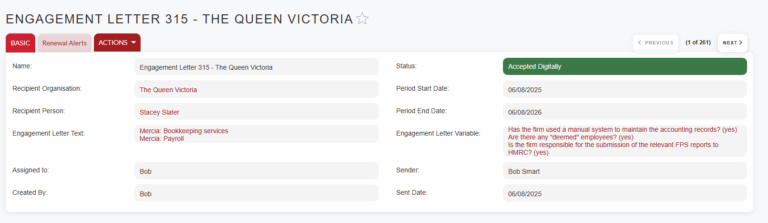
Once the engagement letter has been signed by all that are required the status of Engagement Letter record will automatically update to Accepted Digitally.
A signed copy of the Engagement Letter will be able to be seen in the Final Accepted Engagement Letter Logged.
If an Engagement Letter has been declined that status will update to Declined the reason will be sent to the sender in an email and also updated in the declined reason on the final log.
Engagement Letter Reminders
If a client has an outstanding engagement letter that needs signing, you can set up workflows to set up automatic reminders.
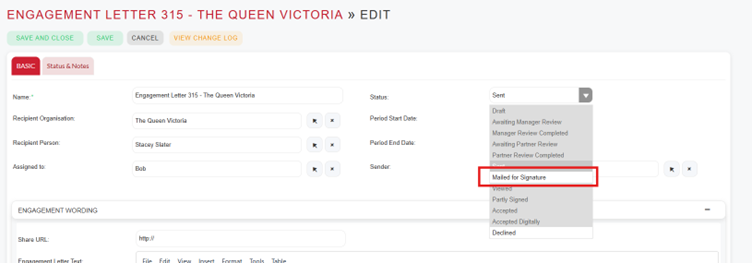
Mailed For Signature
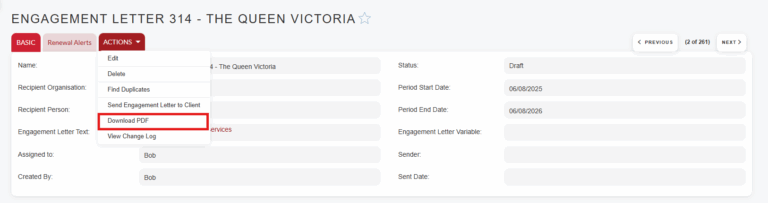
If you need to send a physical copy to a client use the Download PDF tool in the Actions Menu.
You can also update the status to Mailed for Signature and once signed and received back update the status to Accepted. If the client Declines the Engagement Letter update the status to Declined.
Table of Contents
We use cookies to assess how people are using our website, only necessary cookies are enabled. Cookie settingsACCEPTREJECT
Cookie Policy
Privacy Overview
This website uses cookies to improve your experience while you navigate through the website. Out of these cookies, the cookies that are categorized as necessary are stored on your browser as they are essential for the working of basic functionalities of the website. We also use third-party cookies that help us analyze and understand how you use this website. These cookies will be stored in your browser only with your consent. You also have the option to opt-out of these cookies. But opting out of some of these cookies may have an effect on your browsing experience.
Necessary cookies are absolutely essential for the website to function properly. This category only includes cookies that ensures basic functionalities and security features of the website. These cookies do not store any personal information.
Any cookies that may not be particularly necessary for the website to function and is used specifically to collect user personal data via analytics, ads, other embedded contents are termed as non-necessary cookies. It is mandatory to procure user consent prior to running these cookies on your website.
Functional cookies help to perform certain functionalities like sharing the content of the website on social media platforms, collect feedbacks, and other third-party features.
Performance cookies are used to understand and analyze the key performance indexes of the website which helps in delivering a better user experience for the visitors.
Analytical cookies are used to understand how visitors interact with the website. These cookies help provide information on metrics the number of visitors, bounce rate, traffic source, etc.
Advertisement cookies are used to provide visitors with relevant ads and marketing campaigns. These cookies track visitors across websites and collect information to provide customized ads.