KYC + Risk Assessment
Introduction
With the Onboarding module in FibreCRM you can easily conduct your KYC and risk assessments. The process can be conducted for both Organisations and each individual Person records involved with that Organisation. Within the Onboarding module in CRM you can enter all the relevant information to complete the KYC Form.
KYC forms contain different sections (some which can be included or excluded by an Admin) which the relevant user will complete. Once the form has been completed, it can be signed off or referred to members of your risk committee. The KYC form can be completed once it has been signed off, it can then be downloaded to your desktop so you can store in your document management.
Note this document covers all sections that can be included in a KYC form, so not all sections may be relevant to you. Admin users can select what sections are in a KYC form and choose what fields are available in certain ones too. For more information on this please see our user guide:
KYC Form for an Organisation
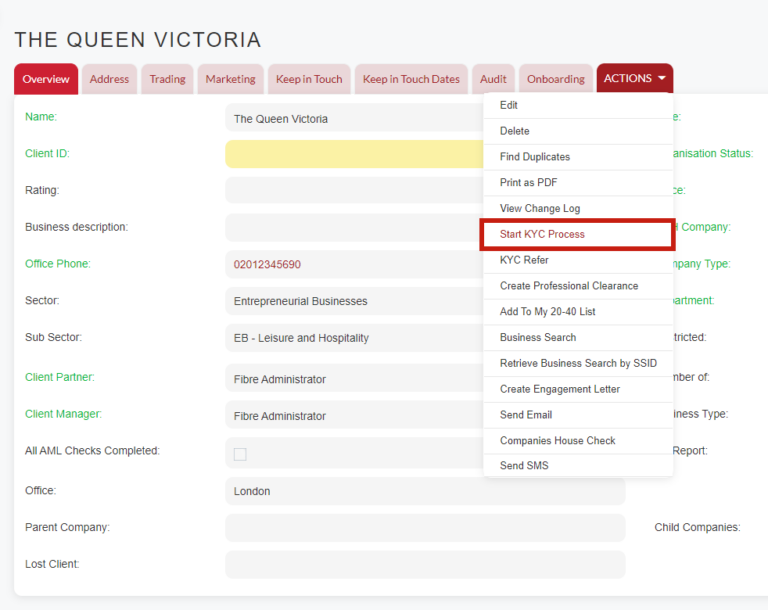
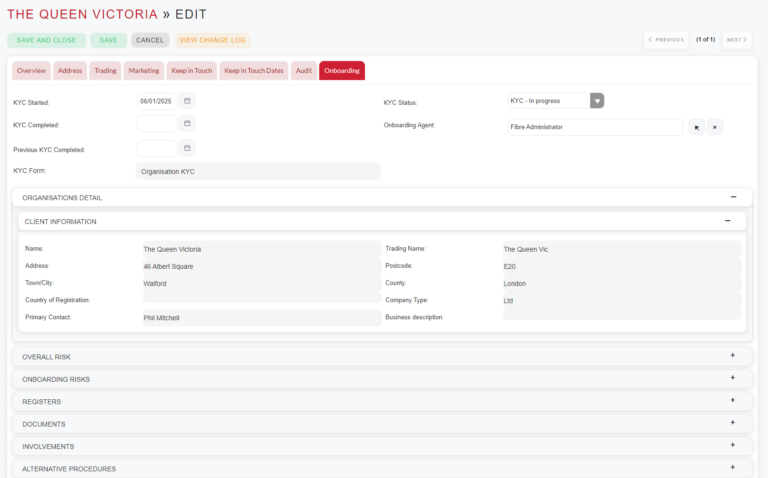
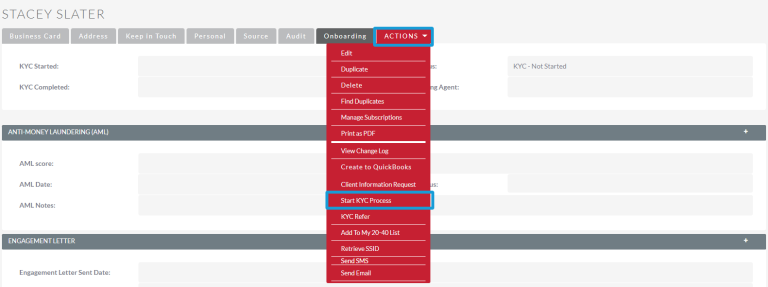
To start a KYC check on an Organisation, first navigate to the Organisation record you’d like to complete the check on and in the Actions Menu select Start KYC Process.
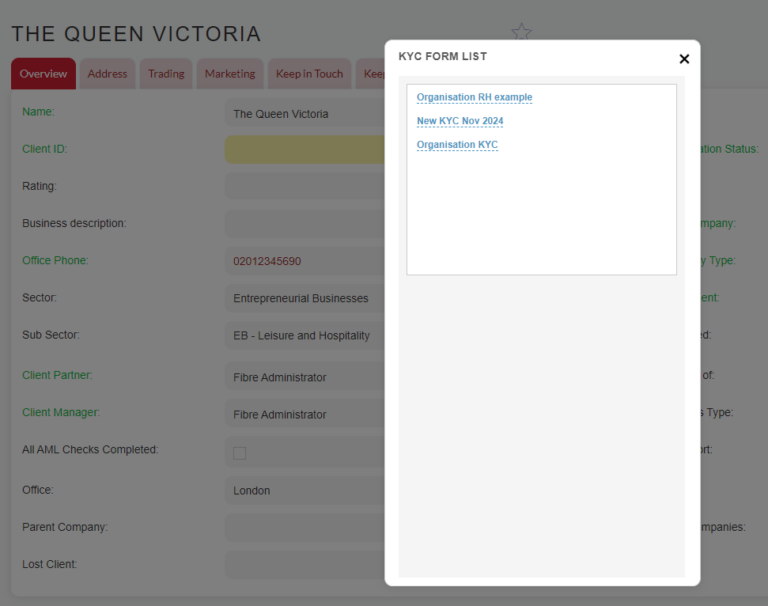
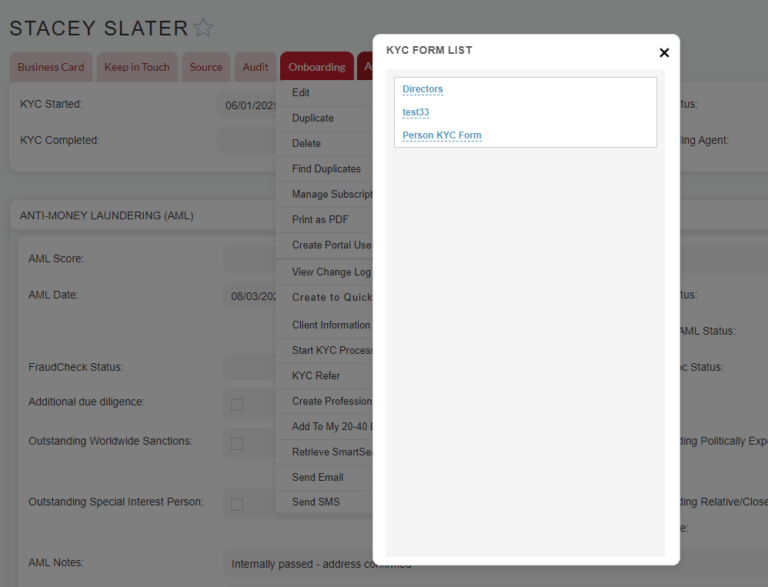
The KYC Form List pop up box will then appear which is where you can select the relevant KYC form for the Organisation. Note: If you only have one KYC Form you will not need to select the form and it will automatically load into the Onboarding tab.
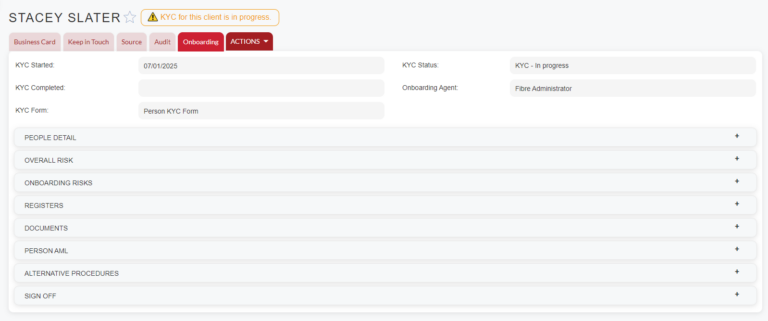
The KYC banner at the top of the record will change to KYC – In Progress when the record is in view mode.
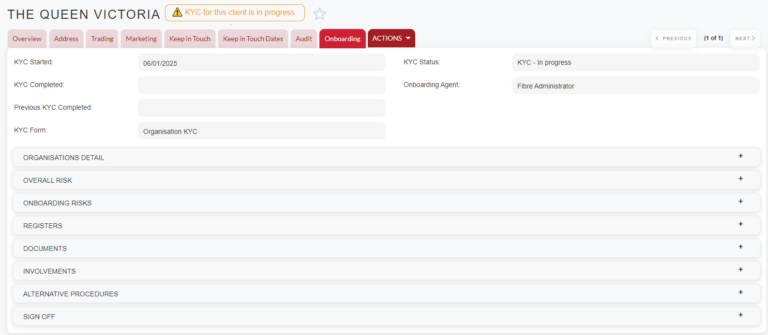
The KYC form you selected will then become the first section you see in the Onboarding Tab in the record. The KYC form is split into sections and as mentioned previously the sections you see will be dependent on what has been created specifically for your firm.
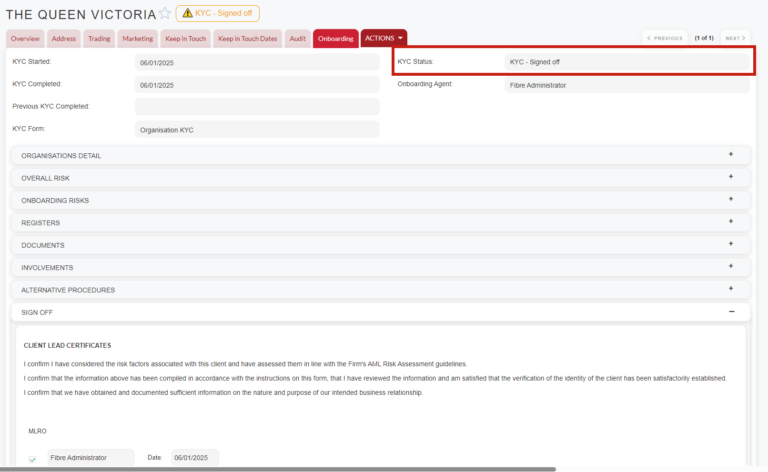
At the top of the KYC section is KYC information such as KYC Start Date, Status, Completed Date, KYC Form selected and Onboarding Agent.
The following sections below are available to be part of your Organisation KYC form and can be completed by a User. The form does not have to be completed all in one go a user can save the form and come back to it later by selecting the Edit options from the Actions Menu.
Organisation Details
This section is a mandatory part of your form.
In the Organisation Details section you will find selected fields containing information about the Organisation. These fields are already available in the Organisation record and pull across from the original field in the record. The Organisation Detail could contain any fields you currently have in an Organisation record in your CRM. If any of the fields in the Organisation Detail have no information, find the field in the Organisation record and fill the field in with the information that is missing. It will then come through to the relevant field in the section.
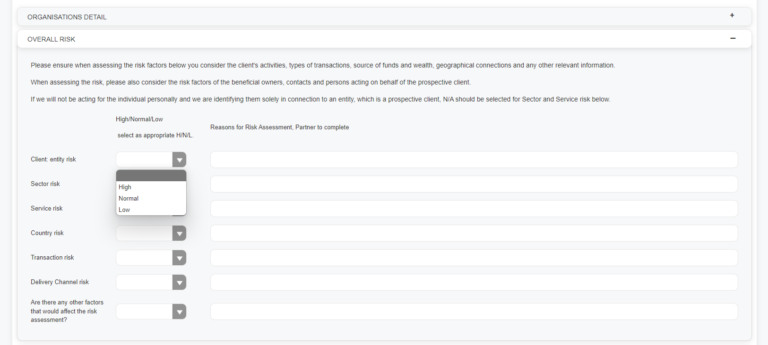
Overall Risk
This section is a optional part of the form and may not be part of your KYC form.
The Overall Risks section you can use to complete a risk assessment, in the section there are multiple risks such as Client Entity, Sector, Service and others that you can rank either Low, Medium/Normal or High using the drop down menu. Next to each drop down field is a text field where you can fill in more information of the risk if required.
Onboarding Risk
This section is a optional part of the form and may not be part of your KYC form.
In the Onboarding Risk section, you can complete Onboarding Forms as part of your risk assessment. The forms that need to be completed for your KYC form will be available to complete in the listed form section. These forms will have been set by your firms Admin when creating the KYC Form. To complete the form click the hyperlinked name.

You can add and complete any extra Onboarding Forms that have been created using the Pick Signoff OB Form button, once completed the Onboarding Form will be added to the KYC form. You can select as many extra onboarding forms as you require to be added to the KYC form.
For more information on Onboarding Forms please see our user guide: Onboarding Forms User Guide – FibreCRM Support Portal
An onboarding form can be edited (for example when a partner is reviewing and would like to change a response) once it has been Saved and Completed as long as the KYC has not been signed off. To make any changes click into the form make the changes and then click Save & Complete again this will update the Date modified information and the form will be locked again. If you are using the 3 tiered signing if your role has signed off their part of the KYC then you will not be able to make any changes however the roles that will sign off after you will still be able to edit until they sign off.
On the left hand side in the subpanel you will see a Green, Amber or Red icon next to the risk form once the Overall Risk section on the form has been completed. This relates to the answer that was given in the risk form in the overall risk section. Green = Low, Amber = Medium/Normal and Red = High. Please note if that section has been removed in any of the risk forms that are to completed it won’t show.
Once completed, information about who completed the form and when it was completed will be available to view in the listed form section.
To remove a completed onboarding form click the X in the Action column.

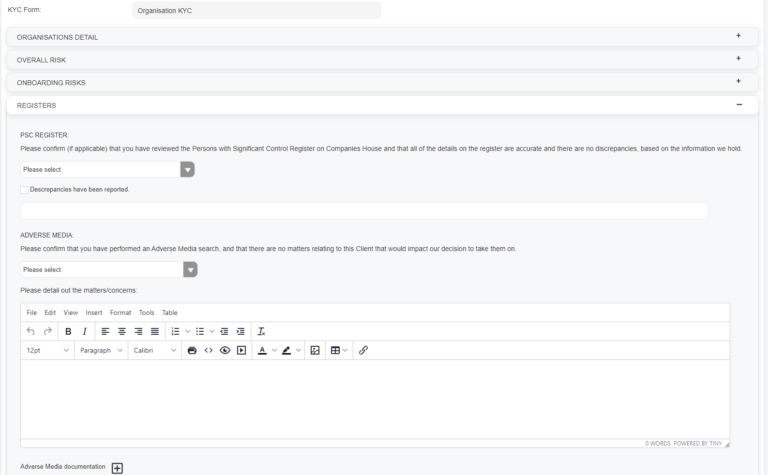
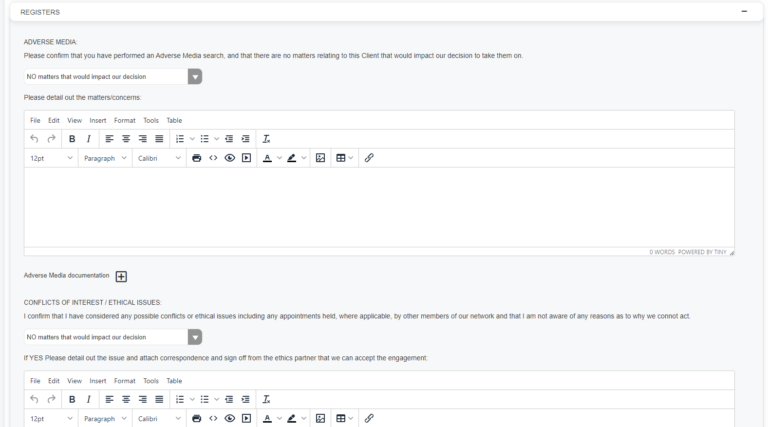
Registers
This section is a optional part of the form and may not be part of your KYC form.
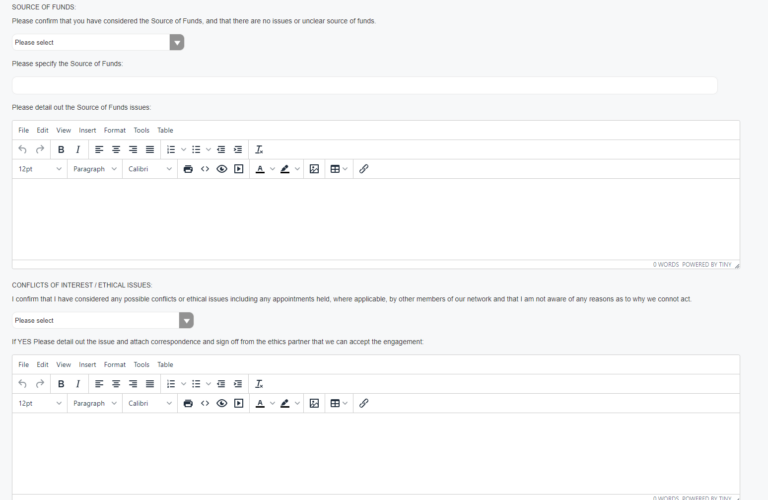
The Registers section is where you can enter information such PSC Register, Adverse Media, Source of Funds and Conflicts of Interests/Ethical Issues sections. You can select if any of these are required using the drop down menu, enter more information in the text boxes for each heading and upload any supporting documentation if required using the + button.
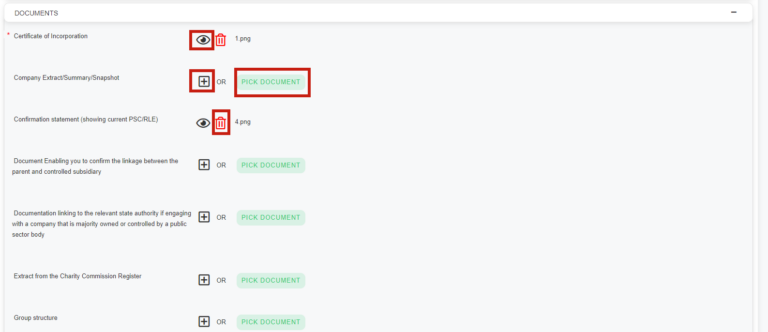
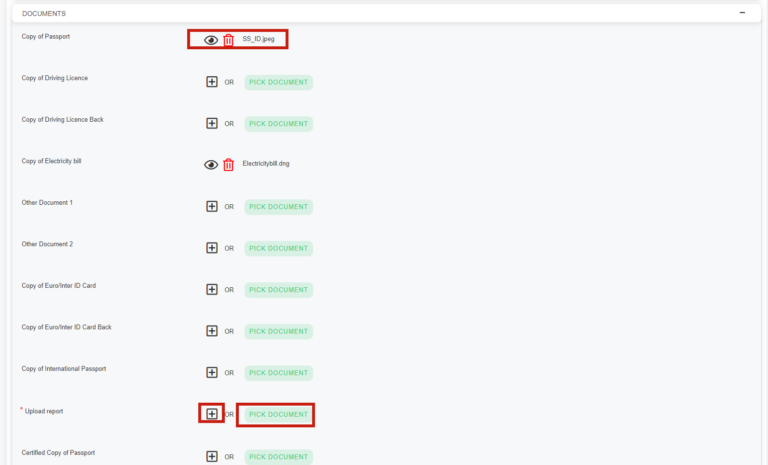
Documents
This section is a optional part of the form and may not be part of your KYC form.
In the Documents you can add/uploaded relevant documents containing information about the company for your KYC form such as Group Structure, Certificate of Incorporation, Confirmation Statement, Register of Directors and more.
The Documents listed that you will need to add to the KYC form will have been selected by an Admin of your CRM when creating the KYC form.
If you have imported the documents via Companies House using the Company House Importer these documents will already be added to view in the this section. For more information on the Company House Importer please see our user guide here: Companies House Importer – User Guide – FibreCRM Support Portal
If you haven’t used the Companies House Importer you can upload a document using the + button. You’ll need to upload the documents individually against each document heading that is listed.
If there are documents in the system already related to the client whether they have been collected via the client information request or added manually into the system you can select them to be added. Certain documents will be automatically pulled in if they match the listed documents.
Any document that is mandatory will have a red * next to it, a document will need to be added against it before the KYC can be signed off.
To view a document select the View icon, if you need to remove a document select the red Delete button.
Involvements
This section is a optional part of the form and may not be part of your KYC form.
The Involvements section is where you can list People or Organisations that are Beneficial Owners, Directors, Relevant Individuals or Organisations to that client that will need to be listed for the KYC and may require an AML search or their own KYC depending on the risk.
Depending on your settings these records may be listed automatically in the involvements section. To add any other involvements select the Add Person or Add Organisation button.

Once selected the a pop up screen will appear which will list all the Person or Organisation involvements that currently exist on the Organisation record. Select which record you’d like to add by clicking Select in the Action column. If you click on a name instead of the select button it will take you to the specific record in CRM. If you need to create a record to add as an involvement click the Add Person/Add Organisation button.

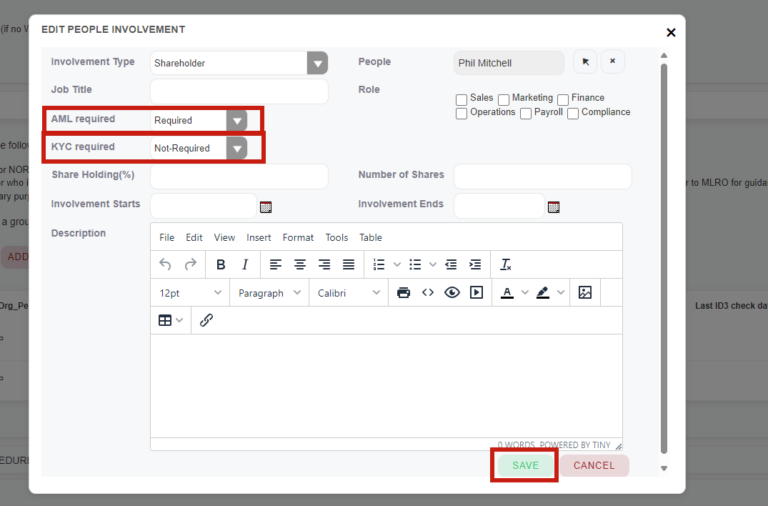
Once an involvement has been selected you will be taken to the Edit Involvement pop up can where can enter information about the involvement in relation to the KYC such as; Share Holding % and Number of Shares. Information that has already been added to involvement previously will already be there to view, this information can be updated if necessary.
For a Person involvement you can choose whether an AML is required by using the drop down menu in the AML Required field. Note: If an AML for the Person is required you will need to complete this before signing off the KYC form, for more information on how to conduct an AML check in CRM please see our user guide: AML Checks in CRM using Smart Search Integration – User Guide – FibreCRM Support Portal or AML Searches with Credit Safe Integration – User Guide – FibreCRM Support Portal
You also have the option here to select whether a KYC is required for the involvement using the KYC Required drop down. The dropdown will default to Not Required. However if you set it to Required you will need to complete a KYC form and sign off that form in that record before sign off can be completed for the Organisation KYC.
In the involvement section you will see information that you have filled in about the involvement such as; Name, Organisation or Person, Involvement Type, AML Required, AML Status, KYC Required, KYC Status, Shareholding and Number of Shares. The information on your system that you see may be slightly different depending on what has been set up for your firm but will include relevant information you need about each involvement.
In the AML Required field you will be able to conduct an AML search by clicking on Required. The person must have the consent check given tickbox ticked for you to be able to conduct the AML search, required will be highlighted in red to show this. Once clicked you’ll be taken to AML search pop up where you can conduct your AML search.
You can Edit or Delete the involvement in the Action column.

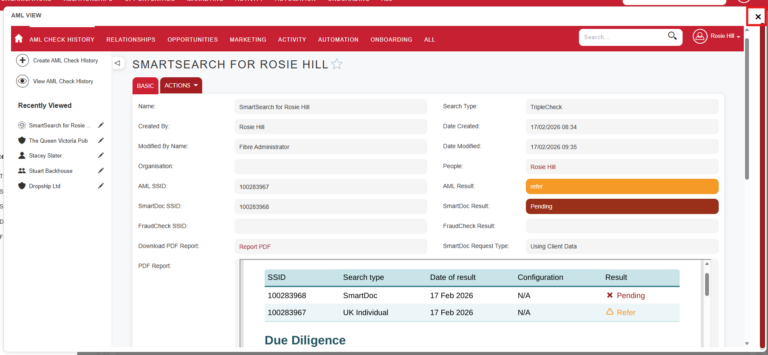
Once an AML check has been completed, you can view the report by clicking the result in the AML Status column. The result will be underlined when an AML check has been completed.
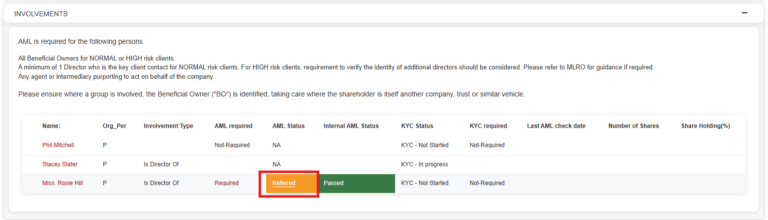
Clicking the result will open the AML View window where you can review the search that has been conducted, whether through CreditSafe or SmartSearch, and view the report. To return to the KYC form, click Close.
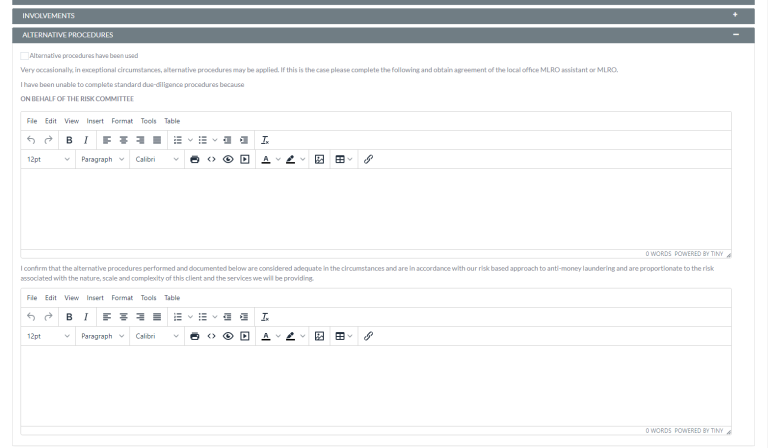
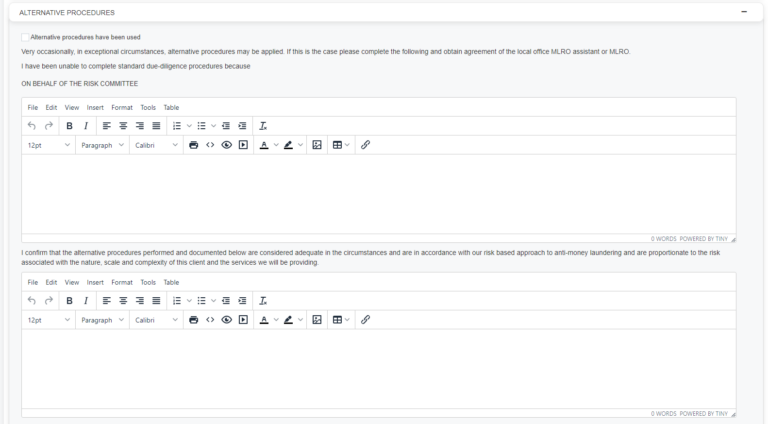
Alternative Procedures
This section is a optional part of your form and may
not be part of your KYC form.
In the Alternative Procedures section you can fill in
if alternative procedures have been used. What determines an alternative
procedure should be agreed in your firm. In the section you have a tick box you can use
to confirm if any alternative procedures have been used. There are also two
text fields one which you can use to give reasons as to why standard due-diligence
procedures haven’t been used and the other to document what alternative
procedures have been used to ensure compliance.
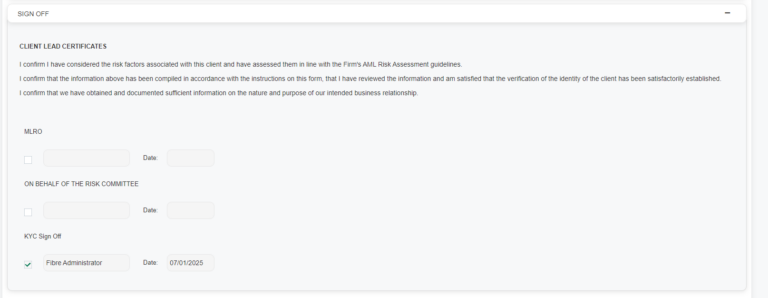
Sign Off
This section is a mandatory part of your form.
Once you’ve completed all the sections on your KYC form, it will be ready for Sign Off. Each KYC Form will need to be signed off by either a Partner or a User in the KYC Sign Off Role. For more information contact your CRM/Onboarding Lead for you specific sign off process.
A Client Partner must be assigned to the Organisation record before any sign off takes place.
To sign off a form the user will need to just click the tick box next to the KYC Sign Off field. Once clicked the field will automatically populate with their name and date of signing, they can then click Save & Close.
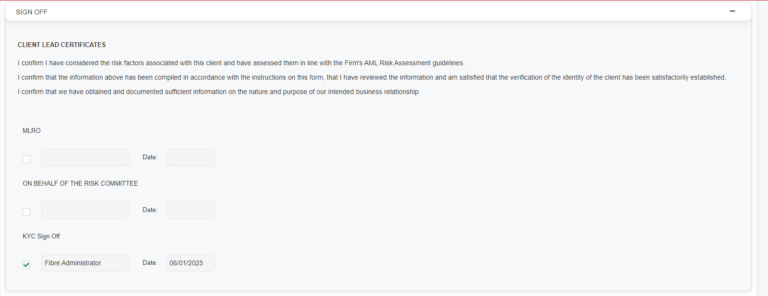
If the Organisation is deemed to be a higher risk or needs to have more than a partner sign off you can also get a MLRO and Risk Committee Sign Off. Users will need to be assigned the MLRO or Risk Committee user role. For information about user roles please see our user guide: Security Groups & Roles – User Guide – FibreCRM Support Portal. The form can be referred to the MLRO or Risk Committee by using the KYC Refer option, for more information on this please see the KYC refer.
Once signed off the KYC banner at the top of the record will then change to KYC – Signed Off. The KYC Status in the Onboarding Tab will also be updated to KYC – Signed Off.
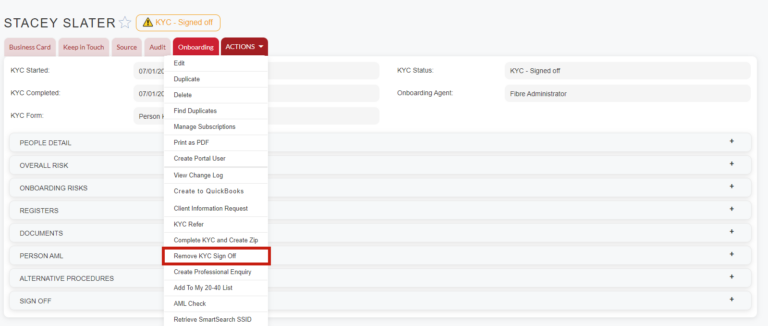
If for any reason Sign Off needs to be removed, navigate to the Actions Menu and select Remove Sign Off. Please note this action will remove all signatures that have been added to the form.
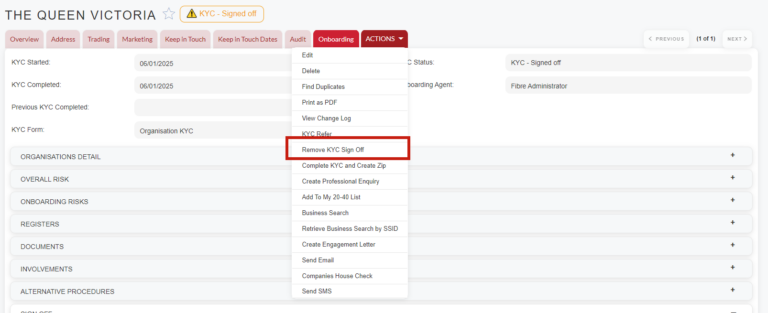
A pop up box will then appear asking if you’d like to remove all signatures. Click OK.
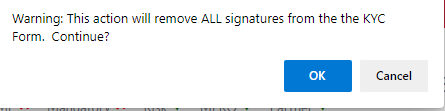
Once done the KYC form will go back to being In Progress.
KYC Form for a Person
To start a KYC check on a Person, first navigate to
the Person record you’d like to complete the check on and in the Actions
Menu select Start KYC Process.
The KYC banner at the top of the record will change to KYC
– In Progress.
The KYC Form List pop up box will then appear which is where you can select the relevant KYC form for the Person. Note: If you only have one KYC Form you will not need to select the form and it will automatically load into the Onboarding tab.
The KYC form you selected will then become the first sections you see in the Onboarding Tab in the Person record. The KYC form is split into sections and as mentioned previously the sections you see will be dependent on what has been created specifically for your firm.
At the top of the KYC section is KYC information such as KYC Start Date, Status, Completed Date, KYC Form Selected and Onboarding Agent.
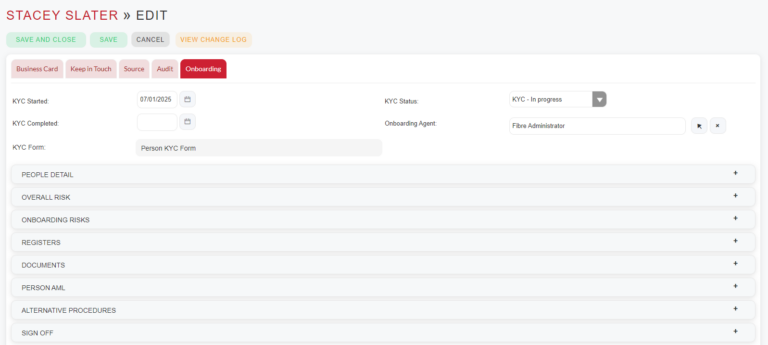
The following sections below are available to be part of your Person KYC form and can be completed by a User. The form does not have to be completed all in one go a user can save the form and come back to it later by selecting the Edit options from the Actions Menu.
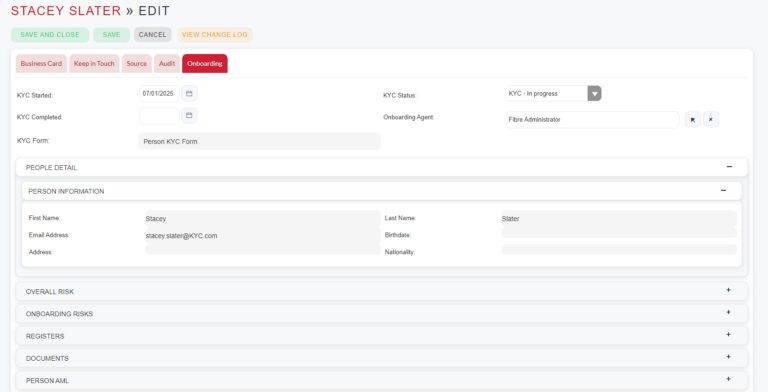
People Detail
This section is a mandatory part of your form.
In the People Details section you will find selected
fields containing information about the Person. These fields are already
available in the Person record and pull across from the original field in the
record. The people detail could contain any fields you currently have in a Person
record in your CRM. If any of the fields in the People Detail have no
information find the field in the person record and fill the field in with the
information that is missing, it will then come through to the relevant field in
the section.
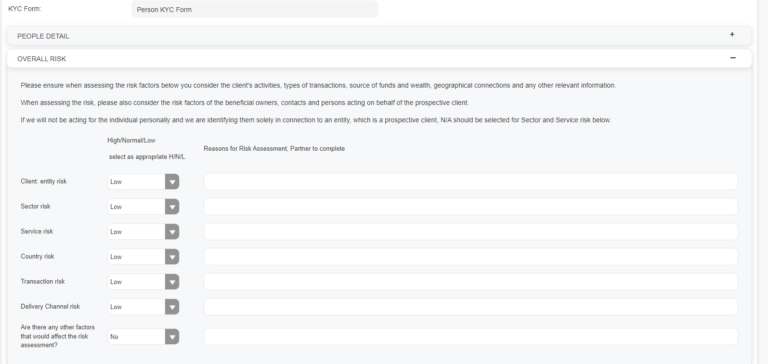
Overall Risk
This section is a optional part of your form and may not be part of your KYC form.
The Overall Risks section you can use to complete a risk assessment, in the section there are multiple risks such as Client Entity, Sector, Service and others that you can rank either Low, Medium/Normal or High using the drop down menu. Next to each drop down field is a text field where you can fill in more information of the risk if required.
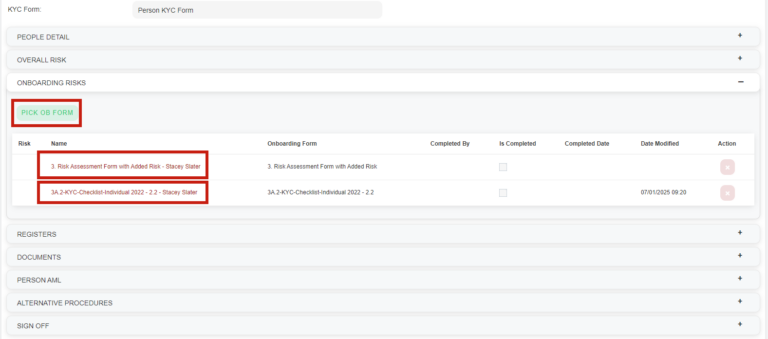
Onboarding Risks
This section is a optional part of your form and may not be part of your KYC form.
In the Onboarding Risk section, you can complete Onboarding Forms as part of your risk assessment. The forms that need to be completed for your KYC form will be available to complete in the listed form section. These forms will have been set by your firms Admin when creating the KYC Form. To complete the form click the hyperlinked name.
You can add and complete any extra Onboarding Forms that have been created using the Pick Signoff OB Form button, once completed the Onboarding Form will be added to the KYC form. You can select as many extra onboarding forms as you require to be added to the KYC form.
For more information on Onboarding Forms please see our user guide: Onboarding Forms User Guide – FibreCRM Support Portal
Once completed, information about who completed the form and when it was completed will be available to view in the listed form section.
An onboarding form can be edited (for example when a partner is reviewing and would like to change a response) once it has been Saved and Completed as long as the KYC has not been signed off. To make any changes click into the form make the changes and then click Save & Complete again this will update the Date modified information and the form will be locked again. If you are using the 3 tiered signing if your role has signed off their part of the KYC then you will not be able to make any changes however the roles that will sign off after you will still be able to edit until they sign off.
On the left hand side in the subpanel you will see a Green, Amber or Red icon next to the risk form once the Overall Risk section on the form has been completed. This relates to the answer that was given in the risk form in the overall risk section. Green = Low, Amber = Medium/Normal and Red = High. Please note if that section has been removed in any of the risk forms that are to completed it won’t show.
To remove a completed onboarding form click the X in the Action column.

Registers
This section is a optional part of your form and may not be part of your KYC form.
The Registers section is where you can enter information about the Adverse Media Search and Conflict of Interest/Ethical Issues. Use the drop down menu to select a decision for both sections. You can also enter more information in the text boxes for each heading. To upload any supporting documentation if required using the + Button.
Documents
This section is a optional part of your form and may not be part of your KYC form.
In the Documents you can add/uploaded relevant documents containing information about the Person for your KYC form such as Copy of Passport, Copy of Driving Licence, Copy of Utility Bill and more. The Documents listed that you will need to add to the KYC form will have been selected by an Admin of your CRM when creating the KYC form.
If the Person has submitted documents via the Client Portal these documents will already be added to view in the this section. For more information on the Client Portal and Client Information Requests please see our user guide here: Sending a Client Information Request – User Guide – FibreCRM Support Portal
If the customer hasn’t submitted documents via the client portal you can upload a document using the + button. You’ll need to upload the documents individually against each document heading that is listed.
If there are documents in the system already related to the client whether they have been collected via the client information request or added manually into the system you can select them to be added. Certain documents will be automatically pulled in if they match the listed documents such as copies of passports.
Any document that is mandatory will have a red * next to it, a document will need to be added against it before the KYC can be signed off.
You can view a document by click the View icon and to remove a document select the red Delete button.
Person AML
This section is a optional part of your form and may not be part of your KYC form.
The Person AML section will show the AML results for the person.
You will able to conduct an AML search from this section by clicking on Required. The person must have the consent check given tickbox ticked for you to be able to conduct the AML search, required will be highlighted in red to show this. Once clicked you’ll be taken to AML search pop up where you can conduct your AML search.
For more information on how to conduct an AML check in CRM please see our user guide: AML Checks in CRM using Smart Search Integration – User Guide – FibreCRM Support Portal or AML Searches with Credit Safe Integration – User Guide – FibreCRM Support Portal

Alternative Procedures
This section is a optional part of your form and may not be part of your KYC form.
In the Alternative Procedures section you can fill in if alternative procedures have been used. What determines an alternative procedure should be agreed in your firm. In the section you have a tick box you can use to confirm if any alternative procedures have been used. There are also two text fields one which you can use to give reasons as to why standard due-diligence procedures haven’t been used and the other to document what alternative procedures have been used to ensure compliance.
Sign Off
This section is a mandatory part of your form.
Once you’ve completed all the sections on your KYC form, it will be ready for Sign Off. Each KYC Form will need to be signed off by either a Partner or a User in the KYC Sign Off Role. For more information contact your CRM/Onboarding Lead for you specific sign off process.
A Client Partner must be assigned to the Person record before any sign off takes place.
To sign off a form the user will need to just click the tick box next to the KYC Sign Off field. Once clicked the field will automatically populate with their name and date of signing, they can then click Save & Close.
If the Person is deemed to be a higher risk or needs to have more than a partner sign off you can also get a MLRO and Risk Committee sign off. Users will need to be assigned the MLRO or Risk Committee user role. For information about user roles please see our user guide: Security Groups & Roles – User Guide – FibreCRM Support Portal. The form can be referred to the MLRO or Risk Committee by using the KYC Refer option, for more information on this see the KYC refer section.
Once signed off the KYC banner at the top of the record will then change to KYC – Signed Off. The KYC Status in the Onboarding Tab will also be updated to KYC – Signed Off.

If for any reason Sign Off needs to be removed, navigate to the Actions Menu and select Remove Sign Off. Please note this action will remove all signatures that have been added to the form.
A pop up box will then appear asking if you’d like to remove all signatures. Click OK. Once done the KYC form will go back to being In Progress.
Completing a KYC Form
Once the KYC has been signed off, you can complete and lock the KYC form and then download a zip file containing all the KYC information that can be added to your document management system.
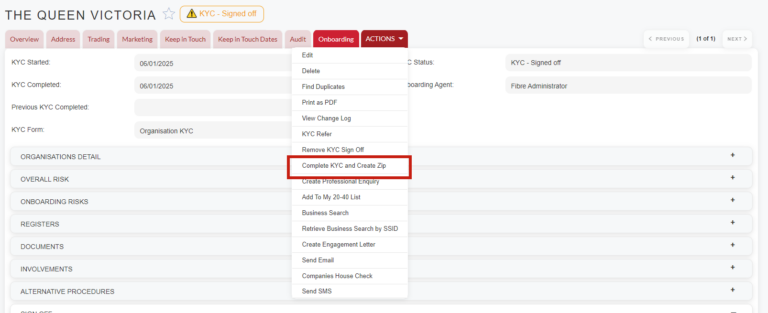
To complete and lock a KYC form navigate to the Actions Menu of the Organisation/Person record and select the Complete KYC and Create Zip.
A pop up box will then appear letting you know the form isnow complete and will be locked, you will have the option to choose whether you would like to down the zip file of the KYC. If you want to download the zip file tick the tick box.
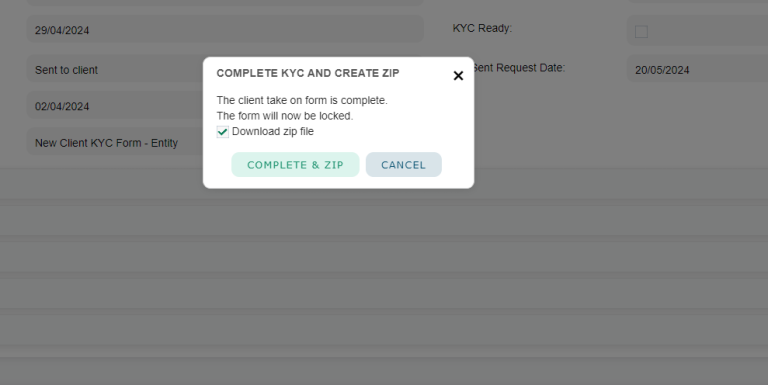
If selected a zip file will download to your desktop containing all the KYC form information which you can store to your document management. The KYC will also be updated to KYC completed and the KYC Completed field will update with the date it has been completed.

A KYC log will also be created which can be viewed in the KYC log subpanel. Each completed KYC for the client will be shown here.

KYC Refer
During the KYC process the Organisation or Person record can be referred to other user roles within FibreCRM such as the MLRO, Partner and Risk Committee for signature, Onboarding form completion or review.
To refer the record, navigate to the Actions Menu in the required Organisation/Person record and select KYC Refer.
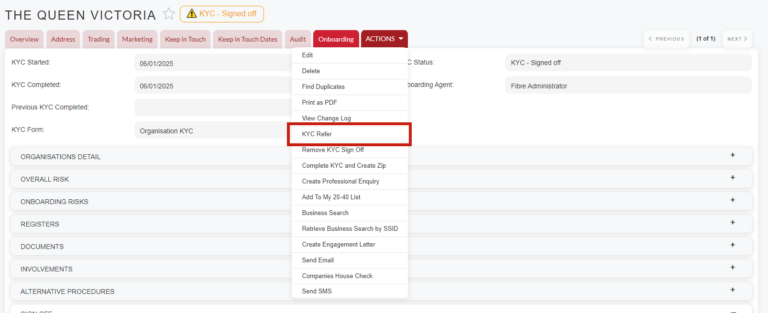
The Refer screen will be displayed where you can select the User Role you are referring the record to such Risk or Onboarding Team. Below is the Assigned To, by selecting the Select User button you can pick a specific user who has been assigned that User Role. You can also set a Due Date, Priority, Activity Type and give a Description of the referral.
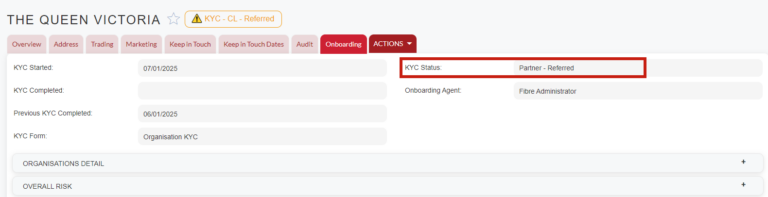
Once completed click Save. The KYC status will then change depending on who you have referred the record to. A Task will also be created for the assigned user to action.

Once saved the KYC banner at the top of the record will
change to KYC – Referred and the status will also update letting you
know it has been referred and who it has been referred to.
Cancelling a KYC Form
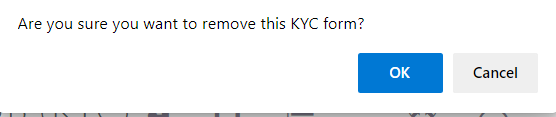
If a KYC form is in progress and is no longer required you can cancel the KYC form. To do this navigate to the Actions Menu of either the Organisation or the Person record and select the Cancel KYC option.

A pop up will then appear asking if you are sure you want to the remove the KYC form. Click OK.
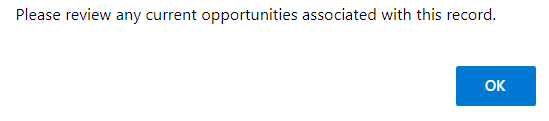
Another pop up box will then appear asking you to check any related opportunities click OK again. The KYC form will be then be cancelled.
The KYC Status in the Onboarding Tab will also be updated to Cancelled.

This will then remove the KYC panels in the Organisation/Person record, so anything captured in them will be reset if the KYC is started again. However any Involvements or OB risk forms that have been completed will be stored in the Onboarding record for the Organisation/Person. But they won’t show in the KYC when/if it is started again.